Thursday, January 31, 2019

It's a Brand New Day - Why Donna Loves the Credit Card Sleeve Die by Eileen Hull

Hello Crafty Peeps!
It's always great fun - and some would say a necessity of crafting - to purchase new goodies for our stash. But isn't it just wonderful when we find a new crafty thing that we know we will use again and again?! Today Donna tells us why she loves Eileen Hull's 'Credit Card Sleeve' die.....


Hi all,
What a fantastic die the Credit Card Sleeve is by Eileen Hull..
I just love this die and it was so easy to use which is always a bonus..
 You can purchase the die  HERE

I created three projects in which the die was a major part.

1. A journal with the sleeve and tags. 
2. An interactive card.
3. A shaker card.


I did use other pieces of this die on the other cards I created but these were the 
three main projects..

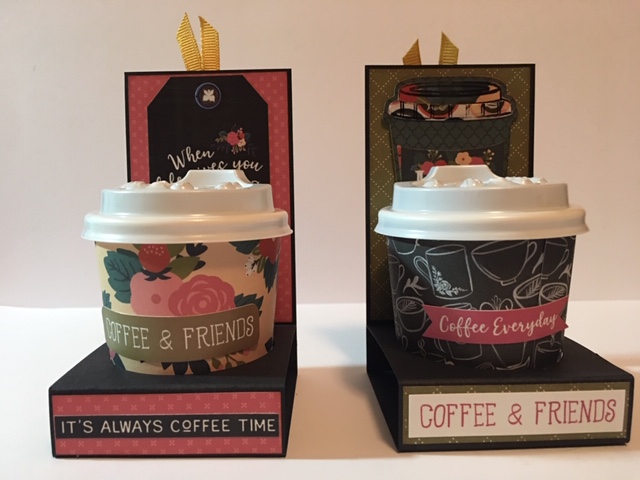
My favourite of all the projects I created with this die is the shaker card.. I just love how this 
turned out and the two dies pictured are just perfect for shaker cards either horizontal or vertical.. 
I will be using this again and again.


And I will definitely be stamping this young lady to use again, I think she is perfect.. And don't you love her little coffee book that I fussy cut from the gorgeous paper..


How wonderful is that frame which I created with the two dies above..


I just love this month's theme, it is just gorgeous and I loved creating with all the yummy papers..

I Hope I have
Inspired you to Create
Glorious Things
Hugs
Donna xx

Core Products:
Coffee Understands Stamps- Picket Fence Studios
Coffee Paper - Echo Park Paper Co
Coffee - Solid Paper Pack - Echo Park Paper Co


Did you know Aunty Vera has layby options, and she can order you anything you need..

Other:
Distress Oxide Inks - Frayed Burlap
On The Go Texture Fades - Sizzix
Lucky Dip Wooden Flourish - Tea Party
Kindy Glitz
Nuvo Crystal Drops

See my blog HERE
You have to check out Aunty Vera's shop HERE and don't forget anything you purchase from what I have used in this project you will get a wonderful discount..  
My Facebook page HERE

Wednesday, January 30, 2019

It's A Brand New Day - Donna's Wrapped Journal

Hello Crafty Friends!
I don't know about you but I reckon you can never have too many journals, TNs and planners..... hehe one of my weaknesses! But you can use tem for so many things and handmade journals are just SO special!
Today Donna creates a beautiful wrapped journal - and guess what she's going to use it for? Brilliant!!


Hi all,
I hope you like what I created with the Box I received from the
Evil Enabling Aunty Vera this month..
I love the Wrapped Journal Die from Sizzix - Eileen Hull. There are just so many things you can create from it and I thought for 'It's a Brand New Day' in January why not create one for my poetry
and stories from 2019.. 

I cut a Wrapped Journal from a piece of strong cardstock and painted both sides with
Gesso.
( Don't use a shim with this die as it cut all the scored lines, ask how I know this lol)


I sponged the journal with Distress Oxide Inks in the order as follows:
 Fossilized Amber, Wild Honey, Iced Spruce, Fired Brick and Frayed Burlap.
Spray separate colours with water and dry before adding the next colour. I did this to both sides.. 


Looks pretty don't you reckon...


I embossed a piece of brown cardstock with the 'On The Go' Texture Fades by Tim Holt and cut a strip for the front of the journal.
I die cut the Credit Card Sleeve and Tags by Eileen Hull in embossed dark brown 
and edged it in gold pen.
A strip of washi tape and a stamped coffee cup backed with 3D foam tape finished off the front.


The three tags from the Credit Card Sleeve and Tags using the stamps with the Core Products.


How great does this look together..


The inside of the right hand side of the Wrapped Journal. I stamped the coffee cup rings all over the inside of the journal. I then punched the cups (minus the handle lol) and popped them up using 3D Foam Tape over two strips of the lovely paper..


Inside of the journal. Using the same coffee stain stamp, I stamped it over the journalling card to give it a uniformed look. A small coffee cup stamped on the flowered paper and fussy cut finishes off this side with a bit of glitter (of course).


I cut a piece off the border paper for the front and covered it in Nuvo Crystal Drops after adding a little Kindy Glitz to her dress and lights.. I then fussy cut two tea cups (tea for me please) and popped them up using 3D Foam Tape. I also painted them with  Nuvo Crystal Drops.


The Wrapped Journal..


I Hope I have
Inspired you to Create
Glorious Things
Hugs
Donna xx

Core Products:
Coffee Understands Stamps- Picket Fence Studios
Coffee Paper - Echo Park Paper Co
Coffee - Solid Paper Pack - Echo Park Paper Co


Did you know Aunty Vera has layby options, and she can order you anything you need..

Other:
Distress Oxide Inks
On The Go Texture Fades - Sizzix
Credit Card Sleeve & Tags Die - Sizzix - Eileen Hull
Kindy Glitz
Nuvo Crystal Drops
Coffee Time Washie Tape

Check out my Blog HERE

My Facebook page HERE


Tuesday, January 29, 2019

It's a Brand New Day - Tina's Mini Coffee Cup Holders.

Hello Crafty Friends!
I love how the coffee papers in our Brand New Day themed month have taken our Creative Team in so many fun directions! Today Tina creates super cute mini coffee cup holders...... can you imagine these on your coffee counters filled with beautifully fragrant coffee beans? Totally on my list!


Hello everyone, today I have created Mini Coffee Cup Holders. These make a great gift and a nice way to hold the different flavored coffee beans I have.


To start I cut and scored two pieces of thick black cardstock. ( See below measurements).


Cut out a circle using a 2" circle die.


Fold the scored lines as shown below.


Next I cut pieces from the patterned paper and inked the edges with Distress Ink - Vintage Photo.


Glue the patterned pieces to the black cardstock piece. The longest piece will be on the back and the other two will be on the front. Start with the large and small piece on one side.


Then the front.


Once folded into place the small piece will be on the front too.


Here is the back.


To make the coffee cups I used mini paper cups. Gently take one of the cups apart to make a template, then cut out in the patterned paper. I cut the paper 1/4'' longer on one side to overlap slightly.


Glue to the cup starting in the middle, gluing one half then the other. ( I found that when I started from one end to the other that it would not fit properly).


I decorated the holders with some of the Echo Park- Coffee-Ephemera , the Sizzix - Coffee - Stamp and Die Set and some of the stickers from the Echo Park - Coffee - Collection.


On the back side of the holders I made pockets to hold two tags.


The shaker tag was made by taping two small tags together. I have so much scrap cardstock so I cut eight of these and glued them on top of each other to make the shaker tag.


I used some of the 28 Lilac Lane - Buttons and Shaker Mix, and a small ribbon from my stash.


The two tags.


The finished coffee cup holders.


I hope you enjoyed this project.
Thank You and Happy Crafting.
Tina xxx
Here are the products used for my projects this month which are on sale at Aunty Vera Scrap and Craft.

Core Products
Echo Park - Coffee 12 x 12 Papers
Echo Park - Coffee - Coordinating Solids 12 x 12 Pack
Picket Fence Studios - Coffee Understands Stamp Set

Chosen Products
Echo Park - Coffee - 6 x 6 Paper Pad
Echo Park - Coffee - 12 x 12 Sticker Sheet
Echo Park - Coffee - Frames and Tags 
Echo Park - Coffee - Ephemera Pack
Sizzix - Coffee - Stamp and Die Set
28 Lilac Lane - Queen Bee Buttons and Shaker Mix


Monday, January 28, 2019

It's a Brand New Day - Gina's Pop and Twist Card

Hello Crafty Friends!
We've seen some really awesome cards from our Team this month haven't we? They've all been so perfect for that coffee themed paper! I love Gina's magical floating coffee cups in her pop and twist card.... so clever!


Hey everyone I hope this month has been good for you all and everyone is ready to get the kids back to school. My eldest will be starting pre-primary this year so it's my first year of school everyday and my 2nd will be starting 3 year old kindy. They grow up so fast.

Anyway enough about me, my last project for this month is a twist and pop card. It was a lot of trial and error getting it to the measurements I wanted but I got there in the end. I started with the coral and green cardstock cut at 11"x 4 1/4". Score it with the 11" side facing up at 5 1/2" to make the base of your card.


Next cut 4 pieces of patterned cardstock at 5 3/8" x 4 1/8" to go on the inside and outside of the card.


Here's what it looks like once I've stuck them all on.


Cut another piece of cardstock at 2 3/4" x 8". This time I've used the light blue and pink cardstock. With the 2 3/4" side facing the top of the scoreboard, score at 1 3/8". Now with the 8" side facing up mark it at 2 5/8" and 5 3/8". Turn it around 180 degrees and mark it again at 2 5/8" and 5 3/8".


Now score the 2 5/8 and 5 3/8 lines from top to bottom to make an X and fold and burnish the scored lines.


Fold the two ends together and inwards to make a triangle on 2 parallel lines. It's a bit hard to explain. If you don't understand please watch the video and that will help.


This forms your pop up mechanism. Now put double sided tape on both the triangles and stick it to the center of the card towards the fold. Cut a piece of acetate to 9" x 2 3/4" and with the 9" side facing the top of the scoreboard, score at 2 1/4", 4 1/2" and 6 3/4" and fold into a W shape.


Next put a small dab of glue or double sided tape on the top right corner and the bottom left corner of the pop up mechanism, once opened and stick the acetate sheet on. You can see where I've put the glue in the picture. When you close the card, the acetate sheet should fold into the pop-up mechanism. You might have to help it along once or twice to get it to work smoothly.


At the bottom I've used one of the 6x6 strips and cut it down to size to make a pocket. I've glued the two side edges and the bottom edge so, if you are giving a gift card, its the perfect place to tuck it in. I've put the coffee die cut in there to show you what I'm talking about :)


In the front of the card, I've stuck one of the die cuts from the ephemera pack and one of those gorgeous prima flowers.


Next with the sizzix die, I've die cut 4 takeaway cups from the 6x6 papers and put them together.


I've stuck them on each fold of the acetate sheet and added a coffee sticker from the sticker sheet to the top of the card and voila, my pop and twist card with the floating cups :)


Here's the Video of how I put it all together.

I hope you enjoyed creating along with me this month and I'll be back again soon.

xx Gina - stay awesome
Related Posts Plugin for WordPress, Blogger...