Friday, May 10, 2019

NSD 2019 Challenge - Gina's Junk Journal - decorating the cover and some pages

Hello Crafty Friends!
Here is Team Gina's final bit of inspiration for your junk journals... decorating the cover... and a few ideas for some gorgeous pages.


Hey everyone how is everyone going with their junk journal challenge? Let me quickly remind everyone, the challenge is to make a junk journal, so you could either do your own thing or follow along with my tutorials but the important thing is to have 2 layout pages with photographs and journaling. They can be hardcover, softcover, 1 signature or more and bound any way you like.

Continuing from my last post we are now ready to decorate the journal cover. I have cut the Botanist paper from the Anthology collection to 4.9" x 7.5" and the Ephemera paper to 4.8"x 7.4". I have cut the Ephemera paper so that I could have the bird in the right corner as I wanted that to be my feature.


I am using the green side of the Botanist paper which I have stuck onto the cover and then I have layered the Ephemera paper on top of it. I love this paper so much I was tempted to just leave it as is but I am also very fidgety :)


I took a piece of lace trim from my stash and stuck it on the top edge of the cover. I've stuck the bookplate die cut and the love die cut from the collectables in the middle and on the bottom left corner I have stuck those gorgeous Prima Heaven Sent flowers. You can't see the shine much on the pictures or the video but they have glitter on them and the best part is no matter how much you fiddle with them it doesn't come off on your hands.


So now that our cover is done it is time to decorate your pages. I have done a few to give you some ideas. To start with I made some envelopes from some of the 6x6 papers. I also used the Tim Holtz stitched slots die to make some slots.


I have used the botanist envelope to make a flip out on one of my pages. I stuck the flap on gluing a line towards the centre so that the flap could be a tuck spot as well. This would probably make more sense if you watched the video. So on one side of the page the envelope flap is a tuck spot and on the other side its a flip out.


I wanted to make a flip out with the stitched slots as well so I backed it on to one of my off-cuts. I then used another off-cut to make a hinge. I cut that at 3 3/4'' x 3/4'' and folded it in half lengthwise to make the hinge. I then stuck one side to my slots and another to the page I wanted it on to make a flip out.


On one page I used the AVSC Vintage Floral washi tape. Just one strip on the side was enough to pretty the page up.


The 6x6 paper pad had a page with these lovely border die cut elements that you can pull out so I used one of those as a tuck spot on another page.


All of the papers that came in the Anthology collection had beautiful phrases on the bottom strip. I kept one aside that I loved for my signature cover. I cut it up and backed it on the buttercup cardstock and then stuck it on to the first page.


So there you have it, a simple 1 signature journal, 28 pages and because we have tied the string around instead of stitching them in, they can be interchanged. They make great monthly planners too if you add another sheet of paper to make it 32 pages.

I cannot wait to see everyone's junk journals.

GO TEAM GINA

NSD 2019 Challenge - Wendy's Spin Changing Photo Card

Hello Crafty Friends!
Oh yay! I love this final addition to Wendy's time capsule...... interactive galore! I can see myself playing with one of these for hours!!!


Spin Changing Photo Card

Hello Everyone,
This is the last of the project elements I have to show you to be added to your Flat Pack Time Capsule. Just remember these projects I have included in my booklets are all optional. You may like to do each and every one or you may have another paper project in mind that can be added. The choice is completely your, personalise it to your liking.

Okay, lets get started...

You will need to draw two circles. Mine measure 5cm and the other one 6cm (with a 5cm circle drawn in the center). Also a strip 7cm x 1cm and another 5.5cm x 1 1/2cm. the top circle needs to be 1cm smaller than the bottom circle.

I used the above measurements for the purpose of showing you my process but the ones I made for my booklet were slightly smaller in radius. 4cm and 5cm. I used the larger size because I thought it would be easier to see the process.

When you have your circles drawn and cut, you make a line from the center point to the edge on the 5cm circle and make a line from the center point to the edge of the inner 5cm circle on the 6cm sized one. Where you have marked the lines this is where you will be cutting slits. The smaller circle is cut from the center straight to the edge and the larger circle is only cut from the center to the 5cm circle line. As shown below.


Then the smaller circle shape is slipped in the cut slit of the larger circle cut slit. It should fit in nice and snuggley. If you want to decorate the front of the circles with photos, I would suggest you do it before you put the smaller circle in the larger circles slit. And don't forget you will also need to make the same slits on the photos, that correspond with your original slits you have made.


Once decorated, decide on the back of your spinner and tape the 5.5cm x 1 1/2cm piece of cardboard as close as possible to the edge showing, like in the picture below. I have also placed some dimensional tape along the outer rim of the 6cm circle and I will be using this to adhere it to my booklet. 


Then flip the circles over and glue the thin strip of cardboard as close to the showing edge of the 5cm circle. This is used as the tab to turn or spin the card. It may need a little bit of 'playing with' to make it spin smoothly but it is worth it in the end. Such a fun photo changing project.


The pictures below show the ones I made for my grandchildren. I glued a photo or two to the front of the circles, so when you spin it around you see a different photo.


You can watch the full process in the video below

I hope you have enjoyed this month's projects. I have certainly loved showing you my start  to finish of making a Flat Pack Time Capsule with all it's little added components holding some precious photo memories of my grandchildren. Now, I / we have to wait five years for them to open their packs up. I'm really going to be looking forward to that day.

If you try one of these Spin Changing Photo Cards be sure to leave a picture of it in my Challenge Album in the Crafty Vera and Friends Facebook group and don't forget at the end of the month I will be randomly drawing a winner to receive The Flat Pack Time Capsule I showed making throughout the month as well as a Happy Mail package with it.

You Have a Great Day!
Wendy xox

Thursday, May 9, 2019

NSD 2019 challenge - adding pages to your Team Gina signature and making the journal cover

Hello Crafty Friends!
It's time to choose some fun papers to make your Team Gina junk journal pages....... and time to make your journal cover!!


Now that you have your signature covers ready, let me show you some options for the pages that go in them to complete your signature. The beauty of junk journals is that the pages don't need to be the same size and they can be anything your mind comes up with. It is preferable that they are either the same length and width as the signature covers or slightly smaller as I have used those sizes to decide the dimensions of the cover. Keep these aside.... you'll need them soon ;)


In the above picture you will see some of the pages I have set aside. They include tea died papers, scrapbooking papers, a white paper bag that I have stuck decorative paper napkins on, an envelope, a decorative paper bag, painted paper, vellum etc. For the size of the journal we are making at least 5 or 6 papers would be perfect and you add them in whatever order you prefer in your signature cover.

Now onto the journal cover. I have started with a cereal box and I have cut out a piece of it at 8" x 10 1/4". I then scored it with the 10 1/4" side facing the top at 5.2" and 5.4" and folded on the score lines. That makes the base of your journal.


I then chose a piece of fabric which I cut at 12 1/4" x 10" which I am going to stick on to the card. If the fabric is thin make sure to stick it on the brown side of the card. Once you have stuck the fabric on the front, cut out the corners as shown and a small triangle in the center as shown in the picture so when you stick the flaps, they do not overlap and bunch up. Then stick the remaining flaps onto the inside of the card. I then used a strip of the Aunty Vera Vintage Floral washi tape which I stuck in the middle.


Next I cut 2 pieces of the Kaisercraft buttercup cardstock at 5" x 7 3/4" which I stuck on the inside of the cover and for the outside I cut them at 5.1" x 7.7" and stuck them on. I lined the inside with the AVSC Vintage Floral washi tape before sticking the cardstock on.


I took a piece of the Tim Holtz paper string, about 24 inches and tied it around the spine. I then tied two of the Ken Oliver Vintage Birdcage charms to the end of each string. Now you can slip your signature into the string and when you finish writing in one, you can remove that and add another and start again. You can also use twine or an elastic band.


Here's a quick video of where we are up to and you can see the pages I have chosen to complete my signature.

Next I will show you how I decorate my cover and some of the pages.

GO TEAM GINA

NSD 2019 Challenge - Tina's Garden Goddess Photo Tag

Hello Crafty Friends!
How are you going with your Team Tina easel cards? Today Tina shows us the final part of her challenge - a beautiful card that slots into your card... making it even MORE special!


Hi everyone, I hope you are all enjoying this month of projects and challenges.
For my next project I have made a Photo Tag that fits in to the Easel Card.

Don't forget to join my challenge to be in with a chance to win my projects for this month.
Details are at the end of this tutorial.


I began by cutting my tags in cereal packaging and in the patterned paper.


I inked all my edges with Distress Ink - Vintage Photo. I traced the inside of the metal die with contrasting paper and cut it out. Because I traced the inside it was slightly smaller than the machine cut tag, which gives me a lovely border..
I added strips from the 12 x 12 Sticker sheet.


Using the Graphic 45 Staples - Die Set - Square Tag and Clock, I cut out the frame.
I embossed it with Ranger Enamelware Embossing Powder. I love this embossing powder as it gives  a speckled, frosted finish.


I glued this on to my tag.


I used We R Memory Keepers Standard Eyelet, which I distressed a little with Prima Rust Effective Paste - Dark Olive. Cut a circle from the patterned paper to fit on top of the frame. The beautiful lady is from the papers, which I fussy cut and placed her on foam tape.


I added Fussy cut flowers and butterflies, and Wink Of Stella Brush on the lady's bouquet and the flowers in her hair.


On the back of the tag I added a little photo book with a magnet closure to place photos in.


Finally I finished the tag with some ribbon from my stash.

My CHALLENGE for this month is to make my Easel Shaker Card/Album. I would like to see photos of your project in early stages,( e.g your cut pieces ready to be put together) and the finished project. Upload the photos in my challenge albumPhotos must be uploaded in my album to be in with a chance) on the Crafty Vera And Friends Facebook group . Anyone can enter, even Team Members.

Here is a List of the products I have chosen from AVSC

Graphic 45 - Garden Goddess 12 x 12 Collection Pack
Graphic 45 - Garden Goddess - Chipboard Pieces
Graphic 45 - Garden Goddess - Tags and Pockets Pack
Tim Holtz - Thinlits Die - Stacked Label
KaiserCraft - 6 x 6 Designer Template - Botanical
Inka - Gold - Rose Quartz - Metallic Paste
Tattered Angel - Glimmer Mist - Wedding Pink

All of these products can be purchased HERE at a discounted price.
Thank You and Happy Crafting.
Tina xxx

NSD 2019 Challenge - Wendy's Pop Out Photo Card

Hello Crafty Friends!
I love interactive crafty projects.... and this pop out photo card from Team Wendy is a brilliant addition for your time capsule!


Hello Everyone,

I have another little project that I'm sure you are all going to enjoy. When I had finished this project, I found myself playing with it quite a lot...the child in me coming out!...LOL

So for this part of the challenge I will be showing you how to make a POP OUT PHOTO CARD as another fun fun element you can add to your Flat Pack Time Capsule.

To start off, you will need pretty sturdy paper (I do suggest a nice thickness of cardboard, that won't bend or wobble too much). The sizes you will need are: One piece 23.5cm x 5.5cm, one piece 20cm x 2cm and the last piece a rectangle 5cm x 4cm.


I start with the largest piece 23.5cm x 5.5cm and fold it in half. Then score a line either side of the center fold at 0.75cm. Then fold on all of the score lines so you end up with an 'M' looking shape in the center. This gives you a little room when folded because your brad will be close to the center fold.


Then grab the piece 20cm x 2cm and score at the 8cm mark and fold.


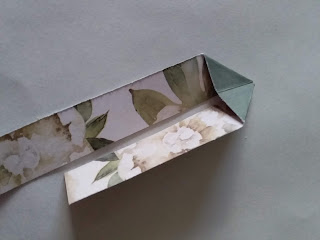
When you fold your piece on the 8cm mark, you need to make a small triangle shape at the folded end by bringing one corner across so the sides match each other.


When you have made a triangle fold at the folded end, you have to open it up and fold the triangle shape to the center of the strip. The pictures below show this step at two different angels.


You then place a brad on the top smaller triangle shape, as shown below and then this is attached to the largest stip for the pulley to work.


The 4cm x 5cm rectangle is then glued to the top strip of the pulley. The picture below shows the completed inside look of the pop out.Place a small strip of double-sided tape on either side of the longest pulley strip, making sure the strip won't come into contact with the tape. This is to hold down the front part of the cover. I also place a smaller piece of coloured cardboard over the front of the pop out as decoration (this is optional).


I cut a photo to size and glued it on top of the rectangle, so this is what you see when you pull the tab and your project is finished. You can decorate it however you like on the front...I wrote the words 'Peek-a-Boo'.


Above is the Pop Out Cards I made for my grandchildren and the covered the front with a cardboard piece in their favourite colours. 


The video shows my process for making the Pop Out Photo Card


This project was so much fun to make and we all had so much enjoyment playing with it before I attached it inside the time capsule booklets.

So, why not try make one for yourself and if you do, I'd love to see a picture of it in the Crafty Vera and Friends facebook Group.

Please don't forget - to be eligible for the draw your challenge entry must be posted in my special Challenge Album in our facebook group

Wendy xox

NSD 2019 Challenge - Donna's Board Recipe Folder

Hello Crafty Friends!
One final recipe book project from Team Donna - I LOVE this board recipe folder!!


Hi all,
 It is NSD (National Scrapbooking Day) which lasts all of May in Aunty Vera's land..  
All of the Creative Team are going to have lots of challenges and tutorials for you to join in and there are also prizes to be won, so make sure you check in heaps to win.. 

NSD is about memories and can take any form; for me this month it is about my grandmother and my mum's recipes that I still use and have passed on to my children.. Wonderful Memories... 

I am going to be giving away one or two of my creations to someone who creates along side of me in all of my challenges.. That means you need to create my project, take a photo and post in my album on Aunty Vera's facebook group.

For my last Challenge I created a board folder.. So easy to put together as well..


Cut thick board at 6 inches x 6 3/4 inches for the front
Cut 6 inches x 3/4 inches for the strip on the front.
Cut 6 inches x 7 1/2 inches for the back


Cover with the gorgeous Bo Bunny Family Recipe paper back and front. I sanded around the paper to cut any bits hanging over the board then inked the edges with 
Clearly Kelly Inks - Coffee & Donuts.


I cut pages to fit the back of the board and punched holes through the paper, the front strip and the back of the board.. Because of the thickness of the board and papers I did all these separate. I added eyelets to the front .. I adhered it all down under the top strip and as you can see I placed two large clips on it to hold while it dried....


I added two hinges so I could lift the front cover easy..


Back of the Board Folder


Inside the Board Folder
I added a strip of the border paper and placed a card with a tag on the front in the pocket .. 


A simple card to write a message..

I love this poem called Angels Recipe for Life..


Inside the back of the Board Folder.. 


On each page I placed some of the delightful washi tape to bring it altogether..


I hand wrote one of my favourite sweet recipes on the front page..


The finished Board Recipe Folder.. 
Do you recognise the trim? It was from a March project for AVSC..
I added a wooden frame from my stash, a small cut apart from the Bo Bunny paper and a tiny spoon from the buttons I received this month. And don't you just adore that tea time border die.. I love it..


I cut the heading of the paper and placed on the frame which fit in nicely as Family Recipes.. The clock was fussy cut out from a piece of the paper.. And I have heaps of glitter and shine on the front as well.. (you can see a little bit on the photo but it is really pretty in real life)..


My gorgeous package for May..


Products are:

Emoji Love Enamel Dots - Simple Stories
Pocket Full of Posies Charm Pack - Do Crafts Papermania
Small Talk Stickers - Tim Holtz idea-ology
Sweet Friends Stamps and Dies - Kaisercraft
Family Recipe Papers - Bo Bunny 
Tea Time Border Die - Cottage Cutz  
Perfect Combo Washi Tape - Doodlebug Designs  

You get a great discount on all products used by the Creative team this month..


You can purchase the items HERE
and check out the facebook group to see everything the Creative Team will be creating throughout May..

I hope I have inspired you
to create glorious things.
Hugs
Donna xx

My FaceBook page Donna's Fun Stuff HERE 
My Pinterest page Donmaree HERE
My Youtube Channel HERE
My Blog HERE
And don't to forget to say hi on Instagram donna.triffitt
Related Posts Plugin for WordPress, Blogger...