Tuesday, April 30, 2019

The Life Within The Seed - Donna's Flower Book

Hello Crafty Friends!
We have one final project for you this month..... a beautiful flower book from Donna that uses those lovely flower cut aparts in the BoBunny Cottontail collection. Just brilliant!


Hi all,
Here we are again for a project that I loved creating.. A book filled with wonderful 
images of flowers and their names from the Bo Bunny Cottontail paper pack.. It was so easy to create..
(Warning: a heavy pictured post)

I embossed two pieces of cardstock one watercolour paper and one normal cardstock, then I rubbed Versa Mark ink over the raised edges and clear embossed it..


I sprayed the gorgeous (I have to get more colours) Distress Oxide Spray - Cracked Pistachio, wiped it over with a cloth and dried it.. Loved how it looks in real life..


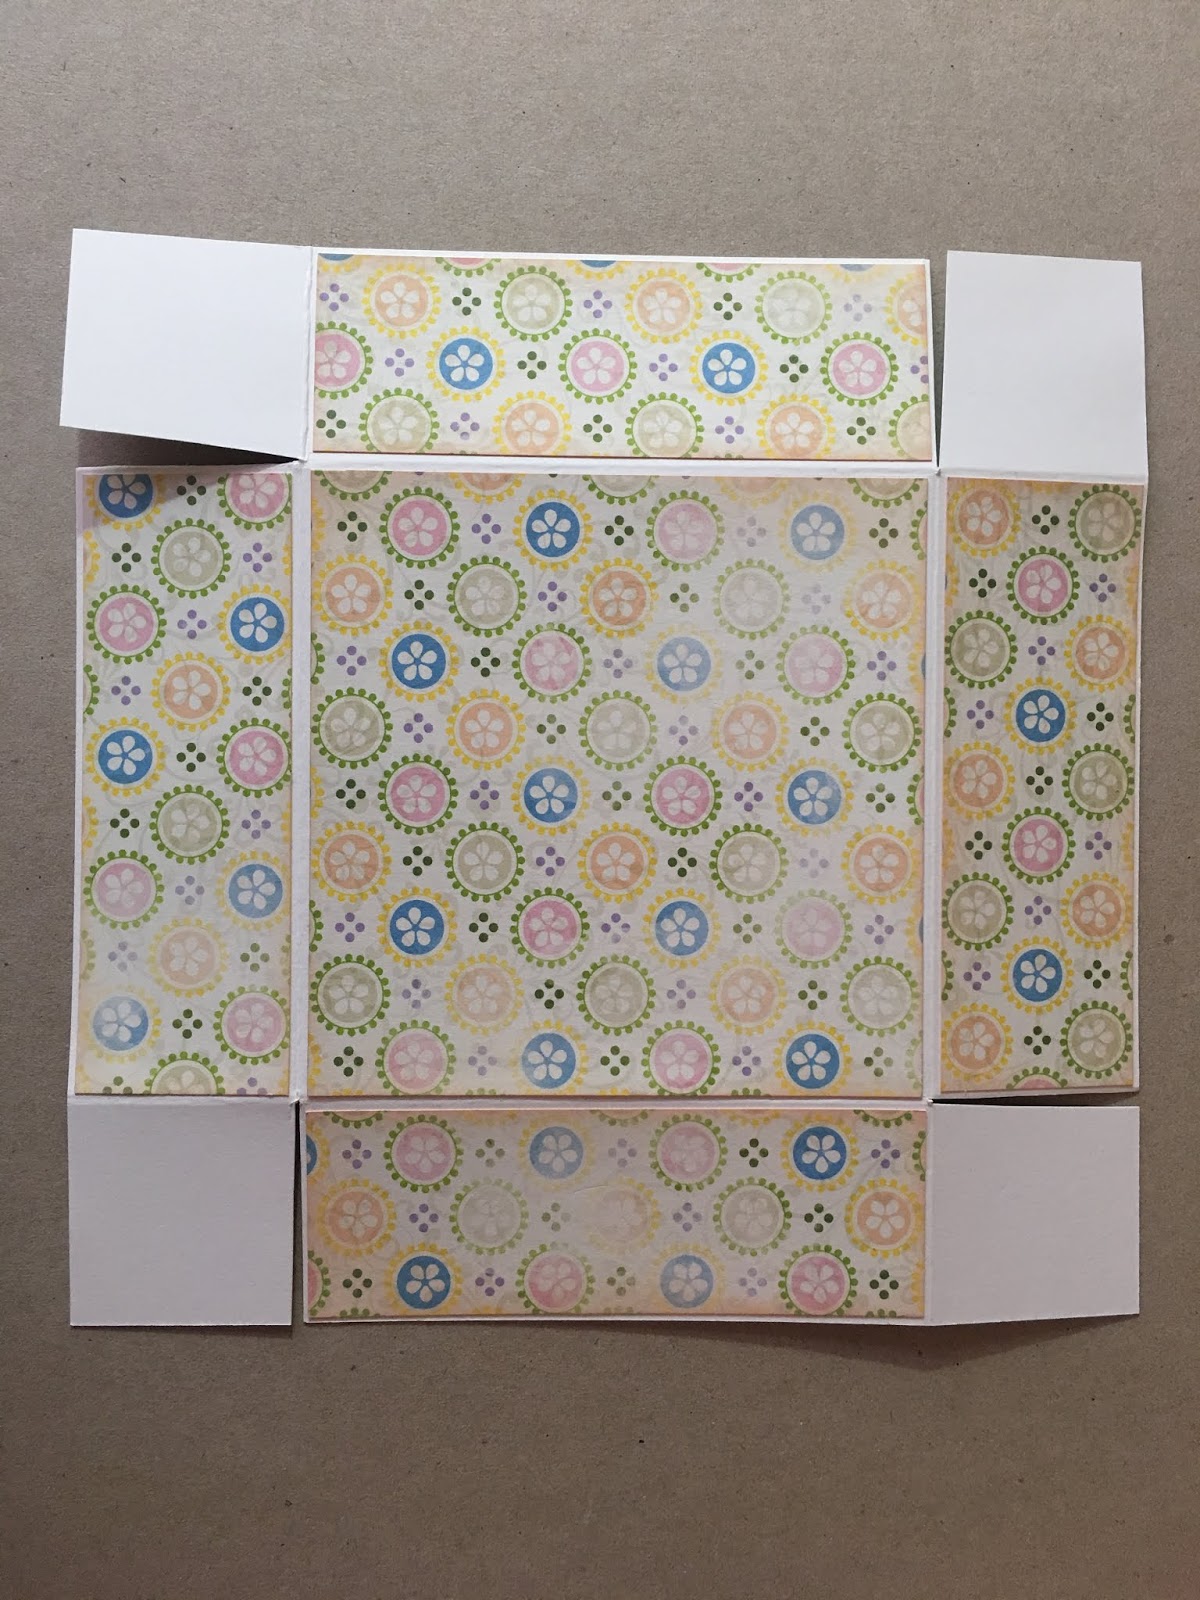
For the book you will need an A4 piece of strong cardstock, fold in half, turn and fold in half again.. Bring the ends to the middle crease and burnish both sides.. Open up and you will have 8 panels as shown.. Cut from the first score line to the third score line then cut down the middle from the cut line as shown.. 


Fold over and open up as shown.. Decide if you are going to have any tags at all and adhere the book together to allow for tags..I adhered the bottom only on the two sides. 


Cut our your panels from a piece of Bo Bunny cut-away cardstock and two pieces of heavy cardstock and two pieces of the gorgeous paper in the collection.


Fold over the paper on your covers and adhere the inside..


Using the gorgeous stencil, spray a little of the Distress Oxide over it and let dry..


Not a lot of spray but it looks brilliant..


Cut a panel from the embossed card you did earlier and adhere to the cover.. Glue the cover and back to the book pages..


Adhere your cut-aparts to the pages and decorate the cover of the book..


The finished book...


A little Tea Dye Distress ink on the wooden flourish and flowers looks brilliant..


The back of the book..


The gorgeous cover that I loved creating..
Love how this sits and opens..


The book pages..


The flaps or pages as you open the book..


Fully opened..


The two tags that are in each cover..


All the Lushiness from my April  Theme- 
The Life Within The Seed.....


The Core products were 

Cottontail Cardstock - Bo Bunny 
Graphic 45 Flowers
Bazzill Cardstock - Spearmint Stick, Cotton Candy, Gumball

The other products are:

Flowers Embossing Folder - Kaisercraft
Cracked Pistachio Distress Oxide Spray - Ranger - TIm Holtz
Easter Basket - Creative Expressions
Be You - Wooden Flourish Pack - Kaisercraft
Mini Stencil set 35 - Stampers Anonymous - Tim Holtz

You get a great discount on all products used by the Creative team this month..


You can purchase the items HERE
and check out the facebook group to see everything the Creative Team have created throughout March.

I hope I have inspired you
to create glorious things.
Hugs
Donna xx

My FaceBook page Donna's Fun Stuff HERE 
My Pinterest page Donmaree HERE
My Youtube Channel HERE
My Blog HERE
And don't to forget to say hi on Instagram donna.triffitt

Monday, April 29, 2019

The Life Within the Seed - Silvia's Double page layout "Easter Hat Parade"

Hello Crafty Friends!
Did you take lots of lovely colourful photos over Easter?
Well now is the time to get scrapping!
Here's some inspiration from Silvia.... showing that you don't need a hugs stash.... or even a whole lot of patterned paper.... to create an awesome double page layout...


I hope you all had a lovely Easter spent with those you love.  I cannot believe its nearly the end of April but I must say I have enjoyed the BoBunny papers and my goodies for the Evil Enabler products for April.   I managed to get another double page layout for you guys.

In today's layout, I will show you that you don't need a lot to make a great page (or two).  I was running low on paper but I had a great stamp set and I had some embossing powder as well as my new found love "Inka Gold".

I took out two 12x12 beige coloured cardstock and then I sat playing with my photos for ages trying to find a composition that worked.  In my head, I had the idea of having an Easter egg border.  So I had marked on my paper in pencil a border where I was later going to add my easter eggs.

I also used an oval die cut to shape some of my photos into easter eggs.  I love how this breaks up the monotony of all square edges.  I feel that it soften the page.


Now for my master plan...  I got out my misti and using water coloured paper I stamped out a lot of eggs.  I used Ranger's archival Ink in jet black.
This beautiful stamp is part of my chosen products from Aunty Vera Scrap and craft.


This next part took a while but it was a labour of love and my form of relaxation.  I took out some watercolour paints and started colouring in.  


Lucky for me another part of my chosen products was the matching die for these lovely eggs so I spent some time using my old cuttlebug.

I should also add that I embossed the bows using another of my chosen products the gorgeous Lindy's Stamp Gang Embossing Powder in "Kind Midas Gold"

I love how these eggs look.

I am not liking the plain beige cardstock so I went to my collection of stencils and found a stencil from Kaisercraft called "crackle". It's a 12x12 stencil and it reminded me of an easter egg that has fallen and broken into a number of pieces. 

I wanted to use my other chocen product which was the Inka Gold "Green Yellow".  but it was too bright to use alone so I mixed it with some white texture paste and I love how this turned out.

Its so easy to design your own paper.

My layout was lacking some embellishment but lucky for me the Bo Bunny "cottontail" collection of paper had lots of wonderful Images I could fussy cut out.


I finally realise now that my original idea is not going to work and I cannot have a border of colourful Easter eggs.  I go looking for more inspiration and I see that I have a sticker sheet.  I take out some scrap cardstock and I pick some stickers I think will work and make a few more embellishments.  I never use stickers as they are intended because I change my mind a lot.


I could not work out what was wrong with this layout, so I went to bed and the next day I studied the photos and it dawned on me. The school uniform shirts are orange and that is what I am lacking.  I find two pieces of orange cardstock.  I am going to trim my lovely homemade background papers and then matt them with this orange cardstock.  I will also be matting my photos with the same orange cardstock.

The double page layout is complete.  I managed to use my lovely eggs and I adhered all those embellishments I fussy cut out and made out of stickers. 

Hope you like the final result. 


Saturday, April 27, 2019

The Life Within The Seed - Donna's Basket of Flowers

Hello Crafty Friends!
I love that Donna has used her basket die so much already!
And it doesn't have to be used as a 3D basket...... check out her basket of flowers....


Hi all, 
I loved this basket so much from the Easter Basket die I received in my April package from Aunty Vera Scrap and Craft, that I decided to make a basket full of flowers....
I embossed a green piece of cardstock with the Flowers embossing folder (not that you can see it much but I Know it's there lol), then placed that gorgeous blue paper on it.. Using the fence and the book page from the Noteworthy pack, I adhered as shown.. 
After die cutting the basket I traced the shape on the flowers from one of the cut aparts and cut it out.. Use 3D foam tape to adhere it to the card front..     


 I inked the wooden Be You Flourish with Distress Ink. Sponged a little Tea Dye ink on the beautiful Rose from the Graphic 45 Flowers in this month Core products and it was done..


Using the same ink as the Be You Flourish, I Inked the butterfly and placed on the edge of the basket.. Cutting two tags from the cut apart paper, I joined them again with lace and twine and tucked them behind the basket..


All the Lushiness from my April  Theme- 
The Life Within The Seed.....


The Core products were 

Cottontail Cardstock - Bo Bunny 
Graphic 45 Flowers
Bazzill Cardstock - Spearmint Stick, Cotton Candy, Gumball

The other products are:

Flowers Embossing Folder - Kaisercraft
Cracked Pistachio Distress Oxide Spray - Ranger - TIm Holtz
Easter Basket - Creative Expressions
Be You - Wooden Flourish Pack - Kaisercraft
Mini Stencil set 35 - Stampers Anonymous - Tim Holtz

You get a great discount on all products used by the Creative team this month..


You can purchase the items HERE
and check out the facebook group to see everything the Creative Team will be creating throughout March.
I hope I have inspired you
to create glorious things.
Hugs
Donna xx

My FaceBook page Donna's Fun Stuff HERE 
My Pinterest page Donmaree HERE
My Youtube Channel HERE
My Blog HERE
And don't to forget to say hi on Instagram donna.triffitt

Tuesday, April 23, 2019

The Life Within the Seed - Wendy's Flower Girl Paper Doll Journal Page

Hello Crafty Friends!
Wendy's paper dolls!! Oh my goodness I love them so much. And her Life Within the Seed doll is just adorable. Show your love in the comments below! And why not join us in our facebook group and share YOUR take on a pretty paper doll :)


Hello Everyone,
 A few years back I drew and made a flower girl paper doll. She was one of my first paper dolls and after going through my paper doll journal, I realised I hadn't added one of her to it. So this project is about adding my flower girl to my paper doll journal and using up some of the scrap BoBunny patterned papers I had left over from other projects.

What I used in this project:
*My Doll Art Journal
*A selection of BoBunny 'Cottontail' patterned papers
*Black Marker
*Pva glue OR glue stick
*A selection of Kaisercraft paints
*some buttons / decorations of your choice
*Flower stamps from my supplies
*Vintage Ink pad

I used a pattern of my flowergirl I drew a few years back. As seen below and I cut a couple of each piece from the left over BoBunny patterned papers. The papers are wonderful to mix and match together.


Once I had my individual pieces cut out I chose the  paper pieces I wanted to use to make my flower girl paper doll.


I gave the edges a dusting with a vintage ink and then use a permanent marker to line the edges. Then it was time to glue the pieces together bringing my flower girl paper doll to life. I drew her face on and added a few small buttons I had from my own supplies which were in the same pastel shades as the BoBunny papers.


 Once my flower girl was put together, I added some paints to my journal page and when happy with the background colours I glued my doll to the page. I used some white gesso to paint in some seeds, a shoot and a little bigger plant to the left side of where I glued my flower girl down.


I also used a small flower stamp to put a border around the journal page and then hand wrote this months title along the cut side of my page..."The Life Within The Seed". This layout shows how after planting a few seeds in the ground and letting them grow: it can turn into a beautiful Flower Girl Doll...heehee!

Below is the final page in my paper doll journal and I love the way it turned out. I really enjoy making paper dolls and I think this little one looks fabulous from using the BoBunny patterned paper range.


You can watch the full making of her in the video below:


I hope you try making one for yourself and sharing it in Aunty Veras' facebook Group.
Have a great day!
Wendy xox

Sunday, April 21, 2019

The Life Within The Seed - Tina's Three In One Explosion Box.

Hello Crafty Friends!
Here's a special Easter Sunday project for you........ Tina joins us today with her tutorial for a three-in-one explosion box. Great for any occasion but how gorgeous is it in the BoBunny 'Cottontail' papers?


Hi everyone. What a wonderful month of projects the Team have created, and we are not even half way through the month. I have joined the lovely girls for one project this month, and I thought I would share a project that was requested by my Secret Santa recipient from 2018 (through Admin) on Crafty Vera and Friends Facebook page. I had purchased the BoBunny papers months ago, that are featured in this month's theme and thought this would be a good opportunity to share my tutorial. Thank you Donna, who was my Secret Santa recipient (you would have known after this) for requesting this tutorial.
The box I designed has three layers and each layer is a pocket. My original design had a lid for each layer but in this and Donna's box I only made the outside lid.


To start, I cut the three base pieces in white cardstock.


Then score as shown in blue marker.


Cut away the corner pieces at an angle.


Next I cut the side pockets as shown below.


Again score as shown with the blue marker below.


Snip away the 1/2'' corners and fold on the score lines.


I cut all my patterned pieces from the BoBunny - Cottontail Collection, slightly smaller than than the pockets.

Glue the patterned paper on the front of the outer pocket as shown below.


Line up the inner patterned paper with the top of the pocket and tape in place with washi. I used the Sizzix Thinlits Die - Stacked Baroque to cut the decorative opening. Line this die as shown in the image below and hold in place with washi tape.


I marked the center with pencil on my paper and die to make sure it lined up properly and used the curves on the die to line up on the edges.


Remove and repeat on the other three outer pockets. I inked all my edges with .Distress Oxide - Tattered Rose
Glue onto pocket.


Add glue to the 1/2'' flap and glue the pocket together.


Now add glue to the base A flap, front and back and slide the pocket into place. Repeat on all the pockets. The inside will look like the image below.


The outside.


Make the pockets for bases B and C and and glue them onto each other.. I did not cut a decorative opening on those, but they can be done with smaller dies for each one. I added a piece of the dots cardstock to the center.


To make the lid cut white cardstock 7 1/8'' x 7 1/8''. Score at 1 1/5'' all around and snip the corners as shown below.


Decorate with the patterned paper, then glue the sides to the flaps.


At this stage I decorated the lid with  a cutout  from the collection and a beautiful hand made flower  that was sent to me from my lovely friend Suzanne Johnston. 


As this will be a gift for a very dear friend I won't be showing what I will fill each pocket and the inside of the box with, I want to keep that a surprise. I hope you enjoyed this tutorial. If you would like to have a look at the inside of Donna's box, click HERE
Thank you and Happy Crafting
Tina xxx

Everything I have used for this project can be purchased at Aunty Vera Scrap And Craft, and the papers  which are the core products for this months theme are on sale.
Related Posts Plugin for WordPress, Blogger...