Hello Crafty Friends!
Are you ready for another stroll through our craft garden? Today Deb is picking flowers from our June Kit and making pretty cards to carry in her glamorous card bag...... just SO awesome!!
Enjoy!
Hi Crafters!
This was so much fun to make, I just love making bags, I know I have said they were all fun to make but I really did enjoy this one, except for the really messy part which you will see further down this post lol!
I have made 4 cards all 4 x 4" and a matching bag to put them in. I have used the Polished Jade Dylusions Ink Spray, Wilted Violet Distress Marker and the Roses Stencil out of the kit.
I don't know what happened when I was taking photos but apparently I forgot to take photos of the different stages of the roses stenciled cards, so sorry about that :(
Step 1: I used an acrylic block and coloured it in with the Wilted Violet Distress Marker, sprayed water on it and then stamped it onto wet watercolour paper, then sprayed the cardstock until I was happy with the effect, then dried it with my heat gun.
Step 2: The messy part! I used Bo Bunny Black Glitter paste with the Roses Stencil. After cleaning up my mess, and after waiting for the glitter paste to dry completely I trimmed back the stenciled watercolour paper to 3 1/2 x 3 1/2 inches.
Step 3: I cut a piece of white cardstock to 3 3/4 x 3 3/4 inches, then I cut a piece of black cardstock 8 x 4 inches to use as the card base. I attached the white cardstock to the stenciled piece and tied ribbon to the bottom then attached it to the front of the black card base. I added some cute little tags around the bow at the bottom which I punched out using one of my punches and stamp sets. The black ribbon and Glitter paste were from my stash.
Step 4: Using the Polished Jade Ink Spray and water I inked some watercolour paper, flowers and the lace trim. The lace trim was in the kit, flowers and watercolour paper were from my stash.
Step 5: I stamped the Garden Helper onto the watercolour paper I just sprayed, layered that onto my card base which was 4 x 8, folded in half. I attached the dyed flowers, lace trim, the very cute little bird cage from the kit. Added some little bling dots which were from my stash.
Step 6: I stamped the inside of the card using the little corner stamp that belongs to the Julie Nutting stamp set from the kit.
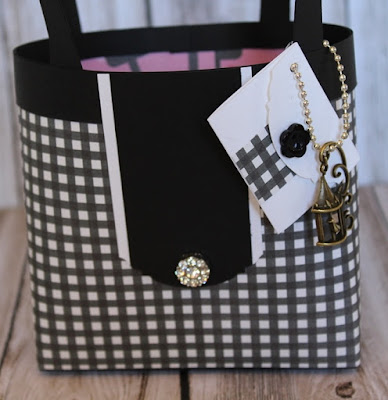
Step 7: Making the bag, which is actually called a box in a bag, as you construct a box first. See photos. The box part is scored on all 4 sides at 1/2 inch.
I have then attached handles which were 1/2 inch wide with staples.
I cut an extra two pieces of black cardstock 5/8ths wide and adhered one to the top outside of the bag and one two the inside top of the back to give it strength. I then added the front panel, and also a cute little envelope pocket to hang from the handle. I then also added one of the little birdhouse brass charms from the kit. The very blingy rhinestone brad was from my stash.
Whew! this was a long post! I am sure I haven't forgotten to tell you something. I just love how this set turned out, and I hope you get some enjoyment looking at it.
Have a great crafting week!
Deb x


No comments:
Post a Comment