Showing posts with label Deb. Show all posts

Sunday, December 10, 2017

A Month of Christmas Craft - Deb's Cards and Replica Post Box

Hello Crafty Friends!
I hope you are all having a lovely weekend. And maybe getting into some Christmas Cardmaking. Today Deb joins us with some lovely Christmas cards ranging from traditional to tropical beachside themed. And a cute little post box for those embellished cards that are just too thick for standard envelopes.
Enjoy!


This is my replica post box, well that is what I tried to do. I made it to fit cards with baubles on them, as envelopes are just not fat enough!


These cards are made using Stampin' Up! inks, and watercolour paper. I have versamarked the beach hut and palm tree with white embossing powder......


Another Christmas Card, using Woodgrain DSP, and stamps from Stampin Up!.....


A set of 3 Christmas Cards, all using Stampin Up stamps and dies. The cute little bauble is also Stampin' Up!


Thank you for joining me today
xx Deb xx

Saturday, December 2, 2017

A Month of Christmas Crafting 2017 - Deb's Advent Calendar

Hello Crafty Friends..... and welcome to our month of Christmas Crafting!
We'll bring you ideas, inspiration..... and lots of Eye Candy from our 2017 Creative Team and our Guest Crafty Peeps!
What better way to get started than by oohing and aahing over Deb's gorgeous Advent Calendar.....


This is my Advent Calendar made using all Stampin' Up! products.


I have attached 25 separate little boxes (which I might add I cut out by hand) and then glued them inside an 8 x 10 picture frame. 


 I have glued on a thick piece of cardboard to the top of the frame to get the nice shape on the top. I used a stampin' Up! sizzlit to get the shape, traced around the biggest one of the set then enlarged it in the photocopier, traced and then cut it out, phew!! The things we crafters do to make something lol!   


If anyone would like to make one of these they can purchase the tutorial from Jacquii McLeay HERE. 

Thank you for joining me today
xx Deb xx


Wednesday, June 28, 2017

How Does Your Garden Grow? Deb's Concertina Wardrobe Card and Gift Bag

Hello Crafty Friends!

Hasn't this month just flown by!! It's time for our final garden inspired project for the month. Today Deb uses those gorgeous Julie Nutting doll cut-outs to create a super sweet Concertina Wardrobe Card. It's totally gorgeous and it could be YOURS to win (see the end of this post for details).
Enjoy!......

Hi Crafters!

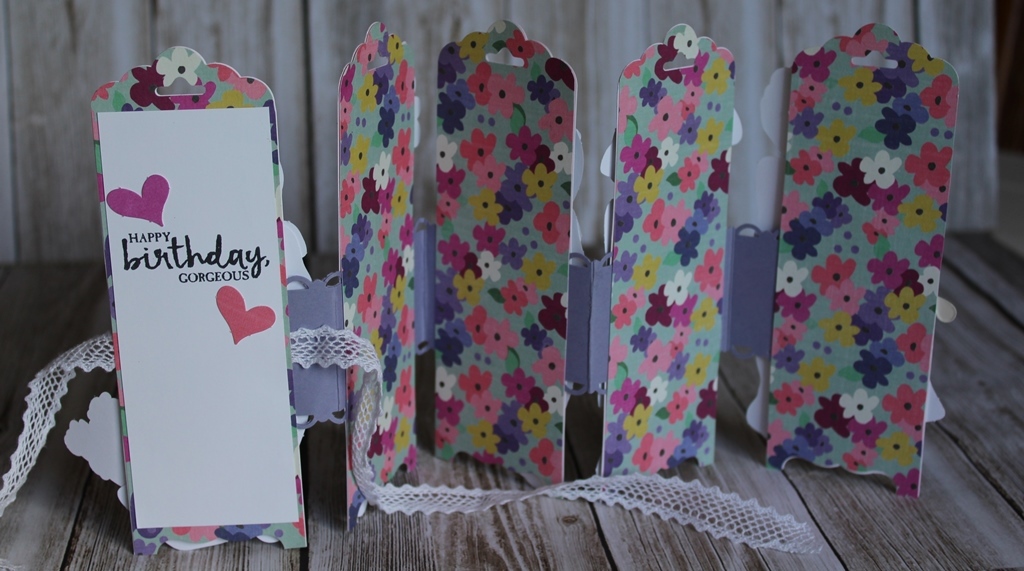
When I saw these adorable little girl cut outs in the kit I thought they  deserved to have their own little wardrobe, so I have made a row of them connected together to make a card which I am sure any young girl would just love! I then made a gift bag to hold the card to keep it safe for giving.


Step one: I used two punches to punch the shape for the top and bottom of the base of the wardrobe and then cut pieces of patterned paper for the wardrobe doors and drawers.


Step 2: I then glued all the pieces onto 5 wardrobe fronts and added brads for the door knobs and drawer knobs.


Step 3: I cut out more wardrobe pieces to attach to the back of the front of wardrobe pieces (and to hide the workings of the concertina strips). I cut two pieces of card stock to attach all the wardrobes together to make them fold on themselves. I added some ribbon so I could tie it around when closed.


Step 4: I have added white cardstock to the back of the last wardrobe and stamped Happy Birthday, and glued on some hearts from the kit.


I made the bag using a Gift Bag Punch Board. I have stamped the cute little girl using the Julie Nutting set that came in the kit, some very cute little stamps in that set. I have coloured her in using markers and fussy cut her out. I added a paper doily from my own stash. 


I hope you have enjoyed looking at what I have made and that it has given you some incentive to put your own take on this and make your own. 

Have a great day all you talented crafters' out there!

Deb x

You can win this Concertina Wardrobe card!!
Simply leave a comment below the post of this card on the Crafty Vera and Friends facebook group HERE to go in the draw.
Winner will be picked Thursday 8pm (Sydney Australia time)

Wednesday, June 21, 2017

How Does Your Garden Grow? Deb's Z Fold Card & Envelope

Hello Crafty Friends!

I have a confession to make........ I only started ordering the Garden Assistant stamp that is in our June Kit because I wanted one for myself. She is just SOOOO gorgeous! And it makes me so happy that all my Crafty Peeps love her too!
Today Deb creates a beautiful Z Fold card featuring our favourite gardening girl........


Hi Crafters!

I just fell in love with this stamp when I saw it, it is so right up my alley!! I thought straight away it lends itself to a 'Z' Fold card, I just love making these as you get a really great 3d effect and they are quite easy to make, the hardest part is thinking what to put inside them!


Step 1: To make the 'Z' fold is really quite easy all you have to do is cut a piece of cardstock, mine is 11 1/4 inches  x 5 inches. I then scored it in half, then the front half is scored in half again, so you then have a 'Z' fold card, easy peasy!


Step 2: I then did the same with a piece of white cardstock which was the same 11 1/4 inches but by 2 inches and folded in half on the back half this time .


Step 3: I then stamped the border along the bottom of the white cardstock, when doing this I only inked up the bottom border of the stamp as I only wanted the flowers and grass along the bottom. Once I had inked it all I then coloured in the images with markers and attached the stamped piece to the base of the card. Added all the little bits and pieces to give it a 3D look. I stamped and coloured the whole image and then fussy cut the gardener out and attached her to the bottom strip.


Step 4: Of course I had to make a matching envelope to put the card in, using my envelope maker.


This was so much fun to make, I can see myself making a lot more projects with this beautiful stamp!

Happy Crafting!

Deb x

Wednesday, June 14, 2017

How Does Your Garden Grow? Deb's 4 x 4 Cards and Bag

Hello Crafty Friends!
Are you ready for another stroll through our craft garden? Today Deb is picking flowers from our June Kit and making pretty cards to carry in her glamorous card bag...... just SO awesome!!
Enjoy!


Hi Crafters!

This was so much fun to make, I just love making bags, I know I have said they were all fun to make but I really did enjoy this one, except for the really messy part which you will see further down this post lol! 

I have made 4  cards all 4 x 4" and a matching bag to put them in. I have used the Polished Jade Dylusions Ink Spray, Wilted Violet Distress Marker and the Roses Stencil out of the kit.

I don't know what happened when I was taking photos but apparently I forgot to take photos of the different stages of the roses stenciled cards, so sorry about that :(

Step 1: I used an acrylic block and coloured it in with the Wilted Violet Distress Marker, sprayed water on it and then stamped it onto wet watercolour paper, then sprayed the cardstock until I was happy with the effect, then dried it with my heat gun.


Step 2: The messy part! I used Bo Bunny Black Glitter paste with the Roses Stencil.  After cleaning up my mess, and after waiting for the glitter paste to dry completely I trimmed back the stenciled watercolour paper to 3 1/2 x 3 1/2 inches.


Step 3: I cut a piece of white cardstock to 3 3/4 x 3 3/4 inches, then I cut a piece of black cardstock 8 x 4 inches to use as the card base. I attached the white cardstock to  the stenciled piece and tied ribbon to the bottom then attached it to the front of the black card base. I added some cute little tags around the bow at the bottom which I punched out using one of my punches and stamp sets. The black ribbon and Glitter paste were from my stash. 


Step 4: Using the Polished Jade Ink Spray and water I inked some watercolour paper, flowers and the lace trim. The lace trim was in the kit, flowers and watercolour paper were from my stash.


Step 5: I stamped the Garden Helper onto the watercolour paper I just sprayed, layered that onto my card base which was 4 x 8, folded in half.  I attached the dyed flowers, lace trim, the very cute little bird cage from the kit. Added some little bling dots which were from my stash.


Step 6: I stamped the inside of the card using the little corner stamp that belongs to the Julie Nutting stamp set from the kit.

Step 7: Making the bag, which is actually called a box in a bag, as you construct a box first. See photos. The box part is scored on all 4 sides at 1/2 inch.


I have then attached handles which were 1/2 inch wide with staples.


I cut an extra two pieces of black cardstock 5/8ths  wide and adhered one to the top outside of the bag and one two the inside top of the back to give it strength. I then added the front panel, and also a cute little envelope pocket to hang from the handle. I then also added one of the little birdhouse brass charms from the kit. The very blingy rhinestone brad was from my stash.


Whew! this was a long post! I am sure I haven't forgotten to tell you something. I just love how this set turned out, and I hope you get some enjoyment looking at it. 

Have a great crafting week!

Deb x


Related Posts Plugin for WordPress, Blogger...