Showing posts with label Accordion album. Show all posts

Monday, March 30, 2020

Dog Days Are Over - Photos added to Wendy's Mini Accordion Album


Photos added to 
the Mini Accordion Album
'Dog Days Are Over'


I wanted to come back here to leave the video to show you all where I have added the photos of our Crafty Vera and Friends facebook group's dogs to the mini album I had previously made.

Thank you to everyone that helped me by leaving a gorgeous picture of their family pet dog that I was able to use in the album.

I hope you all enjoy the video flip through.


Thank you all once again, the album looks fabulous!
Wendy xox

Saturday, March 14, 2020

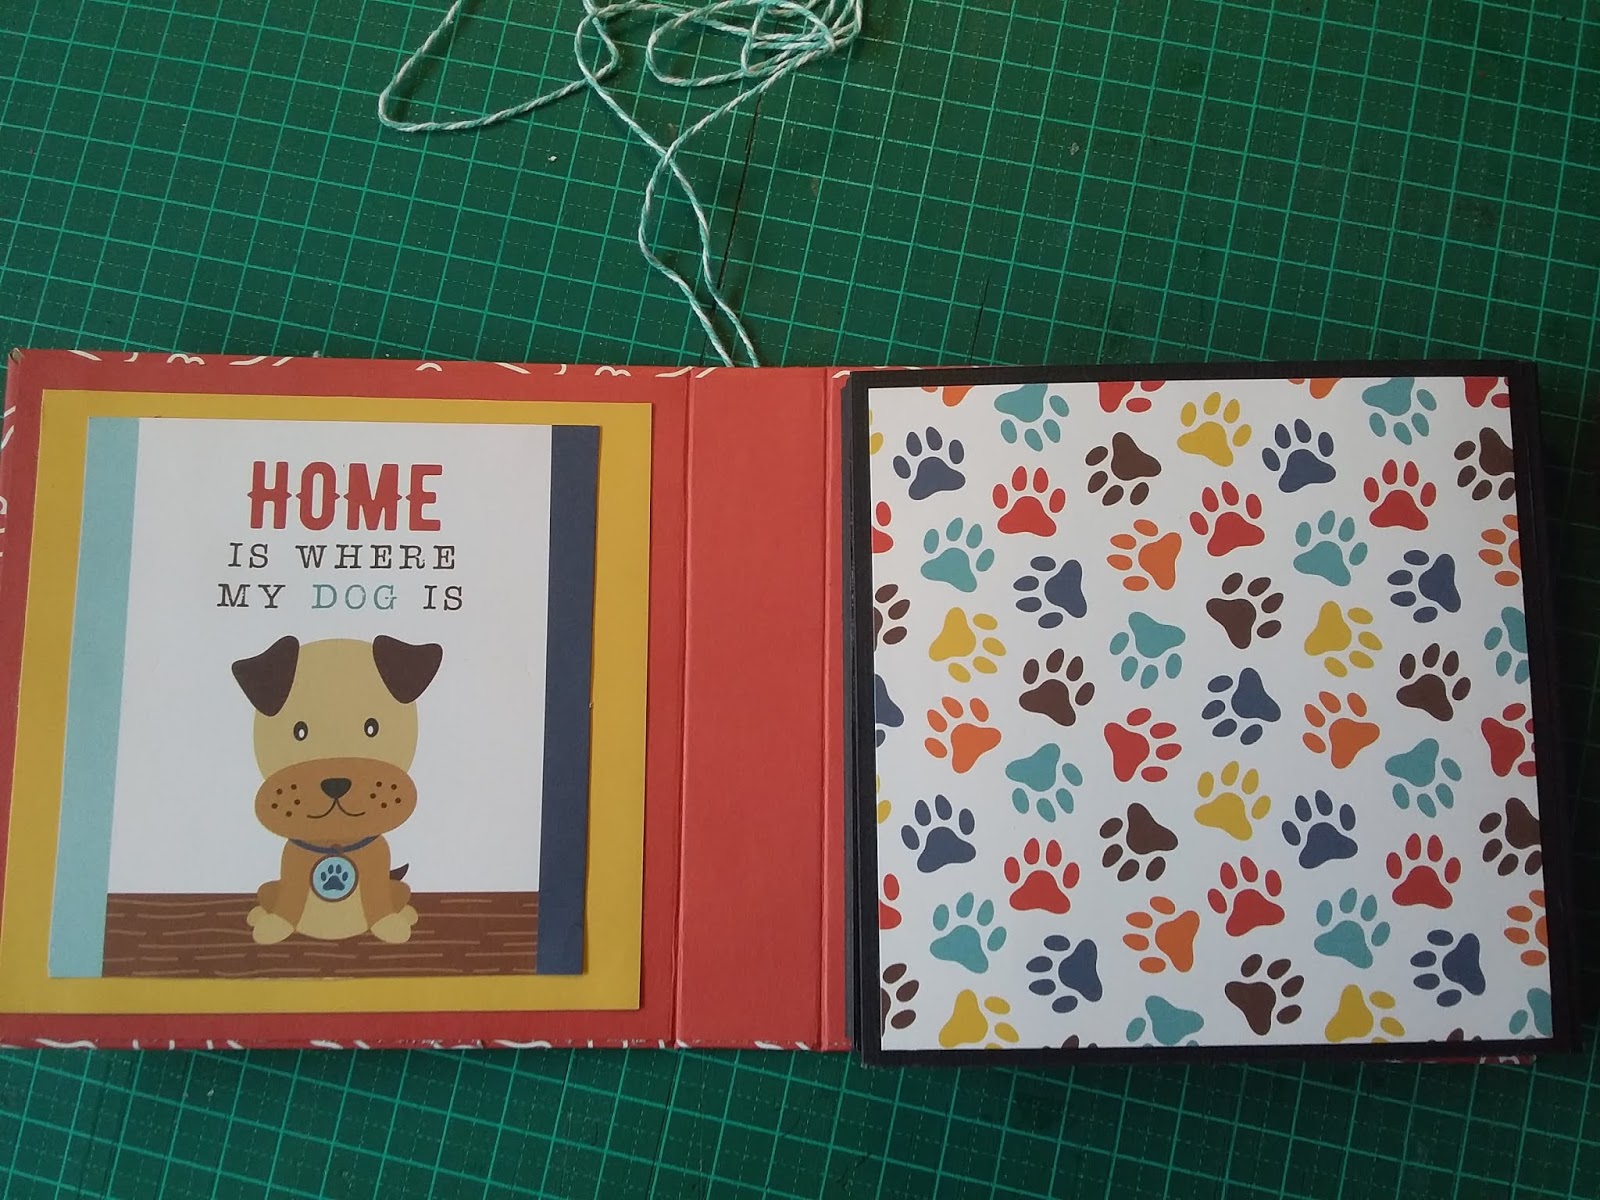
Dog Days Are Over - Wendy's Mini Accordian Puppy Album


Mini Accordion Puppy Album


How wonderful would it be to make a special mini accordion album to store your precious photos of your beloved dog in? I think it would be pretty cool, indeed!
In this day and age of technology, people are forgetting how cherished an actual hands on picture of someone, something and even our pet dog can feel.
Today, I decided to make a mini accordion style album, a place where you can store and proudly show off your family loved pet dog...

What I used:
*Graphic 45 Chipboard sheets
*Echo Park I Love My Dog Collection
*Echo Park I Love My Dog Coordinating Paper Pack
*Sew Easy Fancy Floss (for tie closure)
* A Brad
* An awl or something to poke a hole in cover with.

The Cover
Cut two pieces of the chipboard at 5 by 5 inches and one piece at 5 by 1 inch. This is the cover for the album. To cover the base, I used the reverse side of the 3x4 journaling card sheet of paper. This was cut at 7 inches and leaving it 12 inches wide.


When placing the chipboard on the patterned paper leave about an 1/8th of an inch space between each side of the spine.


I glued the chipboard on with double-sided tap as well as a little wet glue. Then cut the corners off diagonally. Then I used a stylus to score along each side of the chipboard to make an easier fold of the flaps. Then I used a wet  glue to glue each side down.


I grabbed the red corordinating coloured paper and layed it on the inside of the cover and marked off the places where I had to cut it down, so it would fit nicely on the inside. I used double sided tape with some wet glue to adhere the inside cover on. When it was dry, I gently scored down each side of the spine to make the papers bend easier.


The Pages
For my pages (there are a few) I used some black cardstock from my own supplies. I cut the black cardstock at 9 3/4inches for the width and cut the height at 4 3/4 inches. You will need to cut five pieces of black cardstock for the pages. 


I then scored the width side at 4 3/4 and 5 inches. This gives you a 1/4 of an inche spine in the pages.


Putting the pages together, you alternate the spines. So if you start with a spine on the left side, your next page spine will be on the right hand side and then the next on the left hand side...alternating the spine. This is when you decide if you want to add pockets to your pages before gluing them. You can add a pocket at the top or on the side. I chose to add a pocket at the top so I only glued down both sides and at the bottom of my pages. This gives me a nice big pocket at the top where I can add a large mat for a photo.


When my 5 pages were all glued together. I cut out 10 mats from The Echo Park I Love My Dog Collection and 2 mats from the corordinating paper pack to decorate the black pages. These mats were cut at 4 1/2 by 4 1/2 inches and attached to each black page with double sided tape.


Before I attached my accordion pages to the cover. I poked a hole in the middle of the back cover near the spine. I used a brad and tied a length of the Sew Easy Fancy Floss on to it and pushed the brad through the hole. I placed a small piece of tape over the spikey bits of the brad just to protect the cover paper a little. This gives you a novel tie closure on the album.


I then attached my pages to the inside bottom cover with some double sided tape and wet glue. I glued another mat over this inside cover.


Time to Decorate:
I used two of the 3 by 4 journaling cards from the I Love My Dog collection, placing one on the inside front and one on the inside back.


I made four photo mats to go into the pockets. These were cut at 4 1/4 from the back cardstock and rounded the corners of each. I then cut 4 more in the plain coloured coordinating papers at 4 inches by 4 inches and rounded the corners. And glued the coloured mats onto the black mats. The mats fit in the pocket nice and snug.


mats in pockets


I decorated the front of my mini album with another 6x4 quote image from the Echo Park I Love My Dog Collection and backed it on to some black cardstock.


Some pictures of the pages with the beautiful coloured patterns.


I absolutely love the end result of my mini accordion album and hope to gather some dog pictures from our Crafty Vera and Friends Family to add to it to make it complete.

You can view the whole process below :


Let me know if you make one for your family dog in our facebook group, I'd love to see it!

Don't forget the items and papers I used are discounted for the month of March
at Aunty Vera Scrap and Crafts  online store.
You all have a good doggy day!
Wendy xox

Saturday, June 22, 2019

C is for Cookie - Gina's Accordion Mini Album

Hello Crafty Friends!
Gina has a wonderful weekend project for us today...... a mini album just perfect for recording your special baking moments (or any other memories!) Love this so much!!


June is almost over and next month brings two weeks of school holidays, yay. Since we will have to do a lot of indoor activities and my daughters love to "help"in the kitchen, I thought we might bake some desserts together. I plan to take a lot of pictures and for us to sit and write down the recipes that we liked together. This accordion mini album is perfect for us to put our pictures and recipes in and gives us another indoor activity for the next day.

To start, cut 4 pieces of Bazzill Licorice Twist as 8 cm x 23 cm. Then stick two together to form the front and back covers.


For the inside cut the Bazzill Wax Lips to 30 cm x 22.5 cm. On the 30 cm sides, mark it at 7.5 cm, 15 cm and 22.5 cm on both sides and draw a line joining the points. On the 22.5 cm side mark the sides at 7.5 cm and 15 cm and draw lines across. In the end you should have twelve 7.5 x 7.5 com squares. On the left and right centre squares, mark 3.7 cm from the edge and draw a line as shown in the picture. I have shown this on a piece of white paper so you can see all the markings. If you don't understand, the video might help.


Score all the vertical lines, including the two vertical lines made at the 3.7 cm mark, and cut the two middle horizontal lines from the 3.7 mark to the 3.7 mark.


Starting from the middle vertical lines, fold the top and bottom lines upwards and the middle line downwards, and the rest in opposite directions to make accordion folds as shown in the picture. This parts a bit fiddly and you will see me struggle with it in the video too as its the first time I've made one. Make sure you are looking at the picture as you do this.


Now it's time to attach the covers that we made. Cut 2 pieces of patterned paper at 7.5 cm x 22.5 cm. I've used the off-cuts from my previous projects. Stick them on the inside of the covers and then stick the covers onto the front and back of the album. The white tape shows where to put the glue.


This is what it looks like now from the inside. There was a strip of patterned paper peeking out under the red. I went over that with a black sharpie.


Cut two more pieces of patterned paper for the front and back of the covers at 7.5 cm x 22.5 cm and ink the edges with black ink.


On the front cover, I used one of the Echo Park Good Day Sunshine brads to make a closure. I then stuck the patterned papers on. I used one of the cut aparts from the 8x8 paper pad, stuck it on some of the black cardstock and then stuck that in the bottom centre of the cover. I die cut some flowers and leaves with the Tim Holtz Funky Florals dies which I stuck on the right and the bottom of the cut apart. And to finish it off, I stuck one of the stickers from the Authentique Ingredient Sticker Sheet towards the top centre of the cover. I wrapped a piece of the Sew Easy fancy floss blue and white bakers twine around the album and closed it by wrapping it around the brad.


I cut 16 squares, from the Authentique Ingredient 8x8 paper pad, at 7 cm x 7 cm. I also cut 4 rectangles at 7 cm x 3.3 cm and used two of the cut aparts which were about 7.6 cm long. I left the length as is and cut the width down to 3.3 cm. I've inked all the edges with black ink.


I then stuck them onto the album. The picture below shows the inside. The two larger cut aparts go on the middle ends.


This picture shows the back of the album.


Starting from the inside, I will now decorate some of the squares. The first and third squares in the first row, the two middle squares and the second and third squares in the third row are for my pictures so I will be decorating the rest of them. On the second square, I used one of the cut aparts from the 8x8 paper pad. I inked the edges with my black ink and stuck one of the Dress it up Christmas Cookies buttons on the side, after removing the back button.


I did the same thing for the fourth square on the top.


For the middle row, I cut out the stamps from the cut aparts, inked the edges with black ink and then stuck one each on the little 3.2 x 7 cm rectangles.


I fussy  cut the kitchen cabinet from one of the cut aparts which I stuck on the first square of the last row. I then cut out the quote that comes at the bottom of each sheet, inked the edges, and arranged it next to the cabinet.


On the fourth square is another fussy cut image from the cut aparts and an arrow from the sticker sheet.


Here's a look at the completed inside.


On the back I have kept one square in each row for pictures and decorated the others. In the middle, I have made a pocket. I have cut a piece of patterned paper at 4.5 cm x 7 cm and used a scallop punch to cut a little semi circle. I have inked the edges with black ink and stuck it on to make a pocket. I used one of the cut aparts which said holiday favorites and stuck it in the middle of the pocket. I have stuck stickers from the sticker sheet on the top and bottom squares and the tag stickers on the 3.2 cm bits.


Now all that's left to do is add our pictures :)

Hope you enjoyed this album and see you again soon for my final project for the month. Till then stay warm and stay awesome.

Gina xx

Wednesday, May 8, 2019

NSD 2019 Challenge - Tina's Double Layered Easel Shaker Card/Album Challenge - Part Two

Hello Crafty Friends!
Are you ready for the second part of Tina's Challenge? Adding the accordian album attachment to your card so that it can hold photos and memories.....


Hello everyone. What a fun month it has been. Lots of amazing projects from the team and great to see those who are joining in the challenges.
Today, I have the second part of my card that opens out, accordion style for photos, and a pocket to fit the tag.
This month I will giving away my projects to someone who joins in my challenge.

My CHALLENGE for this month is to make this card. I would like to see photos of your project in early stages, (e.g your cut pieces ready to be put together) and the finished project. Upload the photos in my album ( Photos must be uploaded in my album to be in with a chance) on the Crafty Vera And Friends Facebook page. Anyone can enter, even Team Members.

Don't forget to check out part one of this project to make the completed card/album.


Start by cutting and scoring the base in the same heavy weight cardstock used for the easel Card.


Fold along the score lines as shown below.


 Cut the patterned pieces slightly smaller and ink all the edges, I used Distress Ink - Vintage Photo. 


Add the thin strips to the front and back of the spine.


Next I glued the small 1 1/2'' flap to the back of the easel card.


I marked the two outer sides in the middle and added some ribbon. The ribbon will hold the album closed. I used strong double sided tape to hold in place.


Add the patterned paper.


On the left side I added a photo mat. I used the matching Graphic 45 Garden Goddess - Patterns and Solids - 12 x 12 Paper Pad that I had in my stash and I used these for all my photo mats. I then  punched the corners with my photo corner punch.


On the right side I made an accordion style album.
I used Kaisercraft Card - Forest, (below I have shown cut pieces in white paper for this tutorial).
Cut and score two pieces of the card.


Fold along score lines, the 5'' score inwards and the 1/2'' outwards.


Attach the left side of the bottom piece to the 1/2'' side of the top piece.


It should look like this.


I attached the left side panel onto the right side of my card and added all my photo mats.


Here is the opposite side.
Do not punch the corners of the top piece ( the green panel where the pocket will be, unfortunately I didn't take the photo before I attached the pocket).


To make the pocket for the tag, I cut and scored a piece of the heavy weight cardstock as shown below.


Cut away the corners leaving the small tabs.


Fold along all the score lines towards the inside, burnish well. I then glued the two small tabs to the inside of the 1/4'' bottom.


 Next I glued the bottom fold to the side folds.


Front of pocket,


Add the patterned paper and attach to the album.


The easel card/album is complete ready to be filled with photos.


I love all the page combinations this album delivers.


Join me next time for the Photo Tag tutorial to place in the pocket.

I hope you have enjoyed this project and please join in my CHALLENGE for a chance to win this card. Good luck!
Go Team Tina!!!

Here is a list of the products I have chosen from AVSC:

Graphic 45 - Garden Goddess 12 x 12 Collection Pack
Graphic 45 - Garden Goddess - Chipboard Pieces
Graphic 45 - Garden Goddess - Tags and Pockets Pack
Tim Holtz - Thinlits Die - Stacked Label
KaiserCraft - 6 x 6 Designer Template - Botanical
Inka Gold - Rose Quartz - Metallic Paste
Tattered Angel - Glimmer Mist - Wedding Pink

All of these products can be purchased HERE at a discounted price.
Thank You and Happy Crafting.
Tina xxx
Related Posts Plugin for WordPress, Blogger...