
Hello Crafty Friends!
It's Two For The Price of One Day today (lol) as Gina shares with us two awesome projects - a set of autumn tags and some DIY washi tape. This should have you set for some weekend crafting!

Hope everyone is enjoying this super warm Autumn. My weather app says clear skies for the next 10 days with temperatures between 28-31 degrees in my corner of Perth which is not too bad except that it has been unbearably humid. We are trying to make the most of the warm days though by splashing about in the lake every weekend which the kids love :)
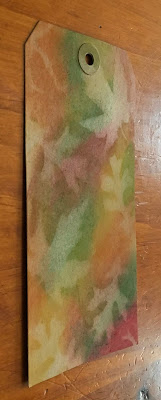
On to my project. This time I wanted to use my lovely Tim Holtz distress tags so I have made 2 tags. For the first tag, I used the large kraft tag and coloured it using my daughter's oil pastels and blended those colours together with my finger.

Next I used the lovely Tim Holtz Autumn stencil and rubbed out some of the colour using a baby wipe. I've taken this picture at an angle so you can see the effect.
Once it was dry, I used my chevron stencil and some white acrylic paint on the top right and bottom left corners of the tag and left it to dry.

I used another layering stencil from my stash and some black ink to add more detail, this time on the sides.

I stamped the acorn stamp from the Tim Holtz blueprint stamps onto tracing paper using my Olive Green Stázon ink pad.

I then stuck it in the middle of the tag using Mod Podge and stuck a strip of the dark green Santoro leaf ribbon on the left.

I cut out one of the quotes from the Echo Park "Fall is Fun"paper and coloured and blended them in using my "old paper" and "tea dye" distress crayons.

I inked the edges with "Tea Dye" distress ink and then stuck them on the tag. I also added one of my fussy cut pieces from the Graphics 45 Autumn paper on the bottom right corner and inked some of the edges of the tag with "Frayed Burlap" distress ink.

Then I splattered some white acrylic paint all over with a paintbrush. I found the tag a bit dull so I decided to add some colour to it. I stamped the maple leaf Tim Holtz blueprint stamp on 3 different colours of paintchip sample cards that I had and fussy cut them.

I then layered them in the middle over the acorn and tied some of my favourite yarn through the hole and stuck the acorn Woodland Critters button in the center of the hole.

For my next tag I started with the heavystock tag also in size #8. I stuck the Tim Holtz "Autumn" stencil over it and using a piece of foam sponge, I applied white acrylic paint.

I removed the stencil and left it to dry.

Once dry, I used my only set of mini distress inks :D and applied them all over the tag with my daubers.

The picture doesn't do it justice but the effect was so beautiful that I was tempted to leave the tag as is but it's me and I'm very fidgety so the next thing I did was cut out some of the leaves from the leaf strip in the sticker sheet. I lightly coloured and blended using the "old paper" and "tea dye" distress crayons and stuck them on the bottom. After I did that I decided I didn't want it to go all the way across so I cut off the brown leaf on the right.

I then stamped the "oak leaf" Tim Holtz blueprint stamp on my paintchip cards and fussy cut them. I stuck the leaves on the top left and bottom right corners. I wanted to stamp some script in the background but couldn't find my script stamp anywhere so I used the Picket Fence Studios "Coffee Understands" stamp set and using a very light layer of tea dye distress ink, added some script.

I then used one of the sentiments I cut from the Echo Park "Fall is Fun" paper and inked the edges with my Creativ yellow ink. I raised it with some cardboard at the back and stuck it on.

I fussy cut some acorns, mushrooms and a maple leaf from the Echo Park "Autumn Friends" which I stuck on and I added the red Santoro leaf vine to the left.

I inked the edges of the tag with my Creativ yellow ink and cut out a flower from the Mirabeau floral lace trim which I stuck on the hole and then I stuck a piece of white ribbon at the back.

Both the tags were easy to work with and held up well to my fidgeting and layering so I enjoyed working on them. It won't be long before I finish the whole pack. I didn't make a video this time but if you would like to see any of the processes I am happy to make one for you.
Ever since I saw the blueprint stamps, I've wanted to make some homemade washi tape with them so that's just what I did. I started with 3 pieces of 48 mm masking tape cut to about 30 cm length each, and 3 pieces of dressing tape which was 25mm width cut to 30 cm length as well.

Using the Tim Holtz "Autumn" stencil, I put white acrylic paint on one set of masking tape and dressing tape and on another set I added gesso.

On the third set I used my oil pastels and added dashes of colour and blended them with my finger. The picture shows all 3 sets. As you can see the acrylic paint didn't work very well on the dressing tape. It seems to have been absorbed into it.

Working on the masking tape with the blended oil pastels, I stamped the Tim Holtz "Autumn" blueprint stamps using Olive Green Stazon ink. Once dry, I sprayd it with Kaisercraft Gold shimmer spray.

Then on the dressing tape with the oil pastels, I stamped the leaf blueprint stamps, sideways and using the Picket Fence Studios "Coffee Understands" as a script stamp, I've stamped script here and there using "Tea Dye" distress ink.

I then splattered some white acrylic paint all over. Here you can see the result. I've taken them off the plastic so you can see better.

Next I worked on the ones that I had stencilled the acrylic paint on. I've used my Tim Holtz mini distress ink pack ("dusty concord", "crushed olive", "ripe persimmon" and "tumbled glass") and blended the colours on the tapes. Since I didn't manage to stencil using the acrylic paint very well on the dressing tape, there's not much detail with the distress ink.

I then stamped the Tim Holtz "Autumn" blueprint stamps on both these tapes as well using the Olive Green Stazon ink. I also stamped the leaves again on the dressing tape in between the green leaves using my Kaisercraft metallic gold inkpad but you can't really see it.

And finally, the tapes that I had added gesso between the stencil. I also blended my distress inks on the masking tape and on the dressing tape, I used the "crushed olive", "ripe persimon", "tea dye" and my yellow Creativ ink pad.

I stamped the blueprint stamps on the masking tape using "Olive green" Stazon but left the dressing tape as is and sprayed them both with Kaisercraft gold shimmer spray.

Hoping everyone has a lovely weekend and see you again next week.
Stay awesome
Gina x
It's Two For The Price of One Day today (lol) as Gina shares with us two awesome projects - a set of autumn tags and some DIY washi tape. This should have you set for some weekend crafting!
Hope everyone is enjoying this super warm Autumn. My weather app says clear skies for the next 10 days with temperatures between 28-31 degrees in my corner of Perth which is not too bad except that it has been unbearably humid. We are trying to make the most of the warm days though by splashing about in the lake every weekend which the kids love :)
On to my project. This time I wanted to use my lovely Tim Holtz distress tags so I have made 2 tags. For the first tag, I used the large kraft tag and coloured it using my daughter's oil pastels and blended those colours together with my finger.

Next I used the lovely Tim Holtz Autumn stencil and rubbed out some of the colour using a baby wipe. I've taken this picture at an angle so you can see the effect.

Once it was dry, I used my chevron stencil and some white acrylic paint on the top right and bottom left corners of the tag and left it to dry.

I used another layering stencil from my stash and some black ink to add more detail, this time on the sides.


I then stuck it in the middle of the tag using Mod Podge and stuck a strip of the dark green Santoro leaf ribbon on the left.

I cut out one of the quotes from the Echo Park "Fall is Fun"paper and coloured and blended them in using my "old paper" and "tea dye" distress crayons.

I inked the edges with "Tea Dye" distress ink and then stuck them on the tag. I also added one of my fussy cut pieces from the Graphics 45 Autumn paper on the bottom right corner and inked some of the edges of the tag with "Frayed Burlap" distress ink.


I then layered them in the middle over the acorn and tied some of my favourite yarn through the hole and stuck the acorn Woodland Critters button in the center of the hole.
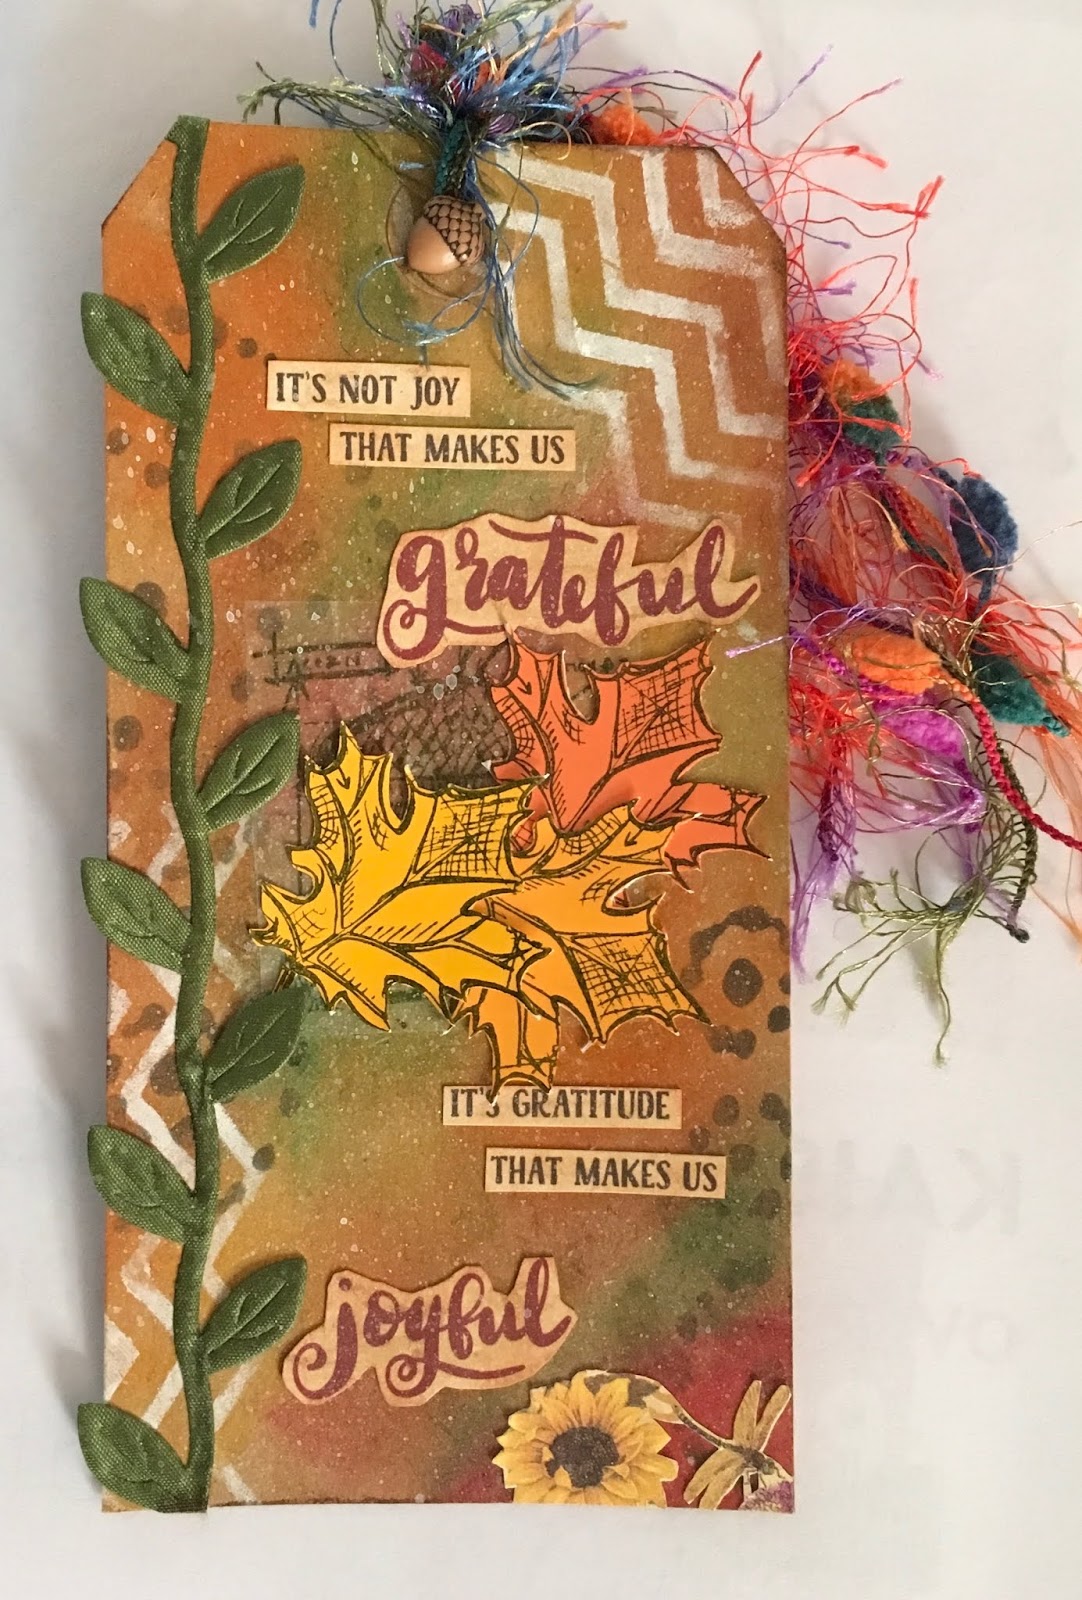
For my next tag I started with the heavystock tag also in size #8. I stuck the Tim Holtz "Autumn" stencil over it and using a piece of foam sponge, I applied white acrylic paint.

I removed the stencil and left it to dry.

Once dry, I used my only set of mini distress inks :D and applied them all over the tag with my daubers.

The picture doesn't do it justice but the effect was so beautiful that I was tempted to leave the tag as is but it's me and I'm very fidgety so the next thing I did was cut out some of the leaves from the leaf strip in the sticker sheet. I lightly coloured and blended using the "old paper" and "tea dye" distress crayons and stuck them on the bottom. After I did that I decided I didn't want it to go all the way across so I cut off the brown leaf on the right.

I then stamped the "oak leaf" Tim Holtz blueprint stamp on my paintchip cards and fussy cut them. I stuck the leaves on the top left and bottom right corners. I wanted to stamp some script in the background but couldn't find my script stamp anywhere so I used the Picket Fence Studios "Coffee Understands" stamp set and using a very light layer of tea dye distress ink, added some script.

I then used one of the sentiments I cut from the Echo Park "Fall is Fun" paper and inked the edges with my Creativ yellow ink. I raised it with some cardboard at the back and stuck it on.

I fussy cut some acorns, mushrooms and a maple leaf from the Echo Park "Autumn Friends" which I stuck on and I added the red Santoro leaf vine to the left.

I inked the edges of the tag with my Creativ yellow ink and cut out a flower from the Mirabeau floral lace trim which I stuck on the hole and then I stuck a piece of white ribbon at the back.

Ever since I saw the blueprint stamps, I've wanted to make some homemade washi tape with them so that's just what I did. I started with 3 pieces of 48 mm masking tape cut to about 30 cm length each, and 3 pieces of dressing tape which was 25mm width cut to 30 cm length as well.

Using the Tim Holtz "Autumn" stencil, I put white acrylic paint on one set of masking tape and dressing tape and on another set I added gesso.

On the third set I used my oil pastels and added dashes of colour and blended them with my finger. The picture shows all 3 sets. As you can see the acrylic paint didn't work very well on the dressing tape. It seems to have been absorbed into it.

Working on the masking tape with the blended oil pastels, I stamped the Tim Holtz "Autumn" blueprint stamps using Olive Green Stazon ink. Once dry, I sprayd it with Kaisercraft Gold shimmer spray.

Then on the dressing tape with the oil pastels, I stamped the leaf blueprint stamps, sideways and using the Picket Fence Studios "Coffee Understands" as a script stamp, I've stamped script here and there using "Tea Dye" distress ink.

I then splattered some white acrylic paint all over. Here you can see the result. I've taken them off the plastic so you can see better.

Next I worked on the ones that I had stencilled the acrylic paint on. I've used my Tim Holtz mini distress ink pack ("dusty concord", "crushed olive", "ripe persimmon" and "tumbled glass") and blended the colours on the tapes. Since I didn't manage to stencil using the acrylic paint very well on the dressing tape, there's not much detail with the distress ink.

I then stamped the Tim Holtz "Autumn" blueprint stamps on both these tapes as well using the Olive Green Stazon ink. I also stamped the leaves again on the dressing tape in between the green leaves using my Kaisercraft metallic gold inkpad but you can't really see it.


I stamped the blueprint stamps on the masking tape using "Olive green" Stazon but left the dressing tape as is and sprayed them both with Kaisercraft gold shimmer spray.

Hoping everyone has a lovely weekend and see you again next week.
Stay awesome
Gina x


