Hello Crafty Friends!
Scrapbooking doesn't have to happen in a big album. Why not try making a little Memory Book?
Go Team Suzanne!
It's here. At last. The Annual Aunty Vera National Scrapbooking Day Challenge.
Hello everyone. I hope you are all ready for the NSD challenges. I've been having a blast getting this little album ready for everyone to be able to follow along and make their own and I have to say I'm a little excited to share my challenge with all of you.
Today I'm sharing how we can make a beautiful little album that has the same dimensions as the gorgeous Sizzix passport book die. In fact it's so similar that my family couldn't pick the one I had made using the die and the ones that I hadn't used any die for. And, its just so easy. So here it goes ...
To construct my little album I use some 350gsm kraft cardstock that I get from Daiso. You will need to cut
Across the spine, mark at 1 inch, 2 1/2 inch and 4 inch
Then make at 1/4 inch intervals - 1/4, 1/2, 3/4, and 1 inch between the two score lines
With an awl or large needle you can now pierce the holes in the cardstock ready to sew the page into. You should have 12 holes in the spine.
For the inside pages you need to put a hole down the scored middle fold at 7/8 inch, 2 3/8th inch and 3 7/8 inch or if you have a Tim Holtz ruler that finds the middle of your page, you can mark the middle and 1 1/2 inches either side of that. It is the same thing.
Cover the front and back covers both inside and out. I chose to make the cover pages a little smaller than the cover itself so that a small border is left around the patterned papers. You can cut them to whatever size you prefer.
Cover the back spine using three pieces of patterned paper. Be sure to turn the spine over now and pierce the holes through the spine again before putting the patterned paper on the inside of the spine. When you have done that, you need to turn the spine over and pierce the holes again. If you don't do this you won't be able to see where the holes should be when you do the other side.
Glue the front and back covers on
Glue the spine flaps to the outside of the front and back covers. Make sure and use strong glue or red line tape.
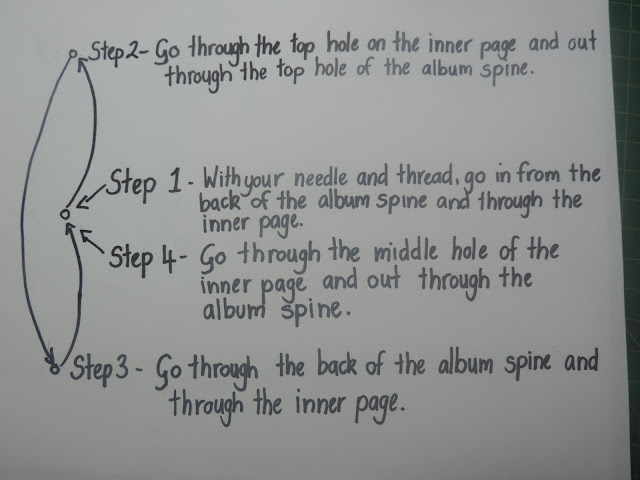
You can now sew the pages into the centre of the album cover. I used linen thread because it is very strong. If you don't have linen thread, I would suggest using a couple of threads together so that it is strong enough to hold the pages. I started on the outside middle hole. Full instructions are below.
This picture shows Step 1
Now you can tie some double knots to keep the pages secure
This is what the album looks like when the pages have been sewn in. The one at the top is the album made with no die and the bottom one has been made with the sizzix die.
I cut another piece of cardstock covered with patterned paper to cover over the sewing or it can be left as is and you can tie charms to the thread.
I then used the Echo park papers to cover the inside pages and the 'Me and my Big Ideas" journaling cards to matt the pages and decorate. Making these little albums is a great way to use up some 3 x 4 journaling cards.
To make the flip pages, I used some of the 4 x 6 journaling cards and created a hinge
Here is a picture of the finished album beside one that has been made using the sizzix die.
I hope that you will join me in making one of these awesome little albums.
You can watch a YouTube video tutorial HERE.
You can get the May kit from Aunty Vera HERE.
You can find all the information you need about the Challenges (including the boring fine print) HERE.
Post your creations in THIS ALBUM for my challenge.


Whoa!! Such a comprehensive tutorial!!
ReplyDeleteI can so do this!! I just need some 350gsm card !! Thats thicker than cereal box isn't it??