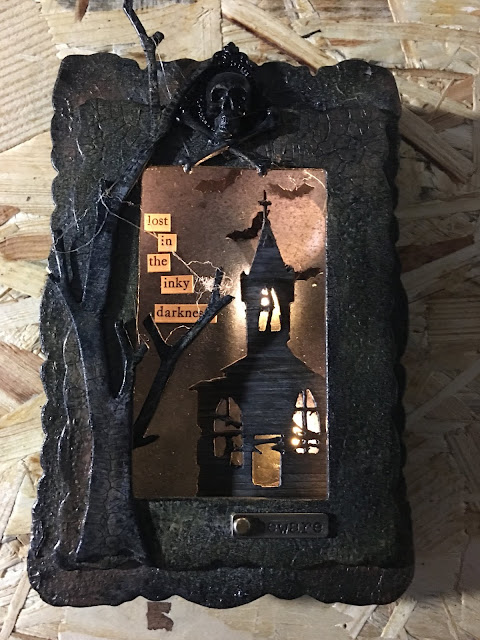
Hi everyone. Today I have a project that I made for my daughter Bella, who requested a ''spooky scene that lights up''. The whole project along the way was made with her choices from the colors to the Idea -ology Clipping in the box.
I started by making the house. I used Tim Holtz - Woodgrain Paper and colored it with Distress Spray Stain - Pumice Stone and Weathered Wood. I also used Distress Ink - Black Soot to highlight the knots.
Next I cut a template of the old church and used this to cut out a piece of black cardstock slightly bigger.
Cut the colored woodgrain paper into thin strips ( I cut mine 1/8'').
Start gluing the strips on to the black cardstock beginning at the bottom working your way upwards making sure to overlap each one slightly.
Place the die on top and run through the die-cutting machine several times. Because this is a thinlits die it will not cut all the way through but it will be easy to cut it with a craft knife.
I placed some Mica Tiles behind the windows and door.
The next step was to make the frames. My daughter had a lot of fun with these and I must say I am pretty impressed with her efforts.
She started with Tim Holtz - Idea-ology - Baseboard Frames.
Painted them with Black Gesso and then applied Little Birdie - Two Step Crackle Medium.
She was pretty happy how the turned out. She added a few other colors of distress stain and Oxides but she couldn't remember what colors she used.
To make the background I cut a piece of watercolor paper to fit the inside of the box. I then cut a small circle for the moon and placed it on the background. I sprayed Distress Oxide Spray - Frayed Burlap over the paper and then used different colors of blue Distress Ink.
I finished it off with black soot to give it more of a night sky look. Bella added a little stenciling.
The box was just one I purchased from a discount store, which we painted black. Glue the background to the inside of the box.
I added some Mini Copper Wire lights.
I just poked a small hole and threaded them through. They are light and thin so they don't bulk out at the back.
I cut out a small stitched hill and glued the church onto black foam.
I added some little bats and the quote from the Tim Holtz - Idea-ology - Clippings Stickers - Halloween, Followed by the larger frame.
To finish the Shadow Box I glued the second frame over the top. The trees were made using the Sizzix - Tim Holtz - Bigz Die Set - Branches which my daughter made the same way she did the frames. On the top I added one of the Tim Holtz -Idea-ology -Adornments - Jolly Roger which was painted black and a Tim Holtz - Idea-ology -Story Sticks - Halloween. Finally a few spider webs made with the hot glue gun and Bella is loving her creation.
I loved spending the time with my daughter making this project and she loved it so much that she can't wait for our next project together.
Here is a list of the products for this month.
Core Products
Crate Paper 12 x 12 sheets - Hey Pumpkin
Tim Holtz - Idea-ology -Story Sticks - Halloween
Chosen Products
Tim Holtz - Idea-ology - Clippings Stickers - Halloween
Crate Paper - Hey Pumpkin - Ephemera Pieces
Tim Holtz -Idea-ology -Adornments - Jolly Roger
Tim Holtz - Idea-ology - Trimmings - Halloween
Stampers Anonymous - Etcetera Tags Mini
Sizzix - Tim Holtz - Bigz Die Set - Branches
Authentique - Twilight 12 x 12 Sticker Sheet - Details Two
All the products listed can be purchased HERE at a discounted price
Thank You and Happy Crafting
Tina xxx


No comments:
Post a Comment