
Hello Crafty Friends!
I'm loving Gina's recipe organiser.... and really - you could make these for so many purposes, not just recipes. Note to self - start collecting those cereal boxes!!!

Hey everyone, I have an upcycle project for you today using my never ending supply of cereal boxes.
I started with 3 cereal boxes of the same size (told you I had a lot) and stacked them together, front to back. I then marked 4 inches from the bottom on the first one and 11 inches from the bottom on the last one. I drew a diagonal line from the 4 inch mark to the 11 inch and cut on both sides.

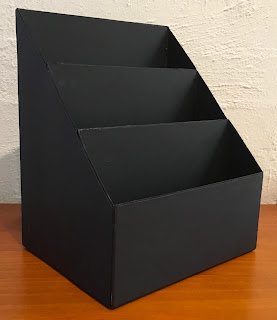
I was left with these three compartments. I then covered all the edges with masking tape.

I painted all the edges black and then stuck black cardstock on all the sides and the insides, except the middle parts which I am going to stick together. The Bazzill Licorice Twist is really good for this as it is very thick so it makes the organiser very sturdy.

I then stuck them all together. I didn't like the way the sides look so I measured cardstock to cover the whole side and stuck it on, so it didn't look like 3 individual compartments but one whole.
I cut the Authentique Ingredient #5 paper at 9.1" x 3.7" and inked the edges with black ink. I then stuck it to the front of the organiser. I used one of the cut aparts from the Authentique Ingredient #12 paper which I stuck in the middle and layered some of the Prima flowers in the corner of it.

I then stuck the Authentique Ingredient #3 on the left and Authentique Ingredient #1 on the right.

On the top pocket of the organiser I stuck one of the Santoro Gorjuss ribbons and I fussy cut the kitchen cabinet from the cut apart sheet which I also stuck on there. In the middle I stuck the "Recipes"from the cut apart sheet. On the bottom pocket, I used another Santoro Gorjuss ribbon and a lady which I fussy cut from the 3x4 cards.

I then made some dividers for the middle pocket. For the first divider, I cut the Bazzill Licorice Twist cardstock at 7" x 9" and rounded the corners. I then layered some of the off cuts on the paper leaving a 1/8" border and for every divider, the paper on the right creates a pocket. I stuck one of the stamp off-cuts in the middle of the pocket and put one of the 3x4 cards in the pocket. I also stuck a tab I made using one of the off-cuts in the top left corner.

For the next divider, I cut the Bazzill Wax Lips cardstock at 7 1/2" x 9" and layered some of the off-cuts and paper from the 8x8 paper pad creating a pocket again on the right. I stuck one of the cut aparts from the 8x8 pad in the middle of the pocket and used one of the off-cuts to make a tab which I stuck on the top in the centre.

The third divider was made using the Bazzill Candy Necklace cardstock. I cut it at 8" x 9" and rounded the corners. I've used an off-cut on the left and an 8x8 paper for the pocket. I stuck a stamp from the offcuts in the middle of the pocket and I've put some of the 3x4 cards in each of the divider pockets. As with the others, I made a tab from the off-cuts which I stuck on the top right corner.

I then put the dividers in the middle pocket of my Recipe organiser. In the bottom pocket I put the Recipe card cut outs and I added some of those gorgeous Santoro bows as well. I don't think I like the one on the hinge clip so much, so I might take that one off.

And here's what it looks like with my altered recipe book added in the top pocket :)

Thank you for following along with me. I will see you again next week with my next project. Till then stay warm, snuggly and awesome.
Gina xx
I'm loving Gina's recipe organiser.... and really - you could make these for so many purposes, not just recipes. Note to self - start collecting those cereal boxes!!!
Hey everyone, I have an upcycle project for you today using my never ending supply of cereal boxes.
I started with 3 cereal boxes of the same size (told you I had a lot) and stacked them together, front to back. I then marked 4 inches from the bottom on the first one and 11 inches from the bottom on the last one. I drew a diagonal line from the 4 inch mark to the 11 inch and cut on both sides.

I was left with these three compartments. I then covered all the edges with masking tape.

I painted all the edges black and then stuck black cardstock on all the sides and the insides, except the middle parts which I am going to stick together. The Bazzill Licorice Twist is really good for this as it is very thick so it makes the organiser very sturdy.

I then stuck them all together. I didn't like the way the sides look so I measured cardstock to cover the whole side and stuck it on, so it didn't look like 3 individual compartments but one whole.

I cut the Authentique Ingredient #5 paper at 9.1" x 3.7" and inked the edges with black ink. I then stuck it to the front of the organiser. I used one of the cut aparts from the Authentique Ingredient #12 paper which I stuck in the middle and layered some of the Prima flowers in the corner of it.

I then stuck the Authentique Ingredient #3 on the left and Authentique Ingredient #1 on the right.

On the top pocket of the organiser I stuck one of the Santoro Gorjuss ribbons and I fussy cut the kitchen cabinet from the cut apart sheet which I also stuck on there. In the middle I stuck the "Recipes"from the cut apart sheet. On the bottom pocket, I used another Santoro Gorjuss ribbon and a lady which I fussy cut from the 3x4 cards.

I attached one of the Tim Holtz Hinge clips to the top right corner so I can use it to hold up my recipes I want to follow at the back.

I then made some dividers for the middle pocket. For the first divider, I cut the Bazzill Licorice Twist cardstock at 7" x 9" and rounded the corners. I then layered some of the off cuts on the paper leaving a 1/8" border and for every divider, the paper on the right creates a pocket. I stuck one of the stamp off-cuts in the middle of the pocket and put one of the 3x4 cards in the pocket. I also stuck a tab I made using one of the off-cuts in the top left corner.

For the next divider, I cut the Bazzill Wax Lips cardstock at 7 1/2" x 9" and layered some of the off-cuts and paper from the 8x8 paper pad creating a pocket again on the right. I stuck one of the cut aparts from the 8x8 pad in the middle of the pocket and used one of the off-cuts to make a tab which I stuck on the top in the centre.

The third divider was made using the Bazzill Candy Necklace cardstock. I cut it at 8" x 9" and rounded the corners. I've used an off-cut on the left and an 8x8 paper for the pocket. I stuck a stamp from the offcuts in the middle of the pocket and I've put some of the 3x4 cards in each of the divider pockets. As with the others, I made a tab from the off-cuts which I stuck on the top right corner.

I then put the dividers in the middle pocket of my Recipe organiser. In the bottom pocket I put the Recipe card cut outs and I added some of those gorgeous Santoro bows as well. I don't think I like the one on the hinge clip so much, so I might take that one off.

And here's what it looks like with my altered recipe book added in the top pocket :)

Thank you for following along with me. I will see you again next week with my next project. Till then stay warm, snuggly and awesome.
Gina xx

How clever, I have a box full of cereal boxes and coffee flavoured sachet boxes. I am making this. 💕💕 love it Gina.
ReplyDelete