
Hello Crafty Friends
What an awesome weekend project! Today Gina walkes us through her tutorial for making a 3x4 mini album... to be decorated very soon with all things Harry Potter!

This month's theme had me dancing all over the house. Don't know if I did the Hippogriff proud but the theme has been a whole lot of fun to play with :)
Since there are a lot of 3x4 cut aparts in the core papers, I thought why not make a 3x4 mini album. I will start with the base and the pages.
To start with I cut two pieces of chipboard at 4 1/2" x 3 1/2" and one piece of chipboard at 4 1/2" x 1 1/2". I cut a piece of Kaisercraft coffee bean cardstock at 7"x 12" and stuck the chipboard pieces in the centre of the cardstock with the 4 1/2" x 1 1/2" piece forming the spine of the book.The chipboard pieces need to be about 1/8" apart so that the book can open and close easily.

Once I stuck them down, I trimmed about an inch from one side of the cardstock as it was a little too long across. I then cut off the edges and put double sided tape as shown in the picture. Burnish all the edges before you try to fold them over so you can get a nice clean fold. The video might be a little easier to follow for those who are trying this for the first time. Once you have stuck the cardstock burnish the edges of the spine again to make it easier to fold the book closed.

Now on to the hinge. Cut three pieces of cardstock, one at 4 1/4" x 1 1/2", one at 4 1/4" x 2" and one at 4 1/4" x 5". Score the first two pieces vertically at 1/2" from both sides.

Fold and burnish the half inch flaps form the hinges of the mini album. I also like to cut off the edges of the flap at an angle to make it easier to slip the pages in. Lay them one on top of the other, and stick them on from smaller to bigger, making sure you centre them. Then stick the 4 1/4" x 5" piece in the centre of the book making sure to align the hinges so they are in the centre of the spine.

Put this aside for now and let's make the pages. I'm making four pages, one for each of the houses. For the first page I cut two strips of cardstock at 9" x 3 1/4". Score them horizontally at 4 1/4" and 8 1/2". Fold and burnish the scored lines as shown.

Add double sided tape to the half inch flaps on each strip. I like to cut off the ends of each flap to make an angle. Makes it neater when you stick them on. Stick each to the bottom of the other page so that you have the main page and then a flap that opens up on one side and down in the other. The picture should give you a better idea, but the video is easier to follow.

For the second page cut one piece of cardstock at 9" x 3 1/4" and one at 9" x 3". Score them both horizontally at 4 1/4" and 8 1/2" and burnish.

Score the 9x3 cardstock horizontally at 1/2" and burnish. We will then cut off the top and bottom flaps as shown in the picture so you have a flap from the middle. Cut the edges at an angle. This part is going to form a flip out pocket.

Put double sided tape on the bottom flap and a tiny strip of glue/tape on the right side of the scored line as shown in the picture. Also put a strip of double sided tape on the bottom flap of the 9x3/14 cardstock.

Fold and stick the flaps for both the pieces leaving the side flap untouched. Next put a piece of double sided tape on one side of the flap and slip it into the opening created on the other piece and stick it on. Make sure it is just on one side as we will also be putting a photo mat into the opening later once we stick the pages onto the hinges. I have also punched a half circle in the middle of the fold out pocket with my circle punch.

For page three cut one piece of cardstock at 9 1/4" x 3 1/4" and score horizontally at 2" and 6 1/4". Fold and burnish and round the edges of the flaps.

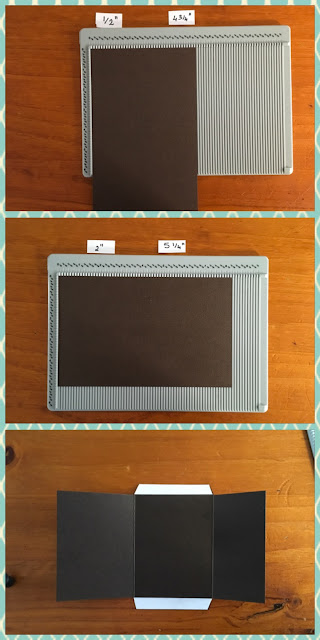
Cut another piece of cardstock at 8 1/4" x 5 1/4". Score vertically at 1/2" and 4 3/4" and horizontally at 2" and 5 1/4" and fold and burnish. Cut off all the 4 corners on the folded lines. The two middle flaps, we will use to stick this on to the other cardstock to form page 3. Note: When I put this together I changed it and decided to make it a gate fold instead of overlapping flaps.
For page four, I cut one piece of cardstock at 5 1/4" x 3 1/4" and scored horizntally at 1/2"and 4 3/4". I cut the second piece of cardstock at 9 3/4" x 4 1/4" and scored horizontally at 3 1/4" and 6 1/2".

Fold and burnish the scored lines. This makes a fold out feature so to make it fold in neatly, cut about 1/8" from the end piece on the right which folds in. Then stick the flaps on to the other side to make page 4.

I also cut a piece of cardstock at 2" x 6" and scored horizontally at 2" and 4" to make a little fold out pocket for the last page. I rounded the edges on all 4 sides.

All that's left to do is to slide the pages into the hinges. Put double sided tape on the hinges and slide the pages in. I prefer to decorate my pages first so I know which side I want for the front and back and in case I decide to change the arrangement.
In my next post, I will show you how I decorated the pages and put it all together.
Till then stay warm and stay awesome.
Gina xx
What an awesome weekend project! Today Gina walkes us through her tutorial for making a 3x4 mini album... to be decorated very soon with all things Harry Potter!
This month's theme had me dancing all over the house. Don't know if I did the Hippogriff proud but the theme has been a whole lot of fun to play with :)
Since there are a lot of 3x4 cut aparts in the core papers, I thought why not make a 3x4 mini album. I will start with the base and the pages.
To start with I cut two pieces of chipboard at 4 1/2" x 3 1/2" and one piece of chipboard at 4 1/2" x 1 1/2". I cut a piece of Kaisercraft coffee bean cardstock at 7"x 12" and stuck the chipboard pieces in the centre of the cardstock with the 4 1/2" x 1 1/2" piece forming the spine of the book.The chipboard pieces need to be about 1/8" apart so that the book can open and close easily.

Once I stuck them down, I trimmed about an inch from one side of the cardstock as it was a little too long across. I then cut off the edges and put double sided tape as shown in the picture. Burnish all the edges before you try to fold them over so you can get a nice clean fold. The video might be a little easier to follow for those who are trying this for the first time. Once you have stuck the cardstock burnish the edges of the spine again to make it easier to fold the book closed.

Now on to the hinge. Cut three pieces of cardstock, one at 4 1/4" x 1 1/2", one at 4 1/4" x 2" and one at 4 1/4" x 5". Score the first two pieces vertically at 1/2" from both sides.

Fold and burnish the half inch flaps form the hinges of the mini album. I also like to cut off the edges of the flap at an angle to make it easier to slip the pages in. Lay them one on top of the other, and stick them on from smaller to bigger, making sure you centre them. Then stick the 4 1/4" x 5" piece in the centre of the book making sure to align the hinges so they are in the centre of the spine.

Put this aside for now and let's make the pages. I'm making four pages, one for each of the houses. For the first page I cut two strips of cardstock at 9" x 3 1/4". Score them horizontally at 4 1/4" and 8 1/2". Fold and burnish the scored lines as shown.

Add double sided tape to the half inch flaps on each strip. I like to cut off the ends of each flap to make an angle. Makes it neater when you stick them on. Stick each to the bottom of the other page so that you have the main page and then a flap that opens up on one side and down in the other. The picture should give you a better idea, but the video is easier to follow.

For the second page cut one piece of cardstock at 9" x 3 1/4" and one at 9" x 3". Score them both horizontally at 4 1/4" and 8 1/2" and burnish.

Score the 9x3 cardstock horizontally at 1/2" and burnish. We will then cut off the top and bottom flaps as shown in the picture so you have a flap from the middle. Cut the edges at an angle. This part is going to form a flip out pocket.

Put double sided tape on the bottom flap and a tiny strip of glue/tape on the right side of the scored line as shown in the picture. Also put a strip of double sided tape on the bottom flap of the 9x3/14 cardstock.

Fold and stick the flaps for both the pieces leaving the side flap untouched. Next put a piece of double sided tape on one side of the flap and slip it into the opening created on the other piece and stick it on. Make sure it is just on one side as we will also be putting a photo mat into the opening later once we stick the pages onto the hinges. I have also punched a half circle in the middle of the fold out pocket with my circle punch.

For page three cut one piece of cardstock at 9 1/4" x 3 1/4" and score horizontally at 2" and 6 1/4". Fold and burnish and round the edges of the flaps.

Cut another piece of cardstock at 8 1/4" x 5 1/4". Score vertically at 1/2" and 4 3/4" and horizontally at 2" and 5 1/4" and fold and burnish. Cut off all the 4 corners on the folded lines. The two middle flaps, we will use to stick this on to the other cardstock to form page 3. Note: When I put this together I changed it and decided to make it a gate fold instead of overlapping flaps.


Fold and burnish the scored lines. This makes a fold out feature so to make it fold in neatly, cut about 1/8" from the end piece on the right which folds in. Then stick the flaps on to the other side to make page 4.

I also cut a piece of cardstock at 2" x 6" and scored horizontally at 2" and 4" to make a little fold out pocket for the last page. I rounded the edges on all 4 sides.

All that's left to do is to slide the pages into the hinges. Put double sided tape on the hinges and slide the pages in. I prefer to decorate my pages first so I know which side I want for the front and back and in case I decide to change the arrangement.
In my next post, I will show you how I decorated the pages and put it all together.
Till then stay warm and stay awesome.
Gina xx

Loving this already, can't wait for the next instalment x
ReplyDeleteHugs xx
I can’t wait to see how you decorate!!
ReplyDelete