Saturday, January 31, 2015

Back to School with Kaisercraft's 2 Cool 4 School

Wow - and just like that we're looking at February! Where did the summer holidays go??

It's that time of the year down here in Aussie Land........the start of the new school year. So cute to see all the little new Kindy kids arriving at school. My 'baby' is in year 12 this year....that's 3 more terms and I won't be a school Mum anymore (yippeee). But I have to say, even though I don't see much of my boys now that they're bigger than I am (lol) I do miss the holidays.....not just having the 'kids' at home, but also the relaxed schedule that is School Holiday Time. Not having to rush about to get everything done between school hours, not having to do the school drop off and pick up....and getting extra time to relax, craft and bake!

What a great time to start on a School Album - whether your kiddies are just starting school or are about to finish and you have a stack of school memories to scrap. The Kaisercraft 2 Cool 4 School Collection is perfect for your school memory albums.

The papers are just brilliant...........


......the stickers, stamps and Collectables will add that little extra something........


 There's also a 12x12" paper pad of co-ordinating colours and designs........


And the pocket page scrappers haven't been forgotten, with two fabulous packs of Captured Moments 'School Days' cards - a 3x4" pack and a 6x4" pack......


And of course......an album to keep all your school memories in....


 Check out the KAISERCRAFT BLOG for come fabulous ideas on using this collection.


Happy Schooling!

Aunty Vera :)


Sunday, January 18, 2015

News from CHA Mega Show 2015 - Ranger Distress Colour of the Month

Hi Scrappy Bloggers!

Well, there's no longer any point calling them Sneak Peeks, as CHA has been packed away for another 6 months and all those great new products are on their way to distributors and, even better, to retailers! But we'll continue to bring you bits and pieces of fun information and news on new releases that we'll be stocking here at Aunty Vera's.

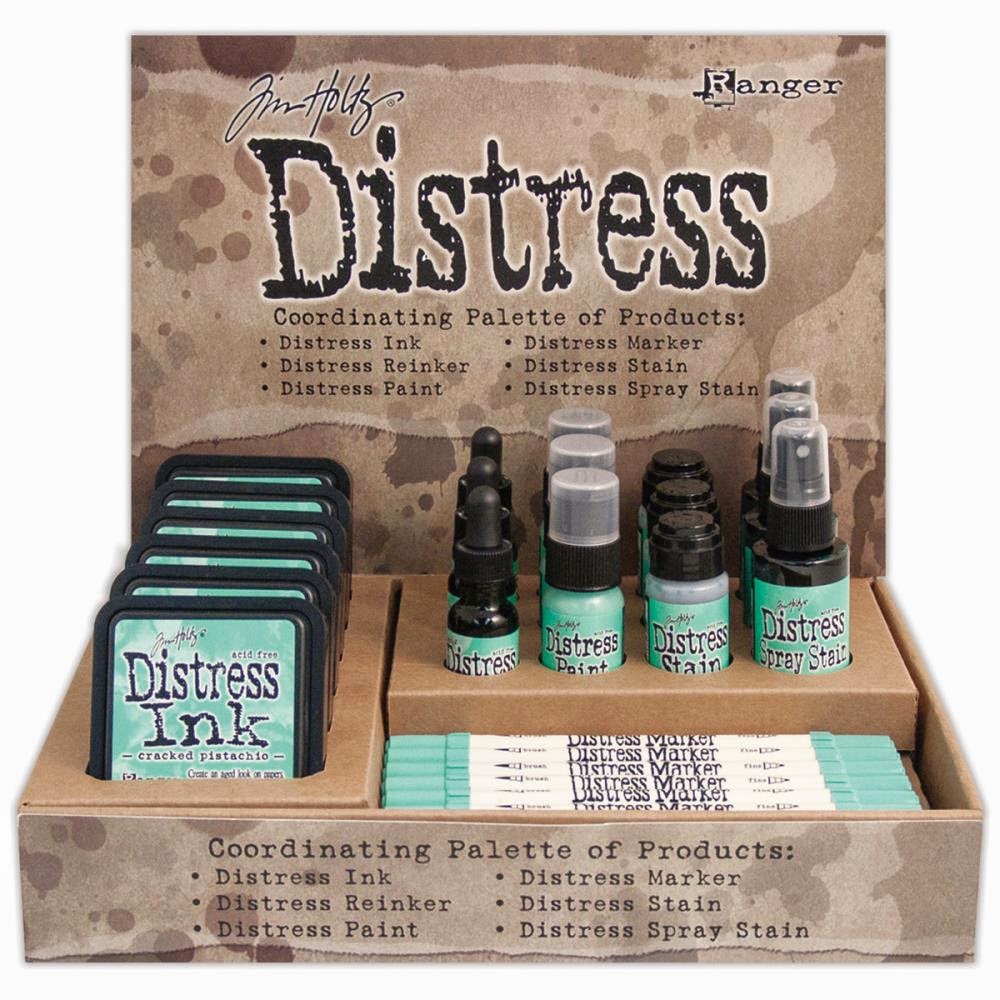
Distress! Yep, it's a word we all know and love, and Ranger will be releasing a new colour to the product line EVERY MONTH over the course of 2015! Each new Distress colour will be available in 6 products: Ink Pad, Reinker, Marker, Stain, Spray Stain, and Paint. What a fun way to build on your collection!!


January's colour is Cracked Pistachio. Doesn't it look just yummy!!!!!

We have ordered all 6 Distress products in this colour and expect them in-store early to mid February.

Keep an eye on our CHA Updates page for more CHA news and arrival dates.
And if you haven't registered on our website yet - do it NOW!. Newsletters are going out this week with instructions on how to pre-order your January Distress products!

Enjoy your weekend!
Aunty Vera :)


Tuesday, January 13, 2015

Tuesday Tutorial with Amira - Spellbinders Shapeabilities "It's a Hoot" Cards

Hello Scrappy Blogers! Today's post comes from our Guest Designer Amira from Handmade in Oz. Amira will be taking over the reigns and with a brilliant tutorial on cardmaking with Spellbinders Shapeabilities dies.......


Happy 2015 to one and all. My name is Amira and I have been an avid customer of Aunty Vera's and along the way, Vera and I have shared our art and craft together, as well as lots of laughs about kids, cats and life in general. I was elated and honoured when Vera asked me to be a guest designer on her blog :) I hope to bring you tips, tricks and ideas on new products that I absolutely love and think are...well, Fabulous!!

So, to kick off January, I thought I would bring you 4 different ways of using the new Spellbinders "It's a Hoot" Shapeabilities Decorative Card Fronts.


These Shapeabilities have the unique quality of being able to cut, emboss and stencil.
You get 2 dies in the pack:
- A border that measures 4.25" wide x 5.25" tall (10.8 x 14 cm)
- An inset that measures 3 7/8" wide x 5 3/16" tall (9.8 x 13.2 cm)

I love these card fronts because you can do ao much with them. here are a few ideas:

Style 1: The Lazy Crafter's Card

So the easiest way to use this die is to die-cut the inset and slap it on some patterned paper and boom instant card.


But since I'm here to give you insiders' tips and tricks let me start by saying that several tools become your best friends when using this die.


Otherwise, you will get something that looks a lot like this and go into "Craft Angry" mode.


However, when done right, even the wax paper gives the most delightful of die-cuts.

Ok, so on to the lazy card. You can choose to die-cut straight onto your card or a piece of cardstock to then attach onto your card (as above).


Here are a few card looks I came up with using various patterned papers. I must say I do like this one as well with the kraft cardstock:


Style 2: Making your own background.

For this look, I desided to make my own blue sky background using Distress Inks Broken China and Mowed Lawn and a nifty home-made cloud stencil I fashioned myself. The background it produces works without fail everytime. It's my favourite go-to background of all time.


I made a maroon coloured frame to go around the background, then put foam dots on the corner of the owl inset as well as on some owls to give them a more dimensional effect. I think the card turns out really nice.


Here are a few more ideas I came up with for making your own background.

1. Spray ink with Clear heat embossing (I do love the black owl inset).


2. Distress Ink blended background with gold heat embossing (leaf stamp not pictured).


Style 3: Partial use of the die.

You can always just use part of the inset to design your card the way you see fit.
In the following card on the left, I left out the bottom row of owls and instead chose to fussy cut the flowers in the lower right hand side of the card. I also added a solid red banner which can be used to display the sentiment and embellished it with a single cute wood ladybug.


For the card on the right, I removed the middle row of owls and inserted a panel of patterned paper. I then added a label with some brads and I used one of the owls as an embellishment piece along with a red heart. Cute! (I also added glitter which was still wet when I took the pic which explains the high sheen).

Style 4: Embellishing the owls.

I must say this was my favourite technique and produced some stunning results.

1. Use of flower soft as owl feathers - here I coloured the inset with Distress Marker (Tea Dye) and added Stickles to the background to imitate a starry night sky.


2. Embossing the owl inset with an embossing folder and then die-cutting it to produce a textured look.


Here is another card:


You can also emboss the background with an embossing folder through your die-cut machine and use heavy weight patterned paper to produce this look. I really like it!


3. Using Perfect Pearls to decorate and embellish the owls -

For this card I coloured the frame of the inset with Mowed Lawn and the owls with Distress Marker Tea Dye. I placed the inset against black cardstock embossed with a stars embossing folder. I then applied glossy accents in 'blobs' on each owl and applied Perfect Pearls to give a beautifully textured card.


4. Using Liquid Pearls to decorate and embellish the owls.

For this card, I used my scalloped scissors to go around the edge of the inset to give it a different look. I then decorated the owls using gold Liquid Pearls. I then placed the inset on a background that was sponged Scattered Straw and my newly discovered Pearlescent DewDrop in Orchid shade. I then stamped the background with a star stamp and versamark ink and then heat embossed it.


And lastly, this has got to be my favourite. I fussy cut the leaves from a little stamp I have and coloured them with two tones of Faber Castell green. I then punched out little flowers and arranged them on the branches. Lastly, I added glitter rocks to the centres of the red flowers. This is cute!!


That's a wrap folks. I hope you have enjoyed my card ideas and that your creativity juices are bubbling and flowing. Thank you so much for stopping by. I would love to hear your comments and am more than happy to answer any questions below. Wishing you a Fabulous Day!


Monday, January 12, 2015

New Week, New Year, New Look!

Hi Scrappy Bloggers!

I know we're now half way through January, and the year is threatening to rush past again the way 2014 seemed to do, but here in Aunty Vera Land, we're just coming out of holiday mode, dusting off the e-shelves and bringing you some new and exciting changes!

Firstly, don't worry, we're still the same Aunty Vera online store....bringing you the Latest and Greatest in scrapbooking and papercraft as well as taking custom orders for items that you may not find in our store. yes, we're always happy to order in special goodies that we've neglected to stock :)


We're following the CHA 2015 Mega Show (online unfortunately, but attending in person is on the Big wish List) and you can keep up to date with our pre-orders and expected arrival dates via the CHA Updates page on our website.


We're updating our website and while everything still works as it should and you can purchase the latest goodies without issue, you'll soon start to see some changes.....new logo, new look website, and lots of great new products!

We'll also be introducing our new Guest Designers and Product Testers right here on the blog.
Begining tomorrow with Amira from Handmade in Oz. Amira will be hosting a fabulous Spellbinders card-making tutorial so be sure to check back in - you're going to love it!


\


Join in the fun! Join us on Social Media!!

Are you on facebook? Follow our Aunty Vera Scrap and Craft page and be the first to know when new products arrive, as well as keeping up with papercraft news, ideas and more!
Join our new facebook group - Aunty Vera and Friends - and share your projects, tips, stories....or just have a chat with other crafty friends :)

We're also on twitter and - for the visually minded....like me lol - on pinterest!

It's going to be a great year and we look forwards to sharing it with you.

We hope to see you soon and have a chat.
Aunty Vera :)


Sunday, January 11, 2015

CHA 2015 Mega Show Sneak Peeks - Tim Holtz Idea-ology

It's not Peekin' Time without a new trunk full of new Idea-ology products!
This year's new releases cover a few different themes with some wonderful products to inspire your creativity.

Papers and embellies for the world travelers......


Old photos and gathered ephemera........


New stickers and Remnant Rubs.... (and a rub on tool).......


Trinkets and found objects to add that special touch to your projects.......


New surfaces to play with.......


And new ways to fasten and display your creations........


New Idea-ology expected to arrive mid to late March.
Keep an eye on our CHA Updates pages for news and expected arrival dates.

Have a wonderful weekend!
Aunty Vera :)


Related Posts Plugin for WordPress, Blogger...