Saturday, August 31, 2019

Dance Like a HippoGriff - Donna's Harry Potter Mini Book

Hello Crafty Friends!
I just love mini books and Donna's HP booklet today is just magical!
Please enjoy our final Harry Potter themed project for 2019......


Hi all,
You have to love all the projects I have been creating this month with Aunty Vera Scrap and Craft. 
It really is a toss up between Cooking and HP, which I love the most.. 

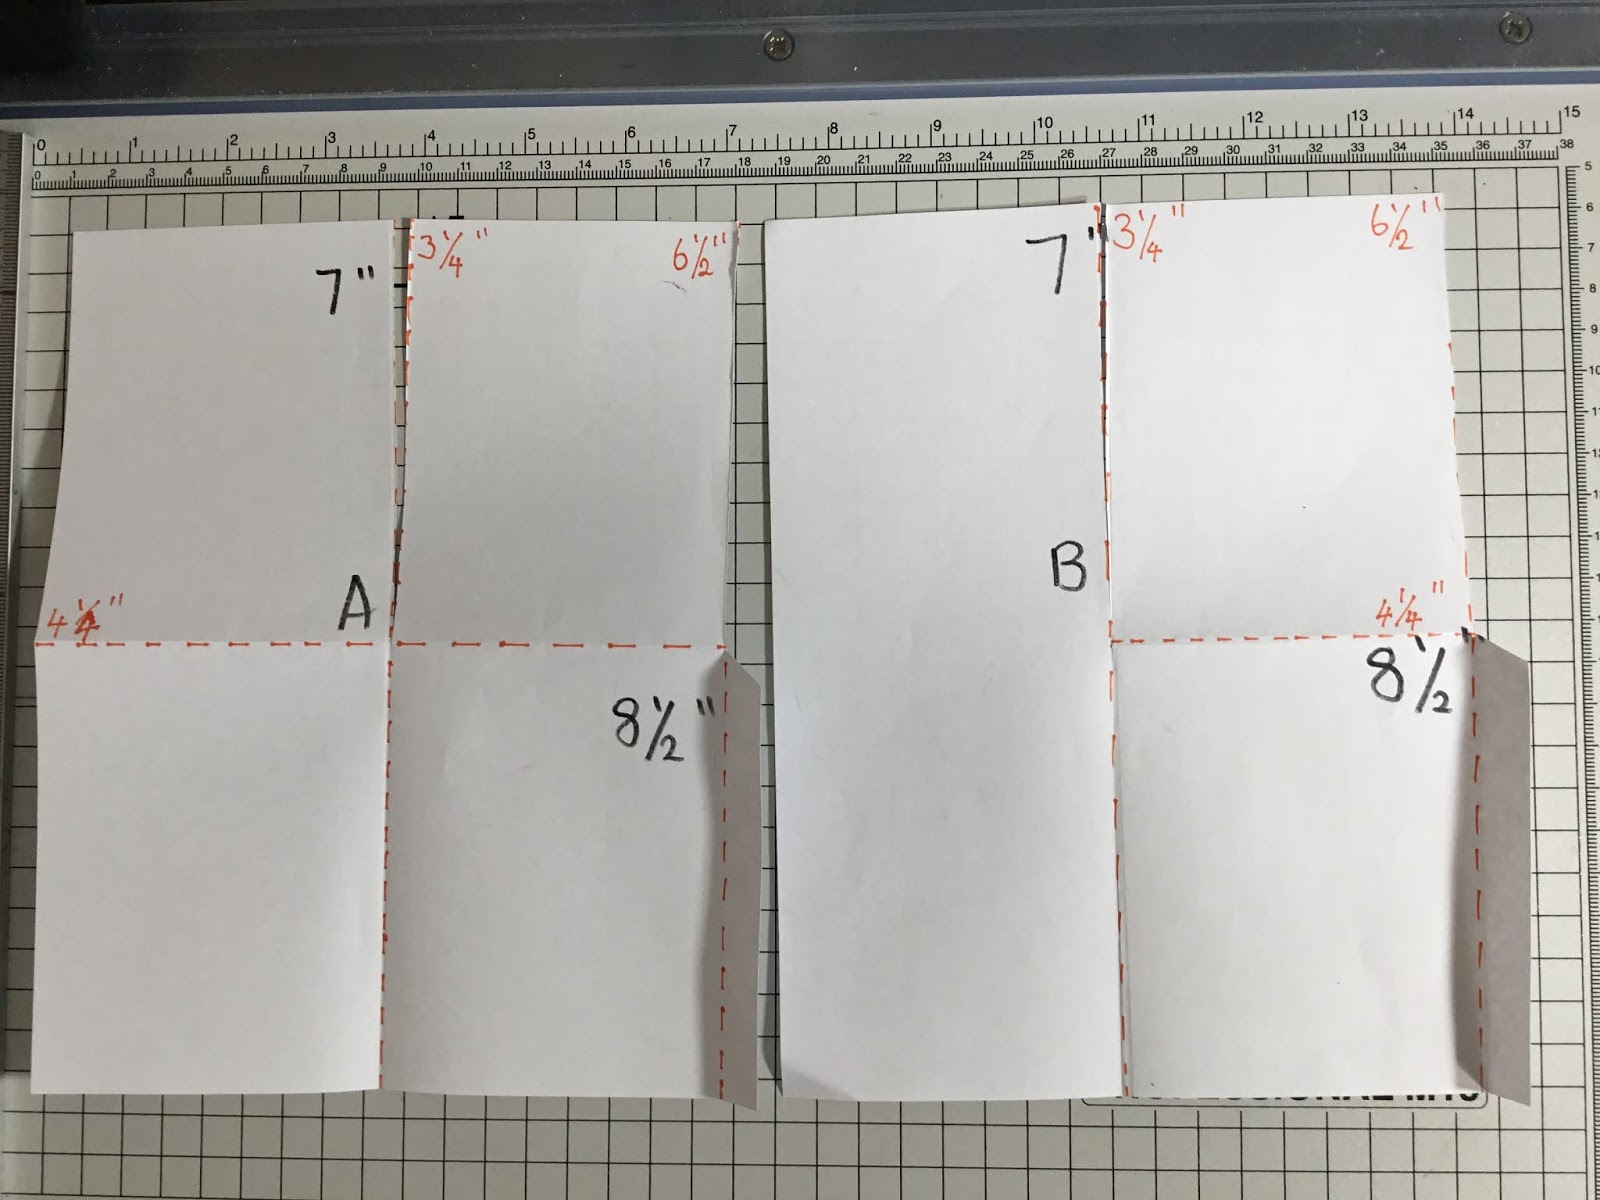
I decided to make this little booklet using the stamps and some of the glorious papers I received. 
You can see instructions here on how I created this..

All items used on this booklet are listed at the end of this post, please click on the links to take you to Aunty Vera's shop..


These are what we call cut-aparts, They come on a 12 inch x 12 inch piece of paper and each one measures 3 inches x 4 inches.. This is the selection I choose for this booklet..


I stamped assorted papers with the Noted stamp set and Archival Black ink and fussy cut them. 
I then inked around each one with brown ink.. 


Using a strip of paper I created a spine to neaten the edges up.. I made a belly band to keep the booklet closed and how appropriate was this sticker from the sticker sheet.  


My favourite cut-apart 'Never Stop Looking Up'. Love this!! I painted the moon with Dimensional Magic Gloss to give it some shine.


You have to agree, that washi tape is GLORIOUS!! . 


I love these stamps and can see myself using them heaps.. 


I have a tee shirt with this on it, (can you tell I am a fan?). Did you notice the bling on the row of diamonds or the bird..


How brilliant do these look together.


Now everyone knows that Ron loves his candy Right?? I placed two of the pearls on his eyes and haven't decided yet if they are spooky or not lol.


In the looking glass, I wonder what we see!! Did you see the gold pearls?  They are brilliant..


Love how this turned out.. Stamps and fussy cutting does wonders.. 


I fussy cut the little windows out of the reel and place a gold sheet from the papers behind it.. 
The stamped book is fussy cut from a brown piece of paper and then again from the grey. 
I cut the two grey pages and glued them down only in the middle and 
curled the pages a little. (it is hard to see here). Love love that ruler..


Though this photo has not picked it up well, the whole piece of cut-apart is covered in glitter. 
I also darkened the shadows to make them stand out more.. 


Back of the book and if you look closely, you will see what a HippoGriff looks like... 


I love this little booklet. Simple but magical all the same..


The booklet and cards together..


I hope I have inspired you
to create glorious things.
Hugs
Donna xx

Products are:

Harry Potter Papers - Paper House 
Harry Potter Die - Hogwarts Castle 
Paper House Washi Tape pack - Patronus
Paper House - Harry Potter Sticky Pix Faux Enamel Pin Stickers
Tim Holtz Idea-ology - Vignette Set - Divided Box
Kaisercraft Die and Stamp Set - Noted
Ranger Mixed Media Powder - Hammered 

You get a great discount on all products used by the Creative team this month..


You can purchase the items HERE
and check out the facebook group Crafty Vera and Friends to see everything the Creative Team will be creating throughout August
.............................................................
My FaceBook page Donna's Fun Stuff HERE 
My Pinterest page Donmaree HERE
My Youtube Channel HERE
My Blog HERE
And don't to forget to say hi on Instagram donna.triffitt

Friday, August 30, 2019

Dance Like a Hippogriff - Gina's Slides, Postcards and Specimen Bottles

Hello Crafty Friends!
I love Gina's project today!! Special bits to put in her Magical Beasts inspired Hufflepuff suitcase! Those speciman jars!!!!! And the slides!! Totally on my list!


We are almost at the end of a surprisingly warm August and all the Harry Potter memes. Today I am making some items to go in my Hufflepuff suitcase.

I started by playing with my Tim Holtz entomology dies. I cut out some of the insects on paper serviettes, tissue paper and I also used the Entomology paper from the Kaisercraft anthology collection to cut out some butterflies and moths.


Some of these insects I used to make slides. I got this idea from watching Jibid Neary on youtube and have been making these for my journals ever since. To start, cut a piece of chipboard at 2 1/2" x 3". Then I cut a square into the chipboard 1/2 an inch from the top, 0.3 inches from the sides and 1 1/2" in length.


I used some paper from the Kaisercraft Anthology 6x6 paper pad to cover the front. I then stuck a piece of acetate to the back, stuck a butterfly I had cut out on tissue paper in the centre and stuck another piece of acetate over that. I used the same Anthology paper to cover the back as well. I inked the edges of the paper with my Tim Holtz Antique Linen distress ink.


I then rounded the edges and added a piece of a sticker from the Kaisercraft Anthology sticker sheet at the bottom to look like a specimen number. I inked the edges of the sticker sheet with my Antique Linen distress ink too.


And here are some more slides that I made.


Next the postcards. As you have probably realised by now, I'm a serial cereal box collector. I cut one of my cereal boxes into 4x6 cards and stuck the map card from the Paper House Harry Potter Hufflepuff Paper and the Castle card from the Paper House Harry Potter Ravenclaw paper onto them.


I rounded the corners and inked the edges of the castle card with black ink and the map card with my Antique Linen. I drew a line in the centre of the card. On the left I used a stamp from my stash to stamp the top and on the right I drew three lines at the bottom and used the lovely postage stamp washi that Aunty Vera sent me for my birthday for the stamps.


I made 2 more postcards using the triangle card from the Paper House Harry Potter Slytherin paper and the Platform 9 3/4 card from the Paper House Harry Potter Gryffindor paper.


And now for the specimen jars. I used some bottles from my stash and put the die cut insects in them. The bee was the perfect size as it seems like its flying in the bottle. I also added some sand to the bottles with the beetle and the moth.


The scrolls in these bottles were made using pieces of colour paper rolled and inserted in a jump ring.


I filled my poison bottle with black sand and used one of the brads from the Eyelet Outlet brad skulls which I stuck on the front, after cutting off the ends.


I had some envelopes in my stash which I thought would go perfectly in the suitcase. I used the seal sticker from the Reminisce Wizard 102 sticker sheet on two of the envelopes.


I had a little package of wrapped postcards in my stash which I put in one of the suitcase compartments. Here is everything placed in the suitcase.


I hope you enjoyed creating along with me this month and see you again sooner than you think.

Till then stay awesome!
Gina xx

Wednesday, August 28, 2019

Dance Like a HippoGriff - Tina's Harry Potter Pop Up Box Cards

Hello Crafty Friends!
This has been such a fun month - I'll be a bit sad when it ends.
Today Tina shares her final Harry Potter project with us... and I'm in LOVE!!!


Hello everyone, Today I have made two Pop Up Box Cards. Another first for me.


Start by cutting the card base in black cardstock as shown below (image below is with white paper for the purpose of this tutorial).


Score as shown below.


Because I wanted the back to stay upright, I did not score all the way on the B piece.
Cut and fold along the score lines as shown below.


Here is what it will look like in black cardstock.


Glue the thin flap from the right side of the A piece to the left side of the B piece. I added some blue textured cardstock on the parts I wanted to decorate, which will be the flaps that fold down except for the back piece which will stay upright.


Here is the other side which will be the bottom half of the card.


I cut out the image I wanted for the back piece slightly smaller than the blue cardstock and inked the edges with Distress Ink - Black Soot, (I did this to all the patterned pieces).
I then cut a circle around the moon and used one of the Sizzix - Tim Holtz Alterations - Dimensional Domes - 1.5'' - pk of 12, and filled with Little Birdie - Sequins Melody - Blue Dazzler. I glued the dome shaker piece down and then the rest of the image in place over the top.


Glue the other pieces which will be upside down so when the flaps fold down they will be the right way up.


The other side.


Join the sides together to make the Box Card.


Cut two pieces of black cardstock measuring 4 1/4'' x 1'' and score 1/2'' on both side sand fold.


Glue these to the inside left and right sides of the card.


I finished the card with the images I fussy cut from the papers.


I decorated the second card with some of the washi tape, sticker from the sticker sheet and one of the Tim Holtz Assemblage Charms - Glass Vials which I filled with Little Birdie - Mixed Media Stones.


Finished cards.


This month I tried a few projects that I have never made before as well as watching the Harry Potter movies for the first time and I enjoyed all of them. Here are my projects for this month.


I hope you enjoyed these projects.

Here is a list of the products for this month.

Core Products
Paper House - Harry Potter 12 x 12 double sided gold foiled paper
Reminisce - Wizard 102 12 x 12 double sided paper
Paper House - Harry Potter Washi Tape Pack - Patronus

Chosen Products
 Paper House - Harry Potter Cardstock Stickers - Harry Potter
Reminisce - Wizard 101 - 12 x 12 Sticker Sheet
Sizzix - Tim Holtz Alterations - Dimensional Domes - 1.5'' - pk of 12
Sizzix - Tim Holtz Thinlits Die Set - Regions Beyond 
Paper House - Harry Potter - Sticky Pix Faux Enamel Pin Stickers
Tim Holtz Assemblage Charms - Glass Vials
Tim Holtz Idea - Ology Foundations - Box Feet - pk of 4 

All the products listed can be purchased HERE at a discounted price

Thank You and Happy Crafting
Tina xxx
Related Posts Plugin for WordPress, Blogger...