Friday, November 30, 2018

Can't You Hear the Thunder - Suzanne's Australian Shadow Box with Mailbox

G'day Crafty Mates!
Wow.... can you believe that today is the last day of November! I know I say this every month but seriously!!
Today Suzanne wraps up our month of Aussie Crafting with a perfect Australian project....  a shadow box and mailbox that just sings Aussie Bush!!


Hello everyone. My final project with the November kit from Aunty Vera was probably the most fun to make.  I do love to get messy and to try out different things and for this project I made a 12 x 12 shadow box with a difference. 

I started out with a 12 x 12 shadow box from Tiddleybitz  (got it from the op shop)  which I had to construct and then paint.  I used some green paint from Kaisercraft in a lovely shade of olive green to match the papers from Kaisercraft that are in the kit called the 'Open Road' collection.


I then used the full sheet with the dirt road and gum trees for the feature of the shadow box and I decorated it with several stickers from the sticker sheet and  a couple of boomerangs from the wooden elements from Kaisercraft.


I then made a mail box and a farm name sign to go with my shadow box.
I used a cardboard cylinder and hot glue to make a tree stump and then painted it with varies shades of grey paint


 I made a mailbox using the corrugated tin paper from the collection and made a parcel, a newspaper and some letters to go inside the mailbox and glued it to the top of the tree stump.


I also made another post for the property name sign that I painted with the nuvo crystal drops and hung a sign with the name 'Coolibah"


I them hot glued them together and added some plant life to the bottom to hide the hot glue.


I think that together the two pieces are just so much fun and I am really enjoying them in my craft room. 


Thanks so much for having a look at my project and I hope you enjoyed it.

You can take a quick look at a short video showing this project HERE.
You can get the kit from Aunty Vera HERE.

Thanks and bye for now
Suzanne xoxo
Wednesday, November 28, 2018

Can't You Hear The Thunder - Tina's Australian Christmas Ornaments.

G'day Crafty Mates!
I have to admit... I had a small panic attack the other day when I realised that this coming Saturday is.... DECEMBER!!!!!! How did THAT happen??? (though I feel like I have said this many times tis year).
Our Aussie CT projects are almost done - we have one for you every day now till the end of the month. Yes. Friday. And then we'll be Christmas crafting through December. So what a great project from Tina today! A bit of Aussie and a bit of Christmas - I ADORE her glittery Aussie Christmas ornaments!!


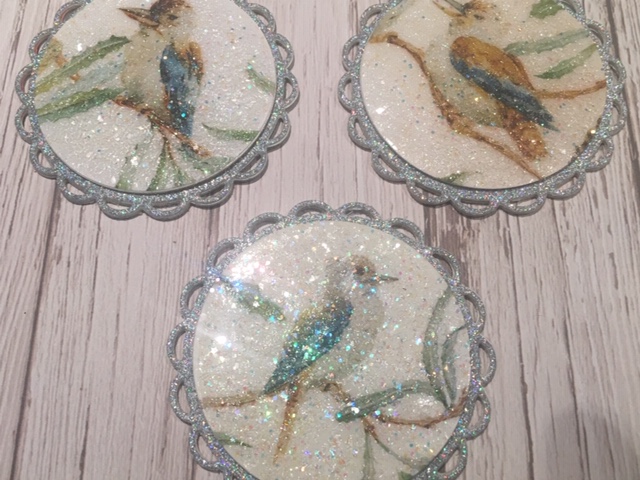
Hello everyone. I hope you have all been enjoying this month's projects. I just love Amira's Australian Traveler's Notebook and Suzanne's Australian Pocket Letter. For my last project of the month, I wanted to lead into what will be an exciting month of Christmas crafting in December. I have made three Christmas ornaments featuring the beautiful paper from the November kit. This is an idea I found online but I have made a few changes to make them my own way. The paper I used was the 'Uncharted' sheet.


I used two circle dies, one with a scalloped pattern and a slightly smaller plain circle. They can be any size you want.


I cut six pieces of white Cardboard I used the front cover of my watercolor paper pad, (which are great for these type of projects). I also cut six pieces in silver glitter paper. All these were cut using the scalloped circle die. I then cut three of the Kookaburras with the plain circle die.


I decided to cut another six pieces of the white cardboard in the plain circle die to give the Ornament greater dimension.


For the base of the ornament, glue two of the cardboard pieces together, white side on the outside. When dry add the two glitter pieces on the front and back. Glue the two pieces of the plain circle pieces together, again with the white side on the outside. Add the Kookaburras and leave to dry thoroughly.


Next cover the Kookaburra pieces with Ranger - Glossy Accents.


While this is still wet add Glitter. Now when I say glitter I really mean glitter and lots of it. I used some of each of these and I was really generous with the Twinklets Diamond Dust ( I love this so much).


They need to dry for a few hours but overnight is best. In the image below the Glossy Accent is still wet. When it dries the image will be clear and super sparkly.


A few hours later.


Once dry, I glued them on to the silver bases.


They are really sparkly!


I added 16mm flat back glue on bails on the top. I also added a string of beads on the bottom.


Finally I added silver metallic twine to hang on the tree.


I love how they glitter and sparkle against the tree lights.


I hope you enjoyed my Christmas ornaments and look forward to returning for a wonderful month of Christmas crafting in December.
Thank You and Happy Crafting
Tina xxx
The November Kit can be purchased HERE

Monday, November 26, 2018

Can't You Hear the Thunder - Suzanne's Aussie Pocket Letter

G'day Crafty Mates!
I love pocket letters! And today Suzanne has a beautiful Aussie themed pocket letter to share with us.....how perfect is the Open Road collection for this kind of project?! And that gum leaf dangle has me swooning!!


Hi everyone.  For my next project, I have made a very quick and simple Pocket Letter with the gorgeous Open Road collection from Kaisercraft which is in the November kit from Aunty Vera.  I used several of the earthy toned pages as the background and then used the cut a part page and Collectables to decorate the front of the pocket letter.


I have also added 'Australia' to the front of the pocket letter using some chipboard letters which I painted with the Nuvo Crystal drops from the kit.

This is the top and middle row of the pocket letter


This is the middle and bottom row of the pocket letter


 I used the beautiful images of the Australian Native plants to decorate the back of the pocket letter and the beautiful washi tape to decorate the side of the pocket letter.


 I used my enamel embossing powder to emboss some gum leaves and gum nuts to make a dangle for the side of my pocket letter


 Here is my very simple pocket letter. It was a lot of fun to make, so I think I will definitely be making another one very soon. 


 Thanks for taking a look at my project today.
Suzanne xoxo

You can watch a short video of this project HERE.
You can get the kit from Aunty Vera HERE.


Thursday, November 22, 2018

Can't You Hear The Thunder - Tina's Australian Animal Playtime Set.

G'day Crafty Mates!
Tina has a fun Aussie Animal project for us today...... what a brilliant idea and wouldn't this be such a perfect Christmas present to make for a little one who loves animals?!


Hello everyone, I'm back today with a little  project using the stamps from the kit. This was a fun project for my little grandaughter, who just loves animals. The project I made is a Felt PlaySet.


I started by stamping the images and then colouring them with my Touch Five Markers.


I used the matching die set (from my own stash) to cut out all my stamped pieces.


I then used the dies to cut pieces in soft felt.The felt pieces are then glued on the back of the stamped pieces.


Next, I used stiff felt for the base. I used blue and green that I cut to fit a piece of Canvas Panel, this makes the base strong and easy to play with.


The pieces stick to the board so easily. 


The picture below shows how well the pieces stick to the board even while upright.


I hope you all enjoyed this project.
Thank you and Happy Crafting.
Tina xxx
The November kit can be purchased HERE
Related Posts Plugin for WordPress, Blogger...