Saturday, March 31, 2018

Hippity Hoppity - Sarah's Gatefold Folio And Surprise Giveaway

Hello Crafty Friends!
I hope all our Crafty Peeps are having a lovely Easter Weekend... and finding some time to do a bit of last minute Easter Crafting. 
Today Sarah creates a fun Easter Folio... just perfect for keeping your special Easter memories.
And be sure to read to the very end of the post...... Sarah has a surprise for us!!


Hello everyone! Sarah here, ready to share my final project of the month using the May 2018 Hippity Hoppity Kit. This fun folio really showcases the Echo Park Hello Easter paper collection and Ephemera Die Cuts.

To start with, I cut my base out of black card stock. The folio measures 8" x 6" when closed, so I just cut off the bottom of a 12x12" piece of card to 8" and then folded the sides in to the middle.


Next I got to work on the inside of my folio. I decided to make the ride hand side a waterfall feature. I cut extra black card stock to 2.5" x 4.5" to fit the width of the right hand column. Folding the tops down 1/2", I then used a corner rounder to give a slight decorative border on the bottom corners. I then used the 3" x 4" journaling cards from the paper collection and matted them on to the black card stock. I had to cut these down a little bit to fit, but I just chose cards that you can still see the sentiment and images on.


I then stuck down these pieces on the right hand side of the folio, sticking only the 1/2" flap down one under the other to give a waterfall effect.


When they flip up you can see the underside of the cards too, doubling the space for sentiments, journalling or photos.


Underneath the waterfall I stuck down a piece of card from the collection as a journalling spot and included this cute sentiment from the ephemera pack on the bottom.


With the right side finished, I moved on to the centre of the folio. Here I cut a piece of paper from the collection to fit and then made a pocket on top. I wanted the feature here to be a belly band, but as the base was so large it didn't quite work. Instead I made the sides using a strip of paper from the collection and then stuck this ephemera piece on top, sticking the bottom down to create a pocket. Now it's a pocket that acts as a faux belly band. 


For the left hand side of the folio, I kept it simple and made two little pockets from the paper collection. I then put in two of the tags from the ephemera pack, that stick out nicely from the top of the pockets.


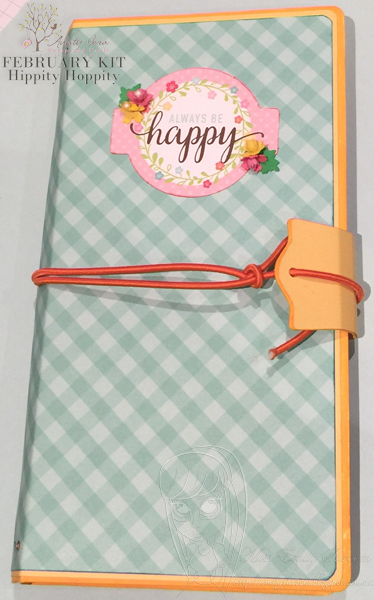
To finish the folio off, I matted some co-ordinating paper onto the front, and added a strip of bunnies on the bottom, which you'll see in the next photo. For a closure, I found these two buttons from my stash and used twine to wrap around them. First, I hot glued the twine to the underside of the pink button. Then I used 3D tape to stick the buttons down so that they are raised up, and wrapped the twine around them to close the folio.


And that's this project done! You can see the finished outside of the folio here.


And here is the inside.


SURPRISE!! 

As a special Easter treat, one lucky reader has won this folio. We randomly selected one person who commented on a blog post this month, and the winner is.... Deb Speijers!


Congratulations! I'll be sending this project out to you next week. I hope this was a nice surprise for you, and that you enjoy using this folio to store your Easter memories.

Have a lovely Easter everyone!

xx Sarah xx

........................................ 

BUY Aunty Vera's Monthly Kits HERE

March monthly kit is available for $57.45 which is a saving of 20% on buying the items separately.

Postage is $9.00 anywhere in Aus. 
For internationals, please email for accurate prices.

C O N T A C T:

 ................................

Check out my instagram HERE or @snapshotscribbles

See my Youtube Channel HERE

And let me know if you'd like a video tutorial of this project.

 ................................

Thursday, March 29, 2018

Hippity Hoppity - Emily's Spring File Holder and Journal


Hello Crafty Friends!
The best thing about purchasing Easter collections designed in the Northern Hemisphere is that they tend to have a Spring theme running through them as well as the Easter theme. So when you've used up all the Easter 'bits', you pretty much have a whole other collection to play with!
Today Emily does just that - creating a gorgeous file holder and journal set from the Spring elements in our March Kit....


Emily here with my final project with the super fun Hippity Hoppity kit from Aunty Vera.  I’ve made a file holder and matching journal cover.  I saw the file holder die and had to have it and Vera kindly got it in for me.  When I was picking it up Vera had a pile of the journal dies and, well, I just had to have it too!

I wasn’t sure what to use to make these but Vera had some MatBoard from Sizzix so that’s what I used.  I have to say I’m not in love with it but I might just need more practice.  I hadn’t used the dies before or the mat board so it could all be user error but the joints tended to crack and adhering the joints was also problematic.


But here goes with how I put them together anyway.  I started with the file holder, gathering all my papers and inks.  The papers in the kit can work for Spring or Easter so I’ve gone with a Spring theme for this set.  I cut the base in one go as the mat board is big enough, I had to do the papers in separate parts as the die is over 12” long.  I cut two in the yellow from the HelloEaster Solids Set of papers and then another one in my designer paper.


Once I had all my parts die cut, I trimmed down the yellow and the designer paper to give a small border to both.  I then set about inking all my edges, yellow round the base and the plain paper and the aqua colour on my designer paper, using the inks from the kit.
 

I figured it would be easier to layer all the pieces before I assembled the file holder but remembered not to do the final inside one to hide the tabs under it.  Not that you can really hide them when they are so thick.  I found the base particularly cumbersome with the various tabs, it ends up really bulky, so I’m going to try making the holder again using a thinner material.


To decorate the file holder I tried out the new Kaisercraftfoam Vera has.  I’ve used other flower making foam before, this one is much the same but maybe a bit thicker.  I got really lazy and didn’t heat this one, I just used my shaping tools and stretched it out with them, I didn’t have a single tear, which makes me think this stuff is thicker


I cut one larger flower, using a cherry blossom flower die from La-La Land Crafts that has three different sized dies, out of Tulip coloured foam.  The top right of the next photo shows the three flower pieces, which I shaped and inked a bit with the pink ink from the kit.  I poked a hole with a pin and threaded through a pearl stamen I had in my stash for the centre.  I then just layered up the flower pieces to get the flower pictured in the bottom right.


I used another La-La Land die, Autumn Leaves, to cut some leaves from the Leaf foam and some smaller flowers from the Daisy foam.  For the smaller flowers I used two of the same sized petals but one I stuck quite closely down on the stamen to create a centre.  I think the flowers turned out quite nicely.  To finish of the file holder I added in the label frame that comes with the die.


With the file holder done I moved on to the journal cover.  I had enough of the same designer paper left to do the outside of the cover.  My steps were basically the same as the file holder, one from the mat board for the base, two from plain paper and two from designer paper.  


For the inside I used the same pattern but in pink and teamed it with some aqua plain paper.  More inking of edges and then adhering the layers before putting the journal cover together.  I really should have adhered the layers using something like Jak paper, which I was going to do, but I couldn’t find my Jak paper.  Take it from me, find yours before you do this or else buy some before sitting down to start your journal!

One of my pieces of green check paper wasn't quite wide enough but this got hidden in the spine.  I used the red line tape Eileen Hull recommended, as you can see in the photo.  It's then an easy thing to line up the holes to adhere the two spines together.

To decorate the journal cover I picked a piece of ephemera from the set in the kit that had a great sentiment.  I made some more small flowers and leaves and finished off with some bright orange cord to close the cover, using the included tab closure from the die.  I haven’t strung the actual cover yet as my cord is way too thick, rooky error that one, buying cord without first checking the size of the hole you need to thread it through!  When I finished I tried to put the journal inside the file holder but it doesn’t quite fit, not sure if it’s because of the thickness of the mat board.


Despite the issues I had with them I really do like these two dies and the set I’ve made.  I had a blast playing with this month’s kit and hope you will too!


Thanks for checking out my project, please come visit me over at my blog.

Monday, March 26, 2018

Hippity Hoppity - Sarah's Mini Easter Top Hat

Hello Crafty Friends!
It's just not Easter without an Easter Hat Parade! And who says kids should have all the fun?? Today Sarah creates an adorable mini Easter top hat that looks great as a fun head piece or could even adorn your Easter table!


Hello everyone! Easter is just around the corner and I figured I needed to make something super Easter-y this week. I'm not sure if anyone else has ever made an Easter hat, but it is a long standing tradition in most primary schools in my small town. Each year the dollar stores fill up with chicks and bunnies, styrofoam eggs and fake grass, all of which is designed to decorate a hat to be worn in the Easter Hat Parade. While I can't guarantee any parades at the end of this post, there might be a sneaky pic of yours truly wearing a handmade mini easter top hat. 

To start with, I used some nesting dies to create the first two pieces of the hat - the top and the brim. While circle dies would probably be easier to use, ovals was all I had, so I made it work. If you don't have any nesting dies you could cut circles using cups, bottles etc as templates.


For the third piece of the hat I cut a strip of co-ordinating paper (both of these come from the Hello Easter Collection). I eyed the width based off how tall I wanted the hat, and then cut the length 2.5 times as long as the length of the oval that will be used for the top of the hat.


Next, I scored the edges of the strip at 1/2" and cut triangles out along the edge to form tabs.


If you're making one yourself, you'll need to fold the tabs in opposite directions like this.


Fold the strip into a cylinder to fit the size of your top hat and glue the outer flaps to the underside of the brim. You'll also need to glue one end of the strip to the other.


Next, glue the inside flaps to the underside of the top piece of the hat. The inside of the hat should look something like this.


Turn it over the right way and you'll have a hat!


I found piecing this together a bit fiddly but it's so cute it's worth it. It's even cuter with decorations! I decided my hat needed some bunny ears... so I cut the ears off this little bunny from the cut-aparts in the collection.


After cutting slits in the top of the hat, I stuck the ears to the underside and was left with cute little bunny ears for the top of my hat.


I then decorated the bottom using some of the embellishments from the Hippity Hoppity Kit. I love this Easter Grass Washi Tape so much that I used it again on this project. I then layered a bunny on top cut using the Cottage Cutz Rabbit Die.


I also tied some of the Baker's Twine from the kit around the bottom, and added a sentiment from the Hello Easter Ephemera Pieces.


And that's the finished hat!


You could glue an elastic string or hair clip to the bottom if you like, or just secure it on using bobby pins.


I may not be as cute as I was in primary school, but the hat looks pretty great!


I hope you've enjoyed this project. 


Bye for now!

Sarah xx

........................................ 

BUY Aunty Vera's Monthly Kits HERE

March monthly kit is available for $57.45 which is a saving of 20% on buying the items separately.

Postage is $9.00 anywhere in Aus. 
For internationals, please email for accurate prices.

C O N T A C T:

 ................................

Check out my instagram HERE or @snapshotscribbles

See my Youtube Channel HERE

 ................................

SaveSave

Sunday, March 25, 2018

Winner Winner Chicken Dinner - Winner of Donna's Easter Giveaway.....

Thank you to everyone who joined in the fun of Donna's Giveaway.
Your comments mean a lot to us.... it means that we're bringing you joy and it lets our Team know that their hard work is appreciated :)
The rules to win one of Donna's Easter projects were to simply comment on ALL FOUR of Donna's blog project posts. All our Peeps who joined in have been squished into the RNG and.....

Congratulation to our winner.....


Rita - please get in touch with me either through facebook, or email me direct at info@auntyverascrapandcraft.com.au with your postal details so that Donna can get your prize posted to you :) 

Saturday, March 24, 2018

Hippity Hoppity - Donna's Set of Easter Cards

Hello Crafty Peeps!
I hope you have all been following and commenting on Donna's posts this month as Sunday night (that's TOMORROW!) we will be drawing a winner.
Today Donna creates a set of super cute Easter cards...... totally one to scraplift Peeps!


 Don't forget I have a giveaway this month with one of my projects. To win it, all you need to do is comment on each project and at the end on the month I will draw a name out of the Easter Bunny Hat...  And remember, you must comment on all four projects for a chance to win the prize.. Good luck peeps...

These cards measure 4 inches x 4 inches and are created from the cardstock in the kit..
I love these cut-aways, you only need a little embellishment to see how pretty they are.


I used several cut-aways on a brad to give this card a different look.


I am sure this bunny is hunting carrots.


A fussy cut bunny makes this card fun.


This card is so much fun that when you read it, it feels like Easter already..


How colourful is this kit!!


All the cards together..


All four projects of the March Hippity Hoppity Easter kit..


I really loved the March kit. It was so fun creating Easter projects.
Please do buy this kit and have your own fun..


I hope I have inspired you to create Glorious things..
Thank you for stopping by..

Hugs

DONNA xx

........................................ 
BUY Aunty Vera's Monthly Kits HERE

March monthly kit is available for $57.45 which is a saving of 20% on buying the items separately.

Postage is $9.00 anywhere in Aus.
For internationals, please email for accurate prices.

C O N T A C T:

 ................................

Don't forget to check out my blog HERE
Please visit me on my FB page  HERE
And
My Youtube Channel HERE

Related Posts Plugin for WordPress, Blogger...