Wednesday, September 26, 2018

Making Daisy Chains - Tina's Craft Room Banner

Hello Crafty Friends!
Have you been spring cleaning your craft rooms? Clearing.... re-arranging... finding long forgotten crafty bits - that's half the fun right? And today Tina has a gorgeous banner that will inspire you and make your crafty space all the more special.....


Hello everyone, this month my projects have been about creating storage solutions for my craft room.
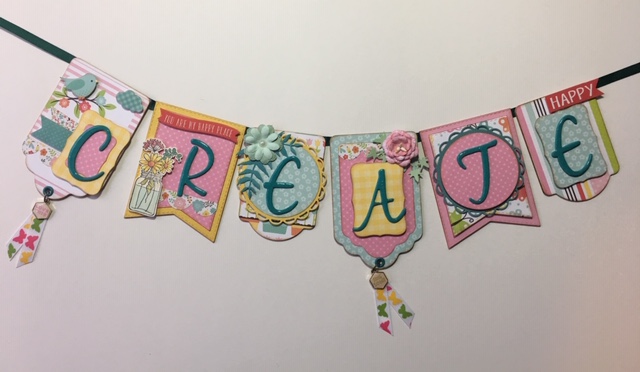
Today I have a decorative project. I wanted to make a craft room banner to tie in the colours and papers from the kit with the storage projects.


I started by cutting my banner from cereal boxes in different shapes, using banner and tag dies.


Next, I cut out the pieces in the papers from the kit and some matching paper from my stash. I glued them onto the base pieces.


I used chipboard letters that I painted in Kaisercraft paint - Sea Breeze. Once they were dry, I added Glossy Accents to the letters.


Then I decorated each piece.
For the first one I cut out the little bird and placed it on foam tape. I used some of the stickers from the kit as well as some of the ribbon and one of the cute little charms.


Here I used more of the stickers and the stamp that I coloured using Distress Oxides.


Thank you Suzanne Johnston for the lovely pink flower, which went perfectly with the papers from the kit. I used more of the ribbon and another charm.


Finally, I added some green ribbon to hang my banner.


I hope you have all enjoyed my month of craft room projects.
Thank you and Happy Crafting.
Tina xxx
The September Kit can be purchased HERE

Wednesday, September 19, 2018

Making Daisy Chains - Suzanne's Wrapped Journal with Kraft-Tex

Hello Crafty Friends!
Suzanne has a wonderful project for us today.....  using our springtime kit along with the new Eileen Hull 'Wrapped Journal' die to create such a beautiful and cheerful little springtime journal.


Hello everyone.  Isn't Spring just the most wonderful time of the year.  The weather certainly has started to warm up here in Queensland.  I hope it is warming up in your neck of the woods as well.

Recently I was fortunate enough to purchase the gorgeous sizzix/Eileen Hull Wrapped Journal die from Aunty Vera.  I was so excited to use it and when the gorgeous September kit turned up, I knew I was definitely in luck and that this was the perfect time to make a cute little journal using the gorgeous papers from Echo Park and the lovely stamp from Stampendous.


I cut the wrapped journal from Kraft-Tex which is a very strong kind of paper fabric.  I decided to paint it with pink acrylic paint from kaisercraft and then I used the stampendous flower stamp on the cover along with a couple of my own stamps.  I used my stamp platform so that I could achieve a clear stamped image.  The Kraft-Tex if quite textured on one side and I had to stamp several times to get a good image.


I then coloured the stamps with more acrylic paint.  At this point I should have sealed the paint but for the purpose of doing the blog, I left that part out as it takes a while for the sealer to cure. 


I then strung my journal with elastic and made 6 little journals to go inside the cover. 


I used the 'Hello Spring' paper from the September kit to make covers for the 6 little inserts.


To finish off the journal, I used one of the cute little charms from the kit and made a small dangle for the spine. 


I hope you have enjoyed having a look at my little journal. 
Bye for now
Suzanne xoxo

You can watch a short show and tell for the journal project HERE.
You can get the kit from Aunty Vera HERE.


Monday, September 17, 2018

Making Daisy Chains - Tina's Craft Room Organiser No 3. - Memory Box

Hello Crafty Friends!
Wow! Tina has been creating such gorgeous craft organising projects this month...... you'd never want to buy 'shop bought' storage again!! Her storage box today can be used for so many things (not necessarily craft)...... I LOVE it!!!


Hello everyone, I hope you are enjoying the Spring weather and the wonderful projects the team at Aunty Vera Scrap And Craft have produced this month.
This month I wanted to focus organisation and storage, and today I have a little project for my youngest daughter. Isabella wanted a box of some sort to store her photos and small mementos from school camps, to sleepovers with her best friends, so again another project that went from the craft room to my daughter's room.
Here I have made a storage box with a lid to keep all her keepsakes.


I started by cutting the box in chipboard. The bottom half  was made first.


I used masking tape to join all my pieces together. This works just as good as my strips of paper I used in my previous two projects. First I placed masking tape on the bottom of the box piece.


I then added the front and back piece and smoothed it down well.


Then I added the tape to the two side pieces.


Adding them together, and securing the sides temporarily with a small amount of tape so I can make sure it all fits in together properly.


The lid is made the same way, with these measurements.


Here is the lid and box ready to be taped all up.


Once I am happy with the box I tape up one side at a time remembering to remove the small piece of
tape. The tape is cut slightly longer on both ends so I can cut it in the middle and fold over the edges. Then I can tape the inside and all the outside edges.
For stability, I added four pieces of chipboard on the inside of the base, half the height of the box.


Once the box is all taped up I painted all the edges using Kaisercraft Paint - Pretty Pink.


I then added some of the American Crafts - Butterfly Ribbon from the kit on the inside lid and base sides to hold the lid in place when it is open. I then decorated it with the beautiful Echo Park - Hello Spring papers from the kit. Starting with the inside ( make sure to leave the back inside piece until after adding the hinges). I just love this paper, I added one of the cut-aparts on the inside lid.


The outside I used a yellow cardstock with the Papers from the kit and then I added my hinges. I marked them in place and glued them down before adding the screws. ( the screws were too long so they had to be cut down to size so they would not poke through the inside of the box.)


I then added some little wooden drawer knobs to the base for the feet.

.
Now I can cover the inside back piece.


I decorated the front of the box with some matching cardstock from my collection and some of the stickers from the kit. The flowers are also from the kit, which I layered on top of each other and added a few extra petals from my own collection.
I left the top of the box for my daughter to decorate, and the little box is now finished.


I hope you have enjoyed my project.
Thank you and Happy Crafting.
Tina xxx

The September Kit can be purchased HERE

Thursday, September 13, 2018

Making Daisy Chains - Suzanne's Springtime Explosion Box with Flowering Teacup

Hello Crafty Friends!
Suzanne has the perfect springtime project for us today! An explosion box just bursting with springtime goodness!! I just LOVE it!!!


Hi everyone.  Spring has definitely sprung here in South East Queensland.  The flowers are blooming and the bees are buzzing.  It reminds me of the September kit from Aunty Vera Scrap and Craft.  The gorgeous paper from Echo Park called Hello Spring is my absolute favourite with wonderful pastel floral prints.  I just had to use it for this project.  I decided on an explosion box, and I wanted a pretty teacup with flowers to decorate the centre. 

I used some mint coloured cardstock and cut four 4 1/2 x 9 inch pieces and scored them in half. One half of these strips will be a base of the box and the other half will be the side of the box.  Glue each base piece together turning the box 90 degrees before adding the next layer so that you end up with a base that is four layers and four sides (walls) of the box. It should look like a plus sign.  See picture below.

I used the 4 x 4 cut-a-parts and a layer of yellow cardstock for the outside layers. This adds strength to the box.

I used some of the 3 x 4 cut-a-parts for the inside of the box and layered them on some pink cardstock.


The lid measures 6 5/8 inch.  Score at 1 inch on each side then cut the tabs on one side of each corner and glue them under to form the lid.


Add layers to both the top and sides of the lid


I used my Uniquely Creative teacup die to make a tea cup for the inside of my Explosion box 


I  made some roses with my Heartfelt Creations stamps and dies and coloured them with distress ink


I then decorated the tea cup to be placed inside the Explosion Box


I also decorated the lid with the flowers I had made before adding  a bee and a butterfly.  I also used a sticker from the paper collection to add a sentiment on the lid.  I put the sticker on some white cardstock to give it strength and popped it up with sticky dots.


Here is the finished Explosion box


Thank you so much for taking a look at my explosion box project.  Stay tuned for more in the near future.

You can watch my process video for the explosion box HERE.
You can watch a short video of how I make my flowers HERE.
You can get the September kit HERE.

Related Posts Plugin for WordPress, Blogger...