Friday, April 29, 2016

Captured Moments 3x4 Mini Accordion Album

Hello Crafty Bloggers and Happy Friday!

A couple of weeks ago on the blog we featured Sarah's 4x6" Mini Album using Kaisercraft's Captured Moments cards.
This is a bit of a follow up on that post. Today Sarah has created a lovely little Accordion Album using 3x4" Captured Moments cards (you could also use Project Life cards)

Here is her mini album in "the raw"......


And featuring photos and journaling.........


This little album can be kept as a stand alone album, or can fit into a Memory Book or folio........


It can also be used as part of a larger scrapbooking layout. Here Sarah has very cleverly added it to a pocket page layout.......


Thank you Sarah for this lovely piece of Friday inspiration. It's a fabulous project for the weekend I think!
What are YOUR crafty weekend plans dear Readers?

Aunty Vera :)

Sunday, April 24, 2016

Aunty Vera's Kitchen - A New Carrot Cake Recipe

Hi Crafty Bloggers!

The weekend has come around again - and so quickly!!!
So that means it's time for.........


I have a favourite Carrot Cake recipe that I use ALL the time. Unfortunately, that recipe is currently packed away with most of my other cookbooks. So when my son asked me to make a carrot cake today, I had to search around a bit for a recipe..... and I found this very interesting one in an old Australian Good Food magazine. I say 'interesting' because it has crushed pineapple in it, which I don't normally add to carrot cakes. So I thought I would try it out.


Good Food's Carrot Cake

Ingredients:
  • 2 1/2 cups plain flour
  • 1 cup sugar
  • 1 1/2 tsp bicarb soda
  • 1 tsp salt
  • 1 cup canned, crushed pineapple in natural juice, undrained
  • 2 cups grated carrots (about 3 carrots)
  • 4 eggs, lightly beaten
  • 1 1/2 cups vegetable oil
  • 1 tsp vanilla extract
  • 1 cup chopped walnuts


Cooking Directions:

Preheat oven to 180C  (355F). Grease and line two 20cm round sandwich pans 

Grate carrots (you'll need about 3 medium sized carrots) to make 2 cups of grated carrot......


Sift the flour, sugar, bicarb and salt into a large bowl.
Add the pineapple, carrot, eggs, oil and vanilla and beat with a wooden spoon until well combined.......


Stir in the walnuts then divide between pans and bake for 45-50 minutes until a skewer inserted comes out clean. Cool in pan for 5 minutes then turn out onto a wire rack and let cool completely.


The Frosting

(At least I have my cream cheese frosting memorized!)

Ingredients:
  • 250g cream cheese, softened
  • 60g butter, softened
  • 1 to 1 1/2 cups icing sugar (to taste)
  • juice of 1/2 a large lemon
Beat the cream cheese and butter with an electric beater until smooth

Add the lemon juice and icing sugar. You're best to start with just one cup and then add more if you want the icing sweeter.

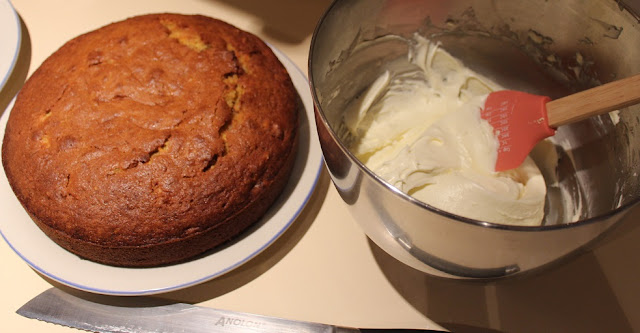
Beat until smooth, then spread between the layers and over the top of your cake......


Decorate the top with a few chopped walnuts, and serve..........


So... the verdict...... I have to say, even though this cake was very, VERY nice (I especially like the moist texture that the pineapple brings to it), it was not quite as yummy as the cake recipe I usually make. So there MAY just be another carrot cake post some time in the future....lol


Enjoy with a cup of tea
Aunty Vera :)

PS - I suddenly realised that being the Anzac Day weekend, I really should have made ANZAC BISCUITS!! Sorry guys - thinking ahead is not my strong suit, as many of you already know (lol).
SO - anybody on the lookout for a great Anzac Biscuit recipe, feel free to visit my friend Bill - he made Anzac Biscuits RIGHT HERE.

V xx


Saturday, April 16, 2016

Aunty Vera's Kitchen - Choc Chip Shortbread Cookies

Hello Crafty Bloggers! It's the weekend and that means it's time for.........


I have a special recipe to share with you today. It's for my favourite ever choc chip cookies. I LOVE shortbread, and these cookies are like a cross between a shortbread biscuit and a chocolate chip cookie. Heaven!! And they're super easy to make :) 


Shortbready Choc Chip Cookies

Ingredients:
  • 200g ( 7 oz) butter (that's unsalted butter folks - the real stuff not margarine)
  • 1/2 cup icing sugar
  • 1 tspn vanilla essence
  • 2 cups plain flour
  • 1/2 cup almond meal
  • 1/2 tspn baking powder
  • 150g (5.3 oz ) chocolate chips

Cooking Directions:

Using an electric mixer, beat the butter, icing sugar and vanilla until smooth and creamy.....


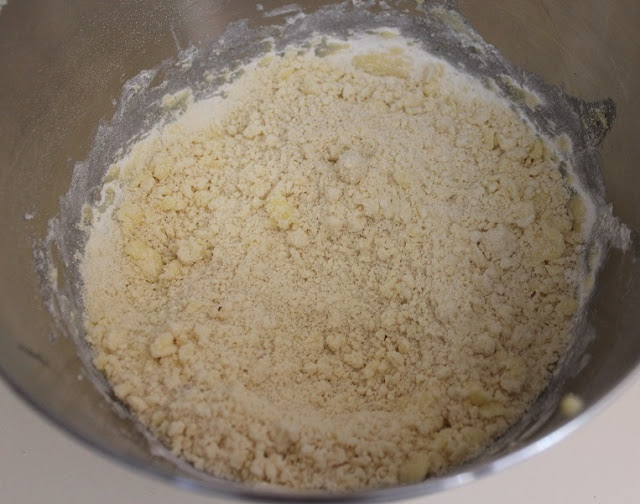
Slowly and gently beat in the flour, almond meal and baking powder until it sort of comes together. At this point it will look mostly crumbly.....


Add the choc chips and then use your hands to bring the mixture together into a smooth dough.
Take tablespoon fulls of the mixture and form into a rough disc, and place onto a baking paper lined baking tray


Bake cookies in a pre-heated 180 C (356 F) oven for 12 to 15 minutes until lightly golden


Cool on a wire rack - if you can wait that long!!!! lol


Thank you for joining us in the kitchen today. We'd love to hear about YOUR favourite cookies!

Happy baking!
Aunty Vera :)


Friday, April 15, 2016

Captured Moments Mini Album

Hello Crafty Bloggers - and thank you for joining us on another fabulous Friday :)

I love Kaisercraft's Captured Moments cards - those little packs of 4x6 inch and 3x4 inch cards that make pocket page scrapbooking so simple and extraordinary. But these cards also have a bunch of uses outside the 12x12" album.
Today Team Designer Sarah shares with us a beautiful Mini Album that she created from the 4x6" pack of Sunny Siesta cards. A pack of cards and a roll of washi tape and look at what you can achieve........


What a beautiful project. Thank you so much Sarah!

Wishing all our readers a lovely and crafty weekend
Aunty Vera :)

Friday, April 8, 2016

A #me Flip Book for your dreams and treasures

Hello Crafty Bloggers and Happy Friday!

Today on the blog Sarah has a play with Kaisercraft's #me collection and creates this gorgeous little Flip Book using the Captured Moments cards and Collectables from the collection.

Enjoy! ..........


Thank you Sarah! What a fabulous little project. I love all the 'secret' flip-outs and pockets.
Aunty Vera :)

Saturday, April 2, 2016

Aunty Vera's Kitchen - Strawberry Swiss Roll

Hello Crafty Bloggers and Happy Bakers and welcome to this week's installment of.....


Today I (Aunty Vera) am in the kitchen, and I thought I'd make something gorgeous and fruity before summer truly disappears, taking all the yummy fruit with her.........


I had to borrow this book from Bill.
Bill's friends on twitter (the #bakinbears) are already very familiar with it...........


The Clandestine Cake Club is such a brilliant concept. Across the UK, happy bakers meet up at a location that is kept secret until the very last minute, each bringing with them a fabulous cake to share. You can find out more about it on their website or facebook page.

So now to the recipe. I decided to bake Lynn Hill's Strawberry Swiss Roll from the book.

1. Firstly, beat 3 egg whites (keep the yolks for later) and 30g of caster sugar until soft peaks form.
Set aside.........


2. With an electric mixer, beat the 3 egg yolks with 140g caster sugar until light, fluffy and doubled in volume..........


3. Mix in the scraped seeds of 1 vanilla pod.

4. Fold in 2/3 of the egg white mixture, then 100g of self-raising flour, and finally the remaining egg white mixture, until thoroughly combined.

5. Pour into a greased and lined swiss roll tin (32 x 23 cm) and bake at 180 for 10 to 12 minutes.....


6. Leave to cool in tin for a few minutes.........


7. Lay a tea towel on your bench top and then a large sheet of baking paper on top. Tip your sponge onto the paper sheet and gently peel off the sheet of paper from the bottom of the cooked cake.
Now beginning from the short side, roll up your cake so that it is rolled with the paper. Then roll the tea towel around the cake log. Leave to cool completely.


Making the filling........
You will need one punnet of strawberries (or 2 if you want extras for decorations)

1. Pop about 1/3 of a punnet into a food processor with a little icing sugar for sweetness, and whizz until you have a lovely pink puree (do you like my mini processor? It's perfect for jobs like this!).......
Pour through a sieve so you have a lovely smooth strawberry syrup.


2. Whip 300ml of cream with a heaped tablespoon of icing sugar and a dash of vanilla.
Spread the cream over your cold and unrolled sponge and then drizzle the strawberry syrup over the cream.......


3. Thinly slice the remaining strawberries and sprinkle them all over the top.....


4. Now the fun bit - roll that baby up! Because it has cooled in the rolled up position, this is really easy. If you find that you have over-stuffed it (like I always do....lol) just push those stray bits back in :)


Dust your cake with icing sugar and if you like, decorate with more strawberries......


I have a son who doesn't believe in dessert without chocolate, so for his benefit I added some chocolate dipped strawberries...... YUM! .........


And voila! A stunning looking dessert or afternoon tea that is really quite simple to make.
A big thank you to Lynn Hill and the Clandestine Cake Club, UK.


Does this put you in a baking mood?
We'd love you to join in our baking fun.
Please comment below and feel free to share your pics via our email (vera@auntyverascrapandcraft.com.au), on twitter, or on our facebook page or our Crafty Facebook Group

Wishing you a lovely, crafty and yummy weekend
Aunty Vera :)
Related Posts Plugin for WordPress, Blogger...