Tuesday, July 30, 2019

On Such A Winter's Day - Wendy's Snow Angel Paper Doll

Hello Crafty Friends!
Hasn't the month just flown by?! I'm actually a bit sad to be moving on to August because I love winter and the cold weather and I have ADORED all the wintery projects that our Creative Team have been sharing with us. 
Today Wendy wraps up the month for us with a new paper doll for her paper doll journal - a pretty snow angel made out of different die-cut shapes. So sweet!!


Paper Doll Snow Angel


I have a passion for making paper dolls as well as art dolls, so what better way to fill a cold rainy day than to stay indoors and play with some beautiful papers and make your own paper doll.  

I have called this little lady my 'Snow Angel' and she is a lovely addition to my paper doll journal. As I was cutting out some of the snow crystal dies, I thought it might be fun to actually make this little lady from other die shapes I had in my supplies and then piece them together and see what I could come up with.


What I Used:
*A selcection of the Solitude patterned paper from Authentique
*Kaisercraft Snow Crystal Die Set
*Hero Arts Dye Inks -Winter, set of 4
*Echo Park Cheery Snowflakes Designer Stencil
*From my own supplies - a large heart shaped die, a large butterfly die, a 1inch circle die, a small friskars snowflake punch, PVA Craft glue and some white paper/card.

             I made my snow angel first by cutting out a large heart shape and turning it upside down to use the point as her neck base and then covering this with some of the Authentique Solitude patterned paper I had left over from previos projects. I then cut her angel wings from a large butterfly die. I cut the butterfly in half and placed a wing shape on either side of the body. I've used a circle die for her head and drew on a little face. To decorate my angel I punched a heap of small snowflakes out and glued them on the bottom of her dress, her neck and a few for her hair. Then for her halo, I used the largest die from the Kaisercraft Snow Crystal Die Set, cut some of the fronds off and glued them to the back of her head...my make believe halo.


When I finished making my snow angel doll, I grabbed my paper doll journal and found a page for her. I wanted some colour on the background, a little not a lot, so I decided to use the Hero Arts Winter Dye Inks set of 4. The shades of each are so complimentary with each of the colours, they turned out so beautiful as the background colour. I cut a scrap of paper to make a waving line and seperated the page roughly into three and used a different colour dye ink for each section on the page.


           After putting down my first layer using the Hero Arts Dye Ink Set, I used the Echo Park Cheery Snowflake stencil with some white acrylic paint for a second layer for my background. I cut quite a few of the Kaisercraft Snow Crystals out using the dies from the set and placed them around my page as another layer for my background.


        The Echo Park Snowflake Stencil is a wonderful size to use and the pattern can be used as a whole or you can use the individual shaped snowflakes in any of your projects for something different.

      Because I had chosen a page that had already been cut at an angle, I also glued some of the medium sized snow crystal hanging over the edge.


Once I had finished making my background and gluing down my snow crystals, I had a perfect wintery background to place my paper snow angel on.


To finish off my layout, I chose one of the cut out sayings from the Authentique Solitude collection and glued it to the opposite page to my snow angel. To add a little bit of sparkle around my layout, I grabbed some Stickles and placed a small amount on each snowflake shape and when the light catches it, it gives off a lovely little sparkle.


I just love the way my Snow Angel turned out and her winter background suits her well, I'm pretty sure she is not going to melt any time soon...heehee!


I hope you enjoyed reading how I made my wintery layout and you can watch my  process video by clicking below:


Have a great wintery day!
Wendy 
xox

Sunday, July 28, 2019

On Such a Winter day - Frozen Arse by Aussie Scrapper

Hello Crafty Friends!
What a perfect winter project we have from Silvia today - perfect because it is a beautiful winter layout.... and also because of the story behind it. LMAO!!!!! I love it!!


I'm back crafty friends with another 12x12 layout and my, how fast is this year marching on.  Hard to believe we are halfway through 2019 and I'm onto my fourth layout for July.  I believe the time is passing because there is so much fabulous scrapping to be done and not to mention shopping at Aunty Vera Scrap and Craft.

The layout I just created was so much fun to make.  I went on a creative adventure.  I had picked my photo as I wanted to document the story of our trip that my husband and I still talk about today and is the butt of many jokes.


My next choice was my paper and I already knew the paper I wanted to use.  The solitude one paper from Authentique was perfect was almost identical to the jumper I was wearing.  This paper will be my background paper.


My second choice of paper was once again from the core products this month - Authentique Solitude Two.  I chose to cut this paper into a circle and from here the layout starting taking shape in my head.

I was looking at my photo and trying to work out how to make my photo stand out from all this these busy patterns.  I knew I wanted to draw out the burgundy in my jumper so I went through all my papers and nothing matched...I pulled out a scrap of red cardstock and then using the Distress Oxides I layered on colour after colour till I got something I liked.  The colours I used were: Fired Brick, Walnut Stain and Aged Mahogany. 


 I used a polka dot embossing folder and ran the paper through my cuttlebug.  I used this newly created piece of paper to matt my photo.  Something was still missing so to add some highlight I got out my favourite chosen core product "Nuvo Glimmer Paste" and using my finger I ran the glitter paste all around the outside edges.  Loved how this looked.


My photo was still not standing out against my busy background papers so I decided another matt was in order.  I chose the coordinating paper on the other side of the solitude two paper and made my second matt.  I repeated the process with the "Nuvo Glimmer" because a girl can never have too much glitter and I loved how this now framed my photo.


The reason for my circle was because I wanted to use this adorable Kaisercraft die which is part of my chosen products.  The die is called "2 birds branch" and I just fell in love with branches.  I used some scraps of red cardstock and using my cuttlebug I made a number of these lovely branches.


I loved my branches but the colour was wrong for my layout so I went took out of my watercolours and experimented with different looks.  In the end, the look I liked best was where I used my colour blast shimmer cubes.  I used the colours fire engine and leather and then I went over some with some
Prima Antique Brillance wax and the rest I added the Prima Metallique Wax in "bronze Age".  Here is the end result of all that mixing and blending:


I had to start putting my layout together and my first step was to add glue to my branches and start to glue them down to my circle.  I love it when things in your head turn out just like you imagined or as in this case better than I thought possible.


I next took out my stamping platform and using my chosen product, the beautiful Kaisercraft "Wandering Ivy stamp" I stamped out a number of flowers using my archival ink in the colour "Vermillion" I also used Archival ink "leaf green" to ink some leaves.  I used my distress inks to colour in the flowers.  A few colours were used to get the right shade.


I fussy cut my flowers and leaves and then attached them to the bottom of my layout and I also adhered my photo down. I also added a butterfly from my stash as the colours were perfect for this layout.


My layout needed some more embellishments so I chose some from the Authentique "Solitude elements" I love these die cuts because they are on perforated 12x12 paper and I can see exactly what I have to use. The ones circled in red are the diecuts I used on this layout.


Finally here is my completed layout. The title was made from some thickers in my stash that I painted over to get the right colour, and I added some of my nuvo glimmer paste for a little sparkle.
The title tells the story of my layout.  My bottom was frozen cold and it took me hours to warm it up.  My husband wanted to take photos because it had gone a blue colour.  Lucky for you guys the evidence is nowhere to be found.


Sorry nearly forgot, I did trim down my solitude one paper and then used some cardstock from my stash to matt the whole layout.  I love this added touch as it balances everything out.

Remember to check out Aunty Veras online store HERE. All the products used this month by myself and the rest of the Creative Team are available at great discounted prices.  Go and get yourself a bargain!

Please hop along to my youtube channel here is the link: https://www.youtube.com/watch?v=hyvFKaly8zA.  love to have you as a subscriber.


Wednesday, July 24, 2019

On Such a Winter's Day - Tina's Christmas Gift Set

Hello Crafty Friends!
As July (and the coldest part of winter) draws to an end, Tina shares her project for a beautiful winter inspired gift set. Wouldn't this make such an awesome Christmas gift for a very special person? There's plenty of time to get busy creating a few!


Hi everyone.
July is almost over and my final project for the month is a little gift set that has a few of the essentials for Christmas.
A perfect gift for someone. The set consists of a Christmas card and a box set containing four gift tags, four Christmas cards and a tree ornament.


The card measures 5'' x 5'' and I layered it several times with the beautiful papers from the Authentique -  Solitude collection and distressed all the edges. ( I don't have a distress too but my Cutter Bee scissors does the job well).


 I finished the card with a poinsettia made with the Tim Holtz - Tattered Poinsettia - Die, berries from my stash and the banner from the elements sheet.


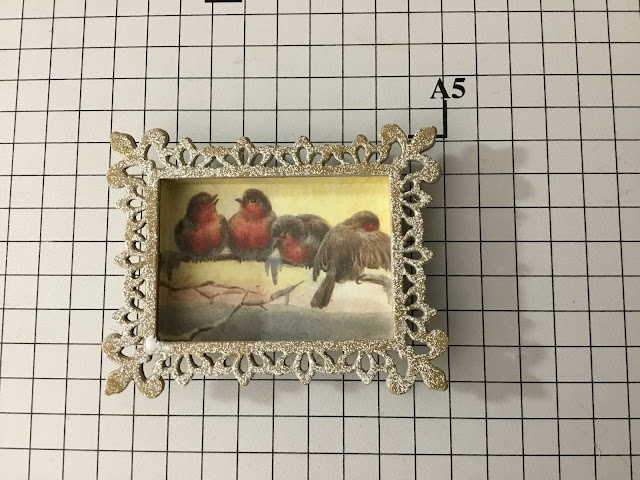
To make the mini shadow box tree ornament, I cut four of the Kaisercraft - Ornate Frame
in natural craft card and one in metallic gold cardstock and glued them on to each other.


I made a shadow box to fit just along the inside edge of the frame and then I added 1/2'' on all sides (depending on how deep you want the shadow box) and scored 1/2'' on all the sides. Fold along the score lines and snip the corners as shown below for the base gluing the corner flaps on the inside to make the shadow box. I made mine in the gold metallic cardstock but for the purpose of this tutorial I have shown it in white paper.


Do the same with the image piece but slightly smaller and cut away the corner pieces.


Next Glue the image piece in to the base and on to the back of the frame piece which I embossed with
Ranger - Enamelware - Embossing Powder.


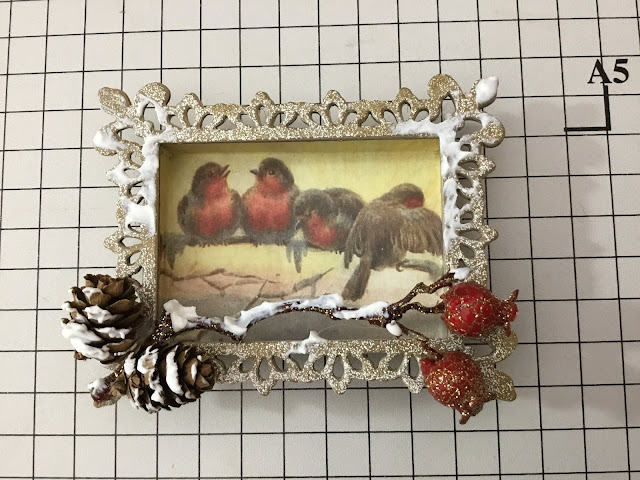
 I added a decorative branch, mini pine cones and red and gold berries from my stash. I also added  some of the DecoArt Dimensional Effects - Paintable Texture Paste to give a snow look.


Some ribbon from my stash and the little tree ornament is finished.


The gift boxes are all made in the same way as the shadow box (with the lid being slightly bigger), the measurements will be determined by the sizes of the cards, tags and shadow box ornament.


Here are the four cards and gift box.


 Four tags with the matching gift box. I used the Tim Holtz - Idea - Ology - Adornments - Snowflakes to finish them off.


I hope you enjoyed this Christmas Gift Set.

Here is a list of the products for this month
Core Products
Authentique 12 x 12 - Papers - Solitude
Authentique 12 x 12 - Elements Sheet.

Chosen Products
DecoArt Dimensional Effects - Paintable Texture Paste.
Kaisercraft Die Set - Ornate Pack 1.
Tim Holtz Idea - Ology - Baseboard Frames - Lace.
Graphic 45 - Rose Bouquet - Bon Voyage and French Blue.
Ranger - Distress Glitter - Clear Rock Candy.
Tim Holtz - Idea - Ology - Adornments - Snowflakes.

All the products listed can be purchased HERE at a discounted price.


Thank You and Happy Crafting
Tina xxx

Monday, July 22, 2019

On Such a Winter's Day - Wendy's Boxed Journal Gift Set

Hello Crafty Friends!
I'm loving Wendy's theme of special winter gifts this month. With Christmas almost around the corner (well, it's not but the way time flies it kinda is, right?...).... these projects are a great inspiration for creating special hand made gifts for the special people in your life. And today.s journal gift set would be so loved by me!! (lol) and anyone who loves the art of writing, journaling and memory keeping :)


BOXED JOURNAL GIFT SET


Today I have this lovely Boxed Journal Gift Set to make.  This would make a very special gift to send to someone. Can you see the trend I have going this month. Winter weather crafts to share with others and take the winter blues away. My mum always said, 'Sharing is caring!', and what better way to feel warm inside by making a wonderful present for someone special to you. 

This set contains a handmade journal and a matching handmade journal pen and is also left undecorated so you can personalise it yourself. 


What I used:
*Authentique 'Solitude five' patterned paper (for the box)
*Authentique 'Solitude four' (for the journal and pen)
*Plain paper from my supplies (for journal pages)
*Twine to bind journal
*Refill pen cartridge
*Kaisercraft Snow Crystal Die Set - Medium snowflake

The first thing I did was put the box together using the 'Solitude five' patterned paper from Authentique. I used the full sheet of the 12x12 paper. Then scored at 1/2inch:1inch:1-1/2inch:2inch around the four sides of the paper. Then on one side I scored at another half inch in (where the 2 1/2 inch would be) but only scored down to the second score mark going across. This is done on the right and also the left of the top and bottom of the paper.


It will look like this below: You can see the four long score lines and the shorter score line only going to the vertical second score line. The corners are then cut out. Cut the short score line, then diagonally to the fourth score line, cut up one and then across, which cuts the corners out.


Your paper will look like this below when all four corners have been cut out.


Double-sided tape is then placed on the outer edge of each side. The sides are going to be folded over and the outer edge is stuck to the base, which gives you the shape of the box.
Then flip the paper over and place a small amount of double-sided tape on the diagonal sides.Take the protective strip off the small piece of tape and replace it back with a little over hanging the edge of the diagonal side. This will help you to pull it out later when the corners have joined together.

 Like below:

Then each side is folded over and attached to the base. Then the protective strip can be pulled out at the corners and your box base is done. The size of the box ends up being 8x8inches and a height of 1/2inch... just a perfect size to add a journal and pen in there.


To make the front cover, I used a piece of the same patterned paper and cut it at 8 1/2 inches by 8 inches. I scored the left side at just under half and inch, put some double-sided tape along it and joined it to the left side edge of the box. This makes my front cover of the gift box. I placed a small amount of velcro on the right hand side top edge of the box, which I used as a closure, so the goodies inside would not fall out.


Making the Pen:
My previous blog post HERE shows you how to make the pen I used in this gift set.

Making the Journal:

I used the Authentique "Solitude Four" as the cover which was cut at 10 1/2 inches by 6 3/4 inches. I scored in a spine at 5inches then 5 1/2 inches. The little wider spine allows for added embellishments inside the journal you may want to add. For the pages, I cut some A4 paper from my supplies to 9 1/2 inches by 6 1/2 inches and they fit lovely inside the cover.


Putting the pages in the cover is rather easy to do. I used a three hole pamphlet stitch and some twine from my stash.


When I had my journal and pen made, the pen was too loose in the box even though you could clip it into to journal, I decided to make a small pouch that would hold it. 


 I cut a piece of paper 2 1/4 inches by 2 3/4 inches. Scored at 1/8 inch and 1/4 inch around three sides, folded the scores and glued the pocket onto the base of the box. This was a perfect size to place the pen I made and it keeps it nice and secure.


I wanted to leave the embellishments to a bare minimum, so the recipient could personally decorate it to how they like. I did add one of the cut outs from the selection of paper to the cover of the journal and also to the front cover of the box. Tied a bow around the outside of the gift box and added a medium sized Kaisercraft snow crystal Die cut to the ribbon, saying, 'Personalise it!'


I think this makes a beautiful gift for someone special to you and it was such a fun winter project for me to make...wearing my cardigan...heehee!


I hope you enjoyed reading about this craft project and I hope it inspires you to make one yourself ...a Winter themed one....using the Authentique Solitude collection of papers from Aunty Vera Scrap and Craft....


You can watch a showing of the completed project below:


You all Have A Great Day! 
Wendy xox
Related Posts Plugin for WordPress, Blogger...