Sunday, July 26, 2020

Get Out of the House - Nat's Planner Title Pages


Hi everyone, hope you are all well and getting some crafty time in 😃

I have been working in my planner inserts creating some title pages and beginning to use them.
This is the bullet journal insert that I made previously.  I created a title page in this using a blending tool with the Distress Oxide through two stencils to get the background.  I had masked off the centre strip with masking tape so no ink was applied there. I drew the outline of the year with the Pigma Micron pen in this clear area and then used a blue marker to colour it in.  A purple marker was used to create the borders and the Bo Bunny Sticker added.  I used purple Distress Ink to stamp the little Photo Play COVIDs onto the page for a finishing touch.


These are the first pages in my bullet journal where I have created a key using some craft paper to remind me of the symbols I am using throughout for entries.  I have embellished this with the Bo Bunny Clear Stickers.  This system was developed by Ryder Carrol whom I discovered on Youtube, and is a great way to efficiently organise a planner. I have been using the Micron pen for all of the writing, titles and lines.  I have trouble trying to write small and neat and have found it so much easier with this pen, also I don't smudge as I write - which, being a lefty - I do usually have issues with 😉. I am using my bullet journal insert for my yearly, monthly and weekly planners.
 

People often add a 'Collections' section to their bullet journals, however I decided to use the Dylusions Dyalog 'Lined' book  to create a 'stand alone' Collections insert.  This will be where I create lists of things I have or want such as a book list, movie list, game list, craft supply lists etc.  As the pages in this insert are nice and thick, I will be able to decorate it with inks, stamping and paints. So I grabbed my Photo Play stamps, embellishments and Spiced Marmalade Oxide to create a cover page for this book.


I used the Spiced Marmalade and some Cracked Pistachio Oxide with a blending tool to add colour to the page then used these also with a honeycomb stencil on the inside of the cover. The Pigma Micron pen worked perfectly to outline the 'collections' title down the side of the page. Black Archival ink was used with the Photo Play stamps to create lined lists with tabs on blank paper - I love how I was able to use four different Photo Play stamps to create these.  I inked around the edges with black Distress Ink and glued these onto the page. I used the other stamps to decorate around these lists. I added more stamping and some of the Photo Play embellishments to the inside cover page.  Very simple but effective and colourful.


Next, on to the process for my Art Journal title page.  I put grease-proof paper over the left cover page to protect it while I applied ink to my page using Distress Oxides in three colours - including "Spiced Marmalade" (which is on sale for the month), Wilted Violet and Cracked Pistachio.  I masked off the center of the page using masking tape to prevent getting the colours in that area while using a blending tool to apply them.  I then removed the tape and used just a light coating of Spiced Marmalade on the the center area.


The next step was to spray some water over the whole page to activate the oxide which created a nice mottled effect.


While the inks were still wet I placed a honeycomb stencil over the page and used a wet wipe to rub over the design which lifted some of the ink to create a wonderful pattern.
I left the inked page to dry while I started decorating the inside of the front cover.  Firstly I mixed some orange paint with a little gesso (for better coverage) and applied this with a dry make-up sponge to the paper, I let this dry a little then repeated the process a few times until I was happy with the outcome.


Once it was dry, I used the Bo Bunny Clear Stickers to decorate the center of the inked page, I chose stickers I felt were suitable for my art journal such as the words: 'Inspire' and 'Create' and the sentence: 'throw kindness around like glitter'. I also began adding  Photo Play "Living the Quarantine Life" Ephemera pieces to the inside cover page.


I used the Spiced Marmalade Oxide to ink the edges of all the ephemera before sticking them down including all the fun speech bubbles I cut out of the "Stay Safe" paper previously.


I found a bottle of purple spray paint and decided to use it to add splatter to my pages, just to make them a little more 'grungy'.  My Pigma Micron 05 pen added some great definition around the ephemera pieces and borders around the stickers.


I am having a load of fun using my planner system and all of the inserts, it is great to be able to customise it all to suit my needs and use the awesome papers, embellishments, stamps, stickers and inks to embellish it.

Happy crafting and stay safe,
Love Nat xxx

Aunty Vera Scrap and Craft products on sale and being used for the month of July are:

Wednesday, July 22, 2020

Get Out Of The House - Aussie Scrapper 12x12 layout "Covid 19 Testing"


Hi my dear friends,  I am back with my 4th layout for the month and I cannot believe how quickly this month has gone.  I thought I would do my final layout by documenting my sons "COVID testing".  Our current times dictate that if he misses school because he is unwell he must be tested and can only go back to school with a negative reading.  He did get a negative reading but I am sure he quickly worked out that it's really not worth trying to get out of going to school anymore.  Let's just say it was not a pleasant experience and mummy was cranky after losing a morning sitting in a car waiting to be tested.

I had picked my one and only photo of this event and this whole layout is based on the colours in the photo.

I am at the end of my kit now so there was not a lot of choice for my papers and what I had did not work with my photo so this is where we really must get creative.  Part of my chosen products was this gorgeous die from Kaisercraft "Fob Watch" so I die cut a whole heap out of watches.


My next big step and I say big because it took me a while to work out how I was going to arrange these watches on my white cardstock.....


Next, I sprayed some Kaisermist in the colour "aqua" and dried it with my heat gun.


This layout becomes very mixed media focused from now on.  My next step was to add a layer of "Turquoise" Dina Wakely Acrylics paints, followed by a second layer of the colour "Sky" from the same brand.  I used the packaging technique to add the colour.


I loved the colour so far but I wanted to add some texture so I mixed some Liquitex "natural sand" with some Dina Wakely acrylic paint in the colour Lapis and scraped it onto my layout using the Rangers texture tools.


Time to use another of my chosen products and that is the Tim Holtz Stitched layering stencil and do a layer of stencilling.


Liking how this is looking so far but I realised my photo had a lot of black and I wanted to introduce some black into the layout somehow, so I decided to use my new toy from Aunty Vera Scrap and Craft and that is my new stamp from Bo Bunny "I heart stamps"


My background is now complete and its time to put this layout together.  I trimmed my background and mounted it on some patterned paper from my stash.  I added some ephemera from the core products from July - Photoplay "living the quarantine life" and I also used one of the stamps from Photoplay's "living the quarantine life" stamp set to add another border.  


Hope you like the end result - its amazing what you can do with a good die, some stamps and an ephemera pack.  The die, stamp set and ephemera pack are all on special for the month of July at Aunty Vera's.  HERE is the link to playland.. Have fun!

To watch the process video, please click HERE.


Saturday, July 18, 2020

Get Out of the House - Planner Writing Board and Customization


Hi everyone - hope you are all well!
So now that I have completed the making of my planner inserts and cover, it is time to customise it with the pieces I require to make it practical and fun to work in.
I have decided a writing board would be a great addition - a flat, firm piece I can slip under the pages I am working on to make it easier to write on when I am "getting out of the house" (as this month's theme suggests 😉).

Firstly, I found a piece of white cardstock in my stash then grabbed all of the left over paper pieces from the Photo Play "Living the Quarantine Life" collection to choose pieces to cover it with.


 I cut the cardstock 3 and 3/4" x 8 and 1/4"..........


.........then I cut the chosen papers the same size as the cardstock. One piece fit perfectly which was great as we want the side we will be leaning on while writing to be smooth.  I did not have pieces big enough to cover the other side though, and opted to use two, which looked really nice.


I went through the Photo Play "Living the Quarantine Life" Ephemera pieces and found some great ones to decorate my writing board with.  I inked the edges of my board and the ephemera with Distress Oxide "Spiced Marmalade" then glued them all down.


I ran the writing board through my laminator.  I decided this would be helpful if I was to do any inking or painting in my planner inserts, I may get some on the board and this would make it easier to clean.


My next task was to fill the planner pockets with useful and fun bits and pieces to use in my planners.
I found the BoBunny 'Life in Color' Clear Stickers and slipped them into one of the Dylusions Dyalog Pockets, I found that if I cut the packaging down just a little that it fit in perfectly.  I found a tag from the Photo Play Ephemera pack that slipped in the slit in the pocket perfectly and looked awesome.


I had a whole sheet of the Living the Quarantine Life "Stay Safe" paper from Photo Play left which has heaps of speech bubbles with pertinent isolation statements on it.  I decided to put it through my Scan 'n' Cut machine to fussy cut them all out, creating a whole pile of embellishments to use in my insert booklets while saving my wrist from all of that cutting!


I put these and the Photo Play Ephemera into resealable cellophane bags and slipped in a backing card made from off-cuts of the papers to stabilise and make it easier to slip into the pockets.


I made a pocket using an off-cut form the  COVID19 paper, by just folding the bottom up and gluing down each side, This was embellished with two of the speech bubbles cut out prior.  The pocket edges and embellishment were inked with Distress Oxide "Spiced Marmalade".


The cut-aparts now slip in the Dylusions Pockets perfectly and are much easier to see, keep together and remove when needed.


The left over piece of file folder from making the cover was used to create another pocket to slip in small off-cuts of the Photo Play papers so that I can use them to further decorate my inserts.  This fit nicely into the front cover pocket.


The Photo Play "Living the Quarantine Life" stamps are a whole bunch of fun! I decided to stamp these onto sticky barcode labels (found at the second-hand store) to create stickers I could use when out-and-about or sitting on the couch - rather than having to grab my inks and stamps all the time (lazy-aren't I!) So now I have heaps of days-of-the-week, emojis and other great stickers to use that can also be bagged up and slipped into the Dylusions Dyalog Pockets.


I hope this has given you some ideas of how you can organise your planner to begin using and embellishing it, and have heaps of fun while doing so!
Happy crafting and take care,
Love Nat xxx

Here is a process video of me making the writing board and organising my embellishments:


 Aunty Vera Scrap and Craft products on sale and being used for the month of July are:

Thursday, July 16, 2020

Get Out Of The House - Aussie Scrappers "Isolation bombfire" layout


Hello everyone, I hope everyone is doing well in these unusual times.  I know that these last few weeks have been the hardest for me.  The start of the whole covid life, I found quite relaxing and for me, it was a break from my very busy schedule.  Now, even though restrictions have been easing, I am really starting to miss my previous life and all the little freedoms we took for granted.

Aunty Vera has given us the perfect theme and papers to document these current events as it's all these feeling and thoughts that we will soon forget about when this whole pandemic is over.  I want my grandchildren to one day read these pages and know what we did to cope.  We are working with Photoplay's "Living the Quarantine Life" Collection

Today's layout is documenting the first weekend of restrictions where you were not allowed to have any visitors, this also coincided with my daughter's birthday celebrations and of course, the family get together had to be cancelled. However, we did still go ahead with the bonfire as planned but it was just the four of us plus the pets...

My first step was to find a suitable paper.  I chose the paper named "This Happened" and I also chose to use the stamp set from PhotoPlay also called "Living the Quarantine Life"


I decided to that I wanted a border all around my paper with phrases that meant something during this time, so I decided to use the stamps #social distancing and #stay at home, as this was the strong message from the government during this period.  In between, I used the stamp with all the little squares.  I used my Ranger embossing ink and then I used my chosen product Ranger embossing powder White


Next, I decided to do a second row of stamping using the same stamps but instead of the squares separating the phrases I used the molecule stamp.


I wanted to bring in more Orange to this layout as the photo has a lot of orange in it, so I decided to do some mix media.  First I need a layer of gesso (picture one) and then I did the old packaging technique, for my first layer of colour I used "Antique Linen" Distress Oxides Spray. My second layer is using "Dried Marigold" Distress Oxides Spray.  I wanted a brighter Orange so I used "Cheddar" Aryclic paint by Dina Wakely.


I now needed a contrasting colour as everything was blending in with the photo so after trying various items I chose this doily from my stash.  I love the pop of colour it gives the layout and helps the photo stand out.


While working on this layout I knew that I wanted to use a cutfile I had bought so, I took out my silhouette machine, cut the file out and backed it using the paper named "Plaid19"


My fire cut file was looking a bit too plain so I did some colouring-in and added some shading to give it a more realistic look.  In my stash, I had an orange frame that I cut in half and used it to help frame my photo.  I also added some black thread.


Next, I worked on my title "Isolation BombFire" using some thickers from my stash.  The thickers I had were the wrong colour so I mixed some black gesso with some Liquitex Natural sand and painted my letter.  This gave my letter a nice course texture and once dry I just used my finger to rub some teal nuvo mouse on.  Hope you like the finished product.


Please click HERE to view the process video
The items used on this layout can be purchased from the most friendly online store in Australia with amazing prices, click HERE for some amazing deals.


Sunday, July 12, 2020

Get Out of the House - Nat's TN Insert Cover


Hi all, hope you are well 😊
In my second Aunty Vera Scrap and Craft project for July, and the theme of "Get out of the House" I wanted to make a cover to fit my four TN inserts into.  To do this I found an old file folder I received when I purchased a second-hand filing cabinet and thought this would make a great base for my cover, then I chose two papers from the Photo Play "Living the Quarantine Life" collection to cover the outside and inside of the folder. I also grabbed my "Spiced Marmalade" Distress Oxide to ink the edges of my papers and embellishments.


I used the Dylusions Dyalog insert to roughly measure how tall and wide I would need my cover and cut it down to approximately 8 and 1/2 inches in height.  I left the width of the folder as it was.


I cut my papers 8 and 1/2" by 11 and 3/4" (to fit between the very outermost score lines on both sides of the folder near the outer edges).  The papers were then scored in their centers and one inch both sides of the center, in keeping with the outermost score lines already found in the middle of the file folder.  This would allow for easier expansion of the covers spine when multiple inserts are added.


 I used double-sided tape and glue to adhere the papers onto the outside and inside of the file folder...


sticking each piece to the spine area first then adhering either side.


As seen below, I cut the papers to cover just to the outermost score line already found nearer the edges of the file folder.  I inserted eyelets near the top and bottom of the covers middle either side, approximately an equal distance between the middle score and the score lines either side of this.  I threaded doubled-over millinery elastic through each sides eyelets top and bottom and tied these off at the back in a double knot.  I left some length of elastic for adjustment if necessary.  The beauty of this method is that the elastic can easily be removed and changed when needed.  I had been a little heavy-handed with my bone folder when scoring the paper on the outer cover, therefore after it was attached to the folder and I folded it - it cracked a little.  Nothing that a tad of washi tape didn't fix 😉


 I used the Dyalog insert to test my elastic and was relieved when it held very well - phew!


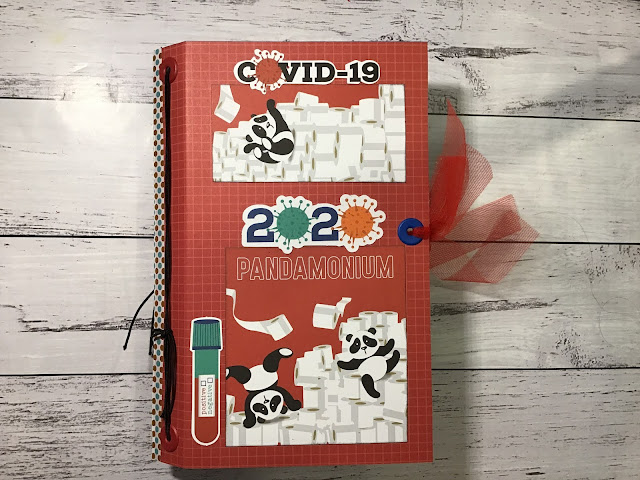
The side edges that were not covered were folded in and glued just along the bottom to create 'tuck spots' at the front and back of the cover, then.........here comes the fun part again! I grabbed my favourite cut apart from the "Covidiot" paper (I just love that name!) and cut it in two, inking the edges with black Distress ink.  These were then glued to the cover with some of the Photo Play Ephemera Die Cuts which had all had the edges inked with the "Spiced Marmalade" Distress Oxide.  Eyelets were added near the center outer of the front and back cover and some red crochet nylon ribbon tied on to keep the cover closed.


I remembered I had also chosen to use the Dylusions Dyalog pockets, these wrap perfectly around the inserts to create a sturdy pocket at the front and back as pictured here.  There were three of these pockets in the packet, and I chose to use one with my expenses insert, one with my bullet insert and the last with my art journal insert.


All pockets and inserts were slipped in under the elastics using a method inspired by Dyan Reaveley and shown in my process video below.


It is not perfect, but I am quite proud of my efforts thus far and cannot wait to get using my inserts and getting some organisation into my life, especially when I begin to "Get out of the House" more!
Take care and have fun!
Love Nat xxx

Process video of making the cover and inserting the pockets and inserts can be found here:


Aunty Vera Scrap and Craft products on sale and being used for the month of July are:
Related Posts Plugin for WordPress, Blogger...