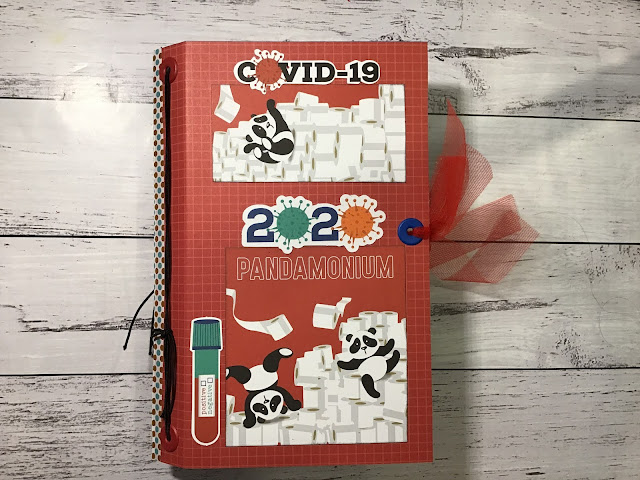
Hi all, hope you are well 😊
In my second Aunty Vera Scrap and Craft project for July, and the theme of "Get out of the House" I wanted to make a cover to fit my four TN inserts into. To do this I found an old file folder I received when I purchased a second-hand filing cabinet and thought this would make a great base for my cover, then I chose two papers from the Photo Play "Living the Quarantine Life" collection to cover the outside and inside of the folder. I also grabbed my "Spiced Marmalade" Distress Oxide to ink the edges of my papers and embellishments.
I used the Dylusions Dyalog insert to roughly measure how tall and wide I would need my cover and cut it down to approximately 8 and 1/2 inches in height. I left the width of the folder as it was.
I cut my papers 8 and 1/2" by 11 and 3/4" (to fit between the very outermost score lines on both sides of the folder near the outer edges). The papers were then scored in their centers and one inch both sides of the center, in keeping with the outermost score lines already found in the middle of the file folder. This would allow for easier expansion of the covers spine when multiple inserts are added.
I used double-sided tape and glue to adhere the papers onto the outside and inside of the file folder...
sticking each piece to the spine area first then adhering either side.
As
seen below, I cut the papers to cover just to the outermost score line
already found nearer the edges of the file folder. I inserted eyelets
near the top and bottom of the covers middle either side, approximately
an equal distance between the middle score and the score lines either
side of this. I threaded doubled-over millinery elastic through each
sides eyelets top and bottom and tied these off at the back in a double
knot. I left some length of elastic for adjustment if necessary. The
beauty of this method is that the elastic can easily be removed and
changed when needed. I had been a little heavy-handed with my bone
folder when scoring the paper on the outer cover, therefore after it was
attached to the folder and I folded it - it cracked a little. Nothing
that a tad of washi tape didn't fix 😉
I used the Dyalog insert to test my elastic and was relieved when it held very well - phew!
The side edges that were not covered were folded in and glued just along the bottom to create 'tuck spots' at the front and back of the cover, then.........here comes the fun part again! I grabbed my favourite cut apart from the "Covidiot" paper (I just love that name!) and cut it in two, inking the edges with black Distress ink. These were then glued to the cover with some of the Photo Play Ephemera Die Cuts which had all had the edges inked with the "Spiced Marmalade" Distress Oxide. Eyelets were added near the center outer of the front and back cover and some red crochet nylon ribbon tied on to keep the cover closed.
I remembered I had also chosen to use the Dylusions Dyalog pockets, these wrap perfectly around the inserts to create a sturdy pocket at the front and back as pictured here. There were three of these pockets in the packet, and I chose to use one with my expenses insert, one with my bullet insert and the last with my art journal insert.
All pockets and inserts were slipped in under the elastics using a method inspired by Dyan Reaveley and shown in my process video below.
It is not perfect, but I am quite proud of my efforts thus far and cannot wait to get using my inserts and getting some organisation into my life, especially when I begin to "Get out of the House" more!
Take care and have fun!
Love Nat xxx
Process video of making the cover and inserting the pockets and inserts can be found here:
- Photo Play "Living the Quarantine Life" paper collection including: Covidiot, Plaid19, Covid 19, Stay Safe, This Happened.
- Photo Play "Living the Quarantine Life" Ephemera Die Cuts
- Photo Play "Living the Quarantine Life" Stamps
- Ranger - Tim Holtz Distress Oxide "Spiced Marmalade"
- Bo Bunny - Clear Stickers "Life in Color"
- Pigma Micron 05 pen
- Ranger Dylusions - Dyalog Insert Book - Ruled
- Dyalog Dylusions - Dyalog Pocket Inserts


Wonderful Nat xox
ReplyDeleteSo great!! On my list of things to do!!
ReplyDeleteLove this Nat x
ReplyDelete