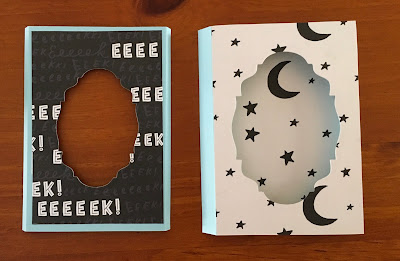
This week, I've decided to make a Halloween card. The Hey Pumpkin Crate Paper pack is perfect for this as it focuses more on the fun side of Halloween and has such lovely bright colours and happy ghosts and witches.
I started with 2 pieces of cardstock from my stash cut at 5 1/2" x 8 1/2". I got these measurements and the idea from Jennifer Mcguire so if you'd like to see the video tutorial of how to put the card together please head to her youtube channel here
Score one of these at 4 1/4" and fold in half. Next cut off 1/2" from the back of this card and put it aside.
Score the second piece at 1/2", 4 1/2" and 4 3/4" and fold to make a box shape.
Take a third piece of cardstock cut at 5 1/2" x 4 1/4" and cut off a tiny bit from the top and the side. Score this piece on each side at 1/4".
To make the windows, I will be using two consecutive Sizzix Tim Holtz Stacked Baroque dies. I put the larger die in the centre of the box shape that we cut as shown and cut it out.
I then placed this over the 5 1/2" x 4 1/4" piece that we cut, lined the smaller die on it and die cut that one.
Then I decided that I wanted to cover the card with some of the Hey Pumpkin Paper. This step will be much easier if you do it before the die cutting. I cut a piece of Crate Paper Hey Pumpkin "Fright Night" at 5 1/4" x 3 1/2" which I stuck at the base of the box card. I used the same side of the paper for the top of the card and the other side for the 5 1/4" x 4 1/2" piece.
This is how it will looked when they are all stacked together.
I then put double sided tape on the flaps of the 5 1/2" x 4 1/4" piece and stuck it in the box. Do that by lining it up as shown in the picture on the spine of the box card first. Stick that down. Then fold it closed, remove the tape and lay the flap of the box card closed over it. It should align to form the tunnel.
Next I took the first piece that we started with and covered the inside left with a sheet of paper from the Crate Paper Hey Pumpkin 6x6 paper pad. Put double sided tape on the other side and stick the back of the box card onto that.
Next I did a little bit of fussy cutting and decorating. The ghosts are fussy cut from the Crate Paper Hey Pumpkin Ghostly paper and the rest are fussy cut from the Crate Paper Hey Pumpkin Happy Haunting paper. The "Spooky" and "Trick or Treat" are from the Echo Park Trick or Treat Ephemera. Next put double sided tape on the 1/2 inch flap and fold it closed to create your tunnel card.
For the front of the card, I've stuck another patterned paper from the Hey Pumpkin 6x8 paper pad. I've then stacked the different sized die cut stacked baroque pieces on top of each other. The piece right at the top was cut from the Crate Paper Hey Pumpkin "Pumpkin Spice" paper and I've inked the edges of that piece with black ink.
On the inside left of the card, I've used another die cut from the Echo Park Trick or Treat Ephemera.
And here's my tunnel card ready to be mailed out :)
This is a surprisingly easy and fun card to make. If you're not into Halloween it would make for lovely Christmas cards too.
Thank you for following along with me and see you again soon. Till then stay awesome!
Gina xx


No comments:
Post a Comment