
What a fun and versatile project from Tina today!
These gift bags can be made to suit any occasion - but don't they look just fabulous coffee themed?!

Hello everyone. Today I want to share a little project that will make a nice gift for a coffee lover like myself, but can easily be filled with many other things other than coffee.
I have a couple of little gift bags I made using the Echo Park - Coffee collection.

To start, I used both the 12 x 12 papers and the 6 x 6 paper pad. I cut the papers as shown below ( I have done this in white paper just to show the measurements).

Next score the papers as shown below.

Fold and burnish the bottom folds.

Glue one of the bottom pieces on top of the other.

Now fold along all the score lines and burnish well.

With the sides folded, bring the piece marked A to the spot marked B and burnish where it folds.
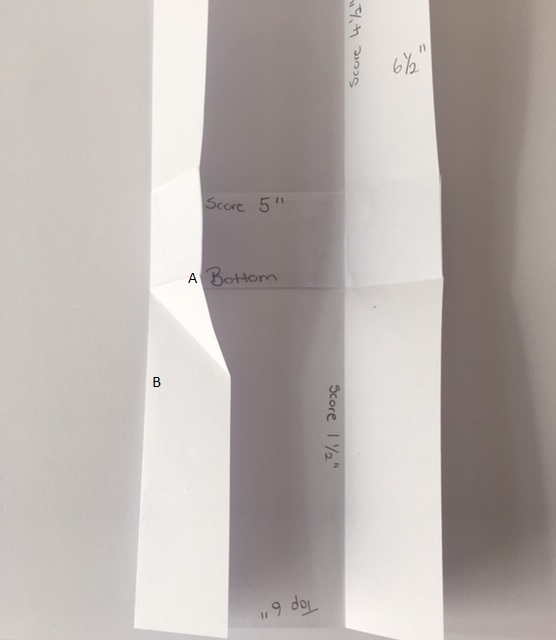

Do the same with all the other sides. There is no measurement where B sits, I just folded it where it easily folded and then made sure that the other side matches.

Once all the sides are folded, the inside should look like the image below.

Now glue the four folded sides down, (I'm using the pattern paper now).

On the front of the bags, cut out a small window.

For each bag I cut two pieces of the co-coordinating cardstock 2'' wide and 5'' long. Score at one inch and fold.

I cut my pieces with my Tim Holtz Alterations Ornate die (making sure not to go too far and cut into my fold) but any edge die or punch will work.

I inked my edges with Distress Ink - Vintage Photo and glued them on to the top of the bags to hide the raw edges. Because I had cut them long, I can adjust them in the position I want and cut off the excess.

Punch two holes on the top for the closure, I used some ribbon from my stash for this.

I decorated the bags with some of the stickers and some of the ephemera pieces in the same collection.
I filled some clear bags with whole coffee beans for one and ground coffee beans in the other. Finally thread the ribbon and tie a bow and the gift bags are finished.


I hope you enjoyed this project.
Thank You and Happy Crafting.
Tina xxx
The items I chose for this project can be purchased HERE
No comments:
Post a Comment